
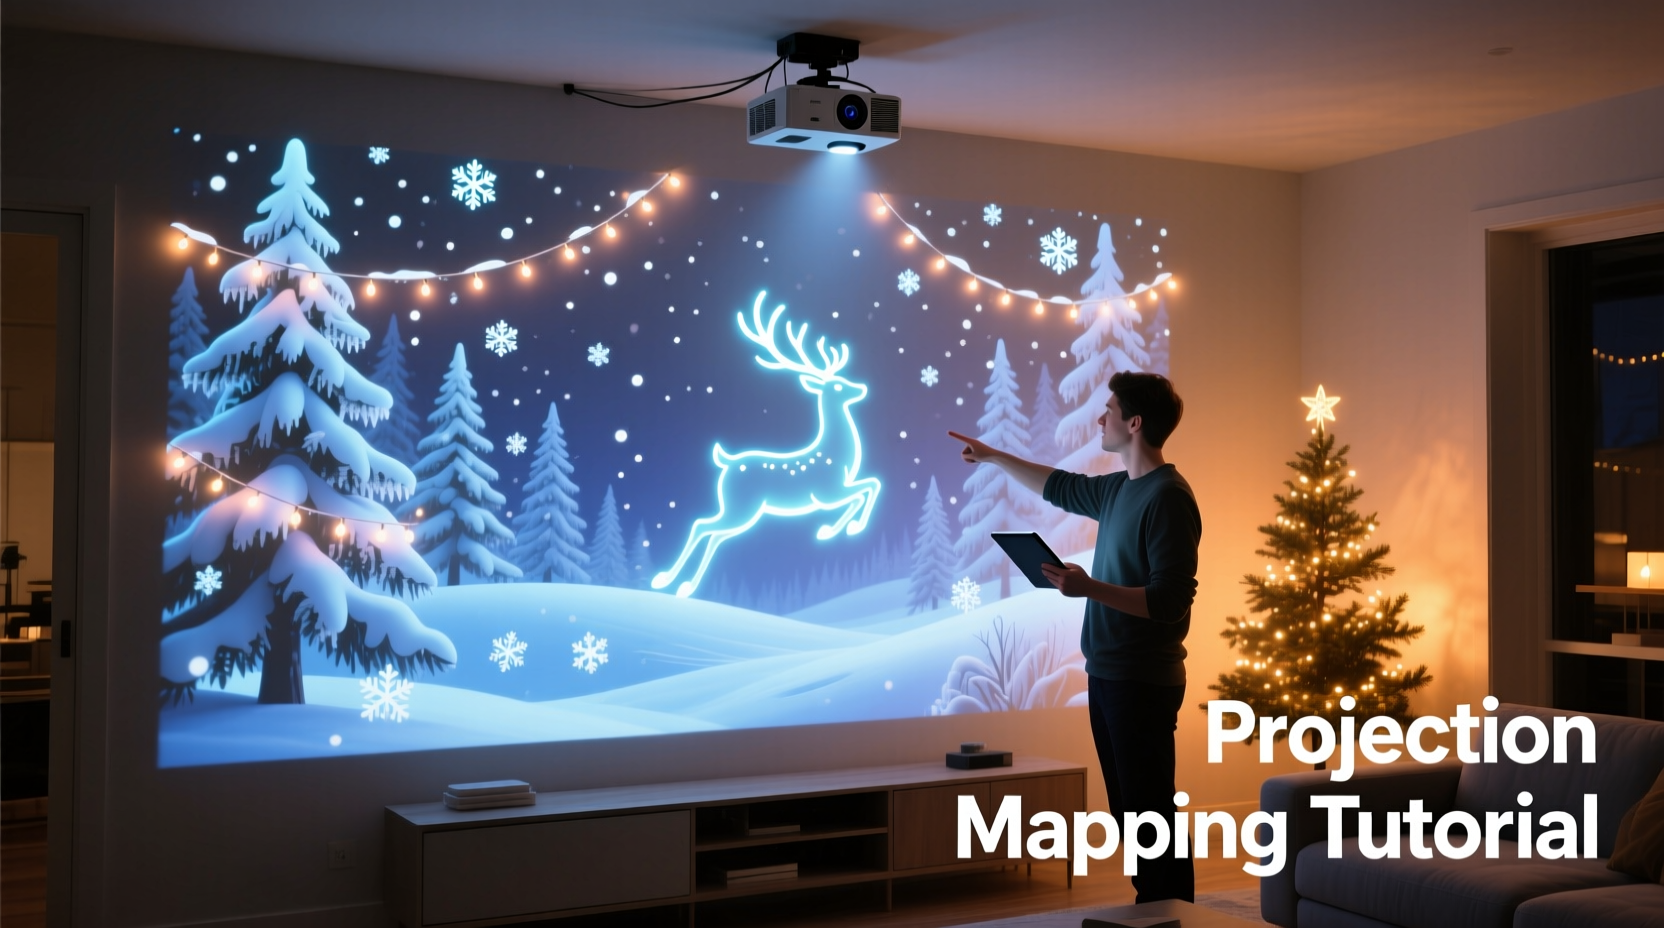
Projection mapping transforms flat, static surfaces into dynamic, story-driven experiences. When applied to holiday decor, it turns an ordinary living room wall into a living winter wonderland: snow gently falling on pine boughs, animated reindeer leaping across brickwork, or a glowing nativity scene unfolding in real time. Unlike static lights or printed backdrops, projection mapping adapts to your wall’s unique shape, texture, and imperfections—using them as part of the narrative rather than hiding them. It’s not just decoration; it’s atmospheric storytelling that engages all senses. And while it once required professional AV crews and five-figure budgets, today’s accessible hardware, intuitive software, and growing library of royalty-free holiday assets make it achievable for homeowners, community centers, and small businesses alike.
Why Projection Mapping Beats Traditional Holiday Decor
Traditional Christmas lighting and decorations rely on physical objects—strings of bulbs, inflatable figures, garlands, and printed backdrops. These have real limitations: installation time, electrical load, storage demands, weather vulnerability (for outdoor use), and visual rigidity. A light-up reindeer stays exactly where you place it, regardless of your wall’s slope, outlet placement, or window framing. Projection mapping sidesteps those constraints entirely.
With mapping, your wall becomes the canvas—not the obstacle. Uneven stonework? The software warps the image to follow its contours. A protruding fireplace mantel? You can mask it or animate ornaments to “rest” on its surface. A doorway interrupting the space? Design the scene so Santa pauses there before stepping through. This level of spatial intelligence creates immersion that static decor simply cannot match.
Beyond aesthetics, projection mapping offers sustainability advantages. No plastic inflatables to landfill after three seasons. No tangled strings of LEDs requiring replacement bulbs and power adapters. One projector, one laptop, and reusable digital assets generate endless variations—this year’s snowy forest, next year’s animated Advent calendar, or a custom family photo slideshow with festive overlays—all from the same setup.
Your Essential Equipment Checklist
Building a projection-mapped Christmas wall isn’t about owning the most expensive gear—it’s about selecting components that work together reliably in your space. Below is a field-tested checklist, refined from dozens of residential installations over the past four holiday seasons:
- A short-throw or ultra-short-throw (UST) projector — Critical for avoiding shadows and enabling placement near the wall (e.g., on a shelf or low table). Look for at least 3,000 lumens for ambient-light tolerance in living rooms.
- A dedicated laptop (Windows or macOS) — Must support dual displays and run real-time graphics. Minimum: Intel i5 / AMD Ryzen 5, 8GB RAM, integrated GPU (Intel Iris Xe or better). Avoid Chromebooks or tablets—they lack the processing headroom for live warping and animation playback.
- Projection mapping software — Free options include VPT7 (Video Projector Tool) and MapMap. Paid but beginner-friendly: MadMapper ($199, with robust tutorials and Christmas asset templates) or Resolume Arena ($599, ideal if you plan to add music sync later).
- High-quality HDMI cable (10+ ft, certified for 4K@60Hz) — Prevents signal dropouts during long runs, especially critical when running from laptop to projector behind furniture.
- A stable mounting solution — Not always a tripod. For UST projectors: a rigid shelf anchored to wall studs. For standard throw: a heavy-duty camera tripod with adjustable center column—or, for permanent setups, a low-profile ceiling mount.
- A calibrated white or neutral-gray wall — Avoid dark paint, heavy textures (like orange peel), or glossy finishes unless you’re compensating with higher lumen output. Matte eggshell works best.
Step-by-Step: From Blank Wall to Immersive Christmas Scene (Under 90 Minutes)
This timeline assumes no prior mapping experience and uses freely available tools. All steps are repeatable and reversible—no permanent modifications required.
- Measure & Map Your Space (10 minutes)
Use a tape measure to record wall height, width, and distance from intended projector location. Note architectural features: windows, doors, outlets, baseboards, and any recesses or protrusions. Sketch a rough floor plan. This prevents surprises during calibration. - Set Up Hardware (15 minutes)
Position your projector on its mount or shelf. Connect it to your laptop via HDMI. Power both devices. Ensure the projected image fills roughly 70–80% of your wall vertically—leave margins for warping. Turn off overhead lights and close blinds to reduce ambient light. - Install & Launch Software (5 minutes)
Download and install VPT7 (free, Windows/macOS) or MadMapper trial. Open the software, select your projector as the output display, and confirm the laptop screen shows the software interface while the wall displays a test pattern. - Calibrate Geometry (25 minutes)
Import a blank white image. Use the software’s grid overlay and corner-pinning tools to warp the projection so edges align precisely with your wall boundaries—even if the wall is crooked or the projector is angled. Zoom and pan until the grid fits snugly within your physical borders. Save this “wall profile” for future use. - Import & Animate Your Scene (20 minutes)
Download royalty-free Christmas animations (sources: OpenGameArt.org, Kenney.nl, or Envato Elements’ free holiday pack). Import a layered PNG sequence or MP4 loop (e.g., “snowfall_background.mp4” + “reindeer_silhouette.mov”). Use masking tools to hide areas behind furniture or windows. Add subtle opacity fades or parallax scrolling for depth. Preview in real time. - Refine & Test (15 minutes)
Dim lights fully. Play the full sequence. Adjust brightness/contrast in software—not projector menus—for consistent tone. Check for keystone distortion (if present, re-warp). Walk around the room: does the scene hold up from sofa-level? From the hallway entrance? Tweak anchor points until motion feels natural across viewing angles.
Do’s and Don’ts of Holiday Projection Mapping
Common pitfalls derail even well-intentioned projects. This table distills lessons from municipal installations, church sanctuaries, and suburban living rooms—where technical missteps quickly become aesthetic liabilities.
| Category | Do | Don’t |
|---|---|---|
| Lighting Control | Use blackout curtains or shades; aim for near-total darkness. Even a streetlight through a gap washes out contrast. | Rely on “ambient light rejection” specs alone—no consumer projector fully compensates for uncontrolled light. |
| Content Design | Use high-contrast palettes (deep navy + warm gold, not pastel pink + mint). Prioritize silhouette-based motion (e.g., flying birds, falling snow) over fine detail. | Import 8K videos expecting visible resolution gain—most walls absorb detail. 1080p animated loops render richer motion and smaller file sizes. |
| Hardware Placement | Anchor mounts securely. Vibration from HVAC or foot traffic blurs mapped edges. Use rubber pads under tripods. | Place the projector on an unstable surface (e.g., wobbly side table) or leave cables dangling where they’ll be tripped over. |
| Sound Integration | Add subtle, non-repetitive audio (crackling fire, distant sleigh bells) via a separate Bluetooth speaker—never route sound through projector speakers. | Sync audio directly in mapping software unless you’re using Resolume or TouchDesigner. Timing drift ruins immersion. |
Real-World Example: The Miller Family’s Living Room Transformation
The Millers live in a 1920s bungalow with a prominent brick fireplace flanked by mismatched built-in bookshelves and a tall, narrow window. Last year, they strung 1,200 lights across the mantel and hung stockings—but the space still felt fragmented, especially when guests entered from the adjacent dining room.
This December, they used a $499 Epson Home Cinema 1060 (3,000 lumens, 1.6x zoom) mounted on a reinforced shelf 4 feet from the wall. With VPT7, they spent one Saturday afternoon calibrating: first masking the window with a black velvet drape (not for blocking light, but as a deliberate “night sky” frame), then warping the projection to wrap around the brick’s irregular mortar lines. Their final scene featured three layers: a slow-moving starfield background, a mid-layer of animated holly vines creeping across the mantel’s edge, and a foreground of translucent, gently bobbing ornaments that appeared to hang in mid-air thanks to careful masking of the bookshelf voids.
“We didn’t remove a single physical decoration,” says Sarah Miller, who led the project. “The stockings stayed on the mantel—the projection just made them look like they were lit from within. Our 8-year-old points to the ‘magic snow’ that only falls on the bricks, not the carpet. That’s the moment it stopped being tech and started being Christmas.”
“Projection mapping succeeds when the technology disappears—and all people feel is wonder. The most powerful scenes aren’t the flashiest; they’re the ones that honor the architecture, respect the viewer’s memory, and invite quiet presence—not passive watching.” — Rafael Chen, Immersive Designer & Lead Artist, Lumina Festivals
Frequently Asked Questions
Can I do this safely on a painted drywall wall without damaging the paint?
Yes—projection mapping emits no heat or UV radiation at consumer projector levels. Unlike spotlights or stage gels, it doesn’t fade pigments or degrade binders. The only risk is physical: ensure mounts are secured to studs, not just drywall anchors, to prevent accidental impact. Never use adhesive tapes or sprays on the wall surface.
How do I handle pets or kids walking through the projected area?
They’ll cast soft, transient shadows—often enhancing realism (e.g., a child’s shadow becoming a “snowman” in the scene). If interruptions frustrate you, position the projector so the brightest hotspot falls above typical walking height (7 feet+), or use motion-triggered pause scripts (advanced, but possible in MadMapper with OSC integration). Most families find the interactivity delightful—not disruptive.
Is it worth investing in a 4K projector for this application?
Not for most residential walls. At typical viewing distances (6–12 feet), the human eye resolves little beyond 1080p detail on a 10–12 ft wide surface. A 4K projector’s primary benefit is pixel density for very large or very close-proximity displays. You’ll see far greater returns upgrading to a brighter lamp (3,500+ lumens) or adding a high-gain matte screen material than jumping to 4K. Save the budget for quality audio or custom animations instead.
Bringing Light, Not Just Pixels
At its core, projection mapping for Christmas isn’t about technical prowess—it’s about intentionality. It asks: What feeling do you want your space to evoke? Is it nostalgic warmth? Quiet reverence? Joyful whimsy? The tools merely serve that vision. A perfectly calibrated 4K projection of a barren forest won’t stir hearts the way a softly animated candle flicker on a textured plaster wall will. The magic lives in restraint: choosing one strong motif over ten competing animations, letting silence punctuate music, allowing negative space to breathe between falling snowflakes.
You don’t need to map every square inch. Sometimes the most powerful statement is a single, slowly rotating ornament suspended in darkness—its reflection shimmering in a nearby glass vase. Or a narrow band of light tracing the curve of your staircase banister, transforming it into a ribbon of stars. These moments resonate because they’re personal, responsive, and deeply human—not algorithmic or generic.
Start small. Map just your fireplace surround. Then expand to the adjacent wall next year. Save your calibration profiles. Build a library of seasonal assets you tweak annually. Let the process deepen your connection to your home—not as a backdrop, but as a collaborator in celebration.


 浙公网安备
33010002000092号
浙公网安备
33010002000092号 浙B2-20120091-4
Comments
No comments yet. Why don't you start the discussion?