
For years, holiday lighting meant untangling miles of cord, balancing on wobbly ladders, drilling into eaves, and praying the extension cord doesn’t trip your neighbor’s toddler. Then came projector lights—and with them, a quiet revolution in outdoor seasonal decor. Unlike string lights that demand precision placement and meticulous wiring, projector lights transform blank walls, driveways, and even snow-covered lawns into immersive holiday scenes in under 15 minutes. They’re not just faster—they’re safer, more scalable, and far more versatile. This isn’t about swapping one light source for another; it’s about rethinking how light functions as design. Whether you manage a single-family home or maintain a community HOA landscape, projector-based lighting delivers theatrical impact without theatrical effort.
Why Projector Lights Outperform Strings for Speed and Impact
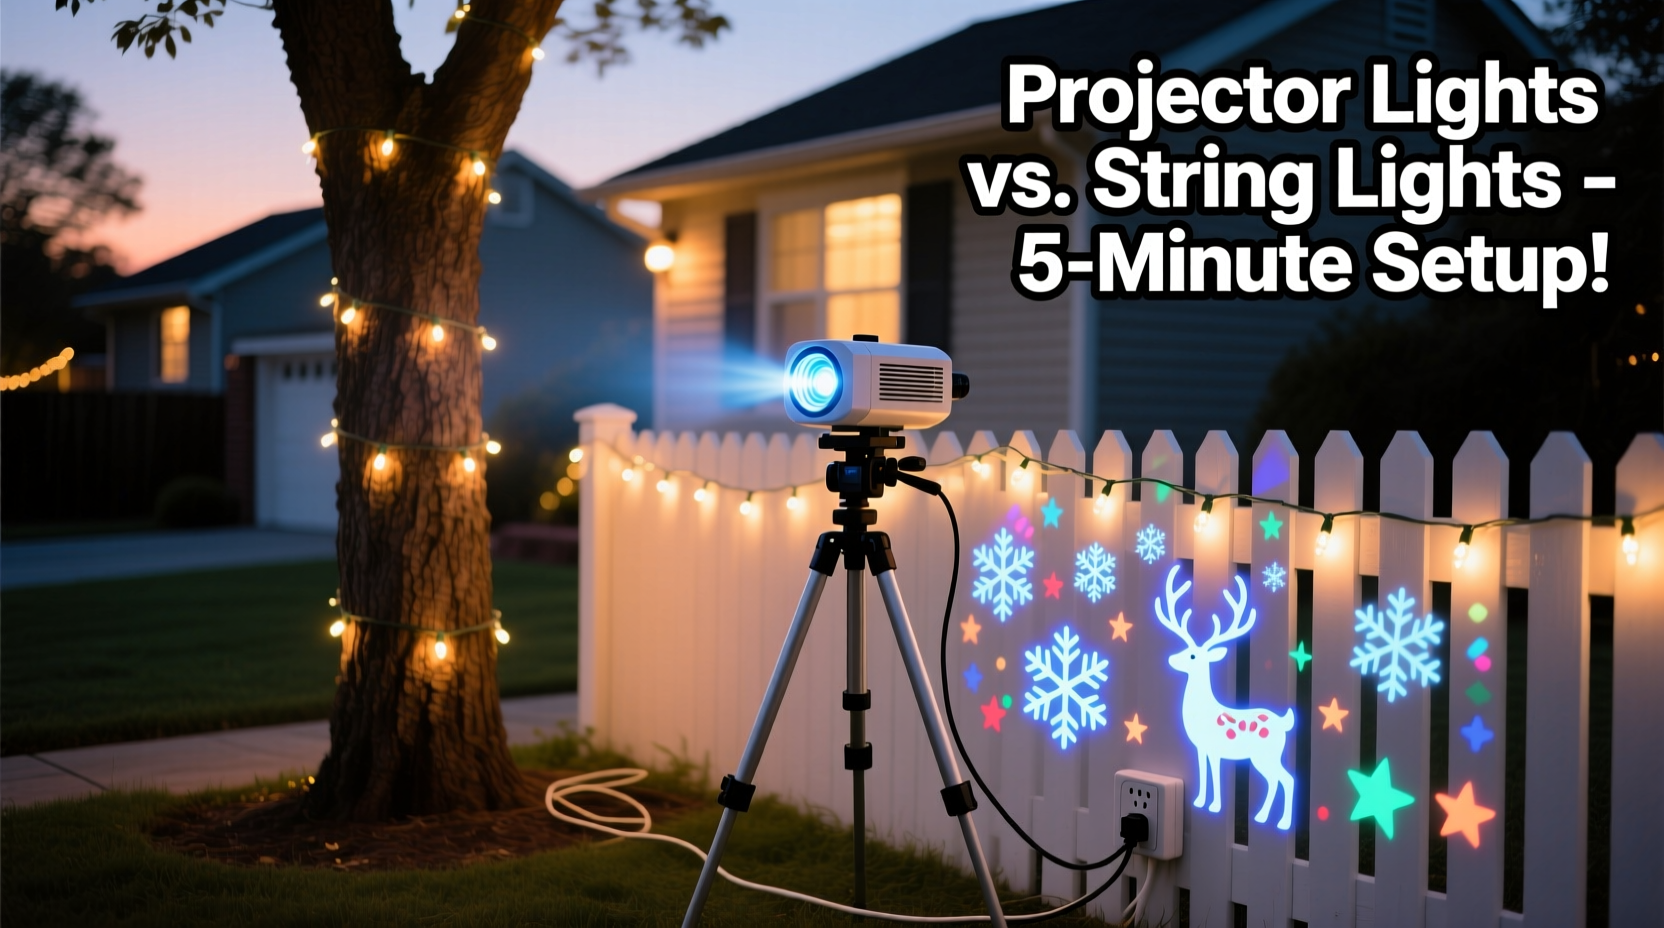
String lights excel at outlining structures: rooflines, railings, shrubs. But they require physical attachment—every bulb, every clip, every foot of wire adds time and friction. A typical 2,000-square-foot yard can take 6–10 hours to decorate fully with strings, including testing, adjusting, and troubleshooting dead sections. Projector lights eliminate nearly all of that friction. Mounted once (often on a garage door, porch column, or second-story window), they cast large-scale, high-resolution images—snowflakes, reindeer, nativity scenes, animated falling snow—across surfaces up to 30 feet wide. The physics are simple: light travels faster than hands. And unlike strings, which degrade visibly over time (faded bulbs, brittle wires, corroded sockets), projectors maintain consistent brightness and color fidelity for 5+ seasons when stored properly.
Energy efficiency is another decisive advantage. Most modern LED projectors draw between 12–25 watts—less than a single incandescent string light set. Even high-output models rarely exceed 45 watts. By contrast, a 150-bulb warm-white string consumes 36–72 watts depending on bulb type. Multiply that across five or six sets, and the cumulative draw—and heat generation—becomes significant. Projectors also reduce electrical load complexity: one outlet powers the entire display, eliminating daisy-chained extensions and overloaded circuits.
Choosing the Right Projector: Key Features That Matter
Not all projector lights are created equal. Performance hinges on three technical specs: lumens, beam angle, and weather resistance rating. A minimum of 800 ANSI lumens is required for crisp, daylight-visible projection—even in suburban neighborhoods with ambient streetlight spill. Below 600 lumens, images wash out after dusk. Beam angle determines how much area the light covers: narrow (15°–25°) suits focused wall art or gable accents; wide (40°–60°) works best for full-yard snowfall effects or driveway animations. Crucially, look for an IP65 rating or higher—this certifies full protection against dust ingress and low-pressure water jets from any direction. IP44 units may survive light rain but fail during freezing drizzle or overnight condensation.
Smart features have moved beyond novelty into practical necessity. Wi-Fi-enabled projectors let you schedule sunrise/sunset activation, sync with music (for subtle pulse effects), and swap patterns remotely via smartphone app—no need to trek outside in subfreezing temps to change from “reindeer” to “snow globe.” Some models include built-in timers, motion sensors, and even solar charging compatibility for off-grid installations like barns or garden sheds.
| Feature | Minimum Recommended | Why It Matters |
|---|---|---|
| Lumens (ANSI) | 800+ | Ensures visibility against ambient light and atmospheric haze |
| Weather Rating | IP65 or IP66 | Guarantees operation through rain, sleet, snow, and freeze-thaw cycles |
| Projection Distance Range | 8–30 ft | Allows flexibility for small patios and large lawns alike |
| Pattern Library Size | 12+ built-in designs | Reduces need for external controllers or SD cards |
| Power Source | 12V DC with UL-listed adapter | Eliminates risk of voltage spikes damaging internal electronics |
A Real-World Installation: How the Chen Family Cut Setup Time by 87%
The Chen family lives in a split-level home in Portland, Oregon—known for damp Novembers and frequent power fluctuations. For seven years, they decorated their front facade with 18 strands of C9 LEDs, requiring two adults, a 12-foot aluminum ladder, and nearly nine hours over three evenings. In 2023, they switched to two 1,200-lumen IP66-rated projectors: one mounted inside their garage’s side window (projecting onto the stucco gable), the other secured to a porch post (casting animated snowflakes across the concrete driveway). Total setup time? 11 minutes—including unboxing, leveling, focusing, and syncing to their home Wi-Fi.
They kept the same outlet (a GFCI-protected exterior receptacle) but eliminated all extension cords. When a December windstorm knocked down a nearby tree branch, their display remained untouched—no broken bulbs, no severed wires, no rewiring. Their neighbors noticed immediately. Within two weeks, four households on their block purchased similar units. “We didn’t just save time,” says Mei Chen, who manages the neighborhood HOA’s holiday committee. “We saved frustration, electricity costs, and the annual argument about whose turn it was to hold the ladder.”
Step-by-Step: Installing Your First Projector Display in Under 20 Minutes
- Select your anchor point: Choose a stable, sheltered location with clear line-of-sight to your target surface—e.g., garage window, soffit bracket, or second-floor balcony railing. Avoid locations directly exposed to wind gusts or dripping gutters.
- Mount securely: Use stainless-steel L-brackets rated for outdoor use (minimum 50-lb load capacity). Drill pilot holes, insert anchors if mounting into brick or stucco, then fasten the projector housing. Tighten all screws with a torque screwdriver—overtightening cracks plastic housings.
- Adjust projection distance and angle: Extend or retract the lens barrel per manufacturer instructions. Tilt the unit using its integrated bubble level until the projected image fills your desired area without distortion. Use painter’s tape on the ground to mark ideal throw distance for future reference.
- Focus and fine-tune: Rotate the focus ring slowly while observing the edge sharpness of the pattern. For animated effects (falling snow, rotating stars), confirm smooth motion by watching for stutter or banding—adjust frame rate in the app if available.
- Connect and schedule: Plug into a GFCI-protected outlet. Pair with the companion app. Set automatic on/off based on local sunset/sunrise times—or create custom schedules (e.g., “On at 4:30 p.m. weekdays, 5:00 p.m. weekends, off at 11:00 p.m.”).
“Projector lighting isn’t a shortcut—it’s a paradigm shift. When you stop thinking about *placing* light and start thinking about *directing* it, your entire approach to outdoor decor changes. The speed is real, but the real value is in repeatability, consistency, and zero wear-and-tear on your property.” — Derek Langston, Lighting Designer & Founder, LuminaScapes Studio
Pro Tips, Pitfalls, and Proven Maintenance Habits
Even the most advanced projector fails without smart habits. Here’s what seasoned users do differently:
- Never aim directly at glass windows: Reflection causes glare, hotspots, and potential thermal stress on double-pane units. Instead, project onto adjacent walls or use frosted film on the interior of the glass to diffuse.
- Rotate patterns weekly: Static images left running for >72 hours risk temporary image retention on LCD panels (not permanent burn-in, but noticeable ghosting). Switching between 3–4 designs resets the panel evenly.
- Clean the lens monthly: Use only microfiber cloths and distilled water. Never spray cleaner directly onto optics—residue attracts dust and degrades anti-reflective coatings.
- Winterize before first frost: Remove projectors from exterior mounts and store indoors in original packaging with silica gel packs. Condensation trapped inside housings during freeze-thaw cycles corrodes circuit boards faster than any other factor.
FAQ: Practical Questions from First-Time Users
Can projector lights work on uneven or textured surfaces like brick or stone?
Yes—but texture affects clarity. Rough surfaces scatter light, softening edges and reducing contrast. For best results on brick or stucco, increase projector brightness (if adjustable), shorten throw distance by 2–4 feet, and choose high-contrast patterns (e.g., bold reindeer silhouettes over delicate snowflakes). Matte white paint on masonry dramatically improves fidelity—but isn’t required for pleasing results.
Do I need an electrician to install these?
No. All consumer-grade holiday projectors operate on standard 120V household current and plug into GFCI outlets. No hardwiring, no permits, no junction boxes. If you can safely plug in a space heater, you can install a projector light. Always verify your outlet’s GFCI function before connecting—press the “Test” button and confirm it trips.
What’s the realistic lifespan—and how do I maximize it?
LED projectors typically last 25,000–35,000 hours—roughly 10–12 holiday seasons at 6 hours/night. To hit that range: store indoors below 77°F (25°C), avoid direct UV exposure during storage, clean lenses gently, and never run units continuously for >10 hours without a 2-hour cooldown. Units left outdoors year-round average just 3–4 seasons before lens clouding or seal failure.
Conclusion: Light Smarter, Not Harder
Holiday decorating shouldn’t be a test of endurance. It should spark joy—not joint pain, frayed nerves, or burnt-out transformers. Projector lights deliver on that promise: dramatic visual storytelling with minimal physical investment. They scale effortlessly from studio apartments with fire escapes to estates with half-acre lawns. They adapt to changing aesthetics—swap a Santa sleigh for a Hanukkah menorah or a New Year’s confetti burst without buying new hardware. And they respect your time, your safety, and your electricity bill. The technology has matured past gimmick stage into reliable, accessible toolset status. You don’t need to be a lighting engineer or a DIY veteran to harness it. You just need to stop treating light as something you hang—and start treating it as something you aim, shape, and command.


 浙公网安备
33010002000092号
浙公网安备
33010002000092号 浙B2-20120091-4
Comments
No comments yet. Why don't you start the discussion?