
Makeup brushes are essential tools in any beauty routine, but they’re also breeding grounds for bacteria, oil, and leftover product buildup if not cleaned regularly. Over time, unclean brushes transfer dirt, dead skin cells, and microbes directly onto your face—contributing to clogged pores, irritation, and persistent breakouts. Dermatologists consistently emphasize that poor brush hygiene is one of the most overlooked causes of acne flare-ups, especially around the jawline, cheeks, and forehead.
Cleaning your brushes isn’t just about preserving their quality—it’s a critical part of skincare. A well-maintained brush applies product more smoothly, lasts longer, and reduces the risk of skin infections. Yet, many people either skip cleaning altogether or use ineffective methods that leave residue behind. This guide breaks down the science-backed best practices for washing makeup brushes, including frequency, products, techniques, and drying tips to keep your skin clear and your tools in top condition.
Why Clean Brushes Matter for Skin Health
Every time you use a makeup brush, it collects a mix of foundation, concealer, oils from your skin, environmental pollutants, and airborne bacteria. Without regular cleansing, these substances accumulate in the bristles and ferrule (the metal part holding the bristles). When reused, this contaminated residue is reintroduced to your skin, disrupting its natural balance.
Dr. Nina Lee, a board-certified dermatologist based in Los Angeles, explains:
“Makeup brushes can harbor Staphylococcus and Propionibacterium acnes—the same bacteria linked to inflammatory acne. If you're breaking out despite a solid skincare regimen, dirty brushes might be the hidden culprit.”
In addition to bacterial growth, old product buildup can harden bristles, making them scratchy and abrasive. This micro-trauma weakens the skin barrier, increasing sensitivity and inflammation—especially problematic for those with acne-prone or rosacea-affected skin.
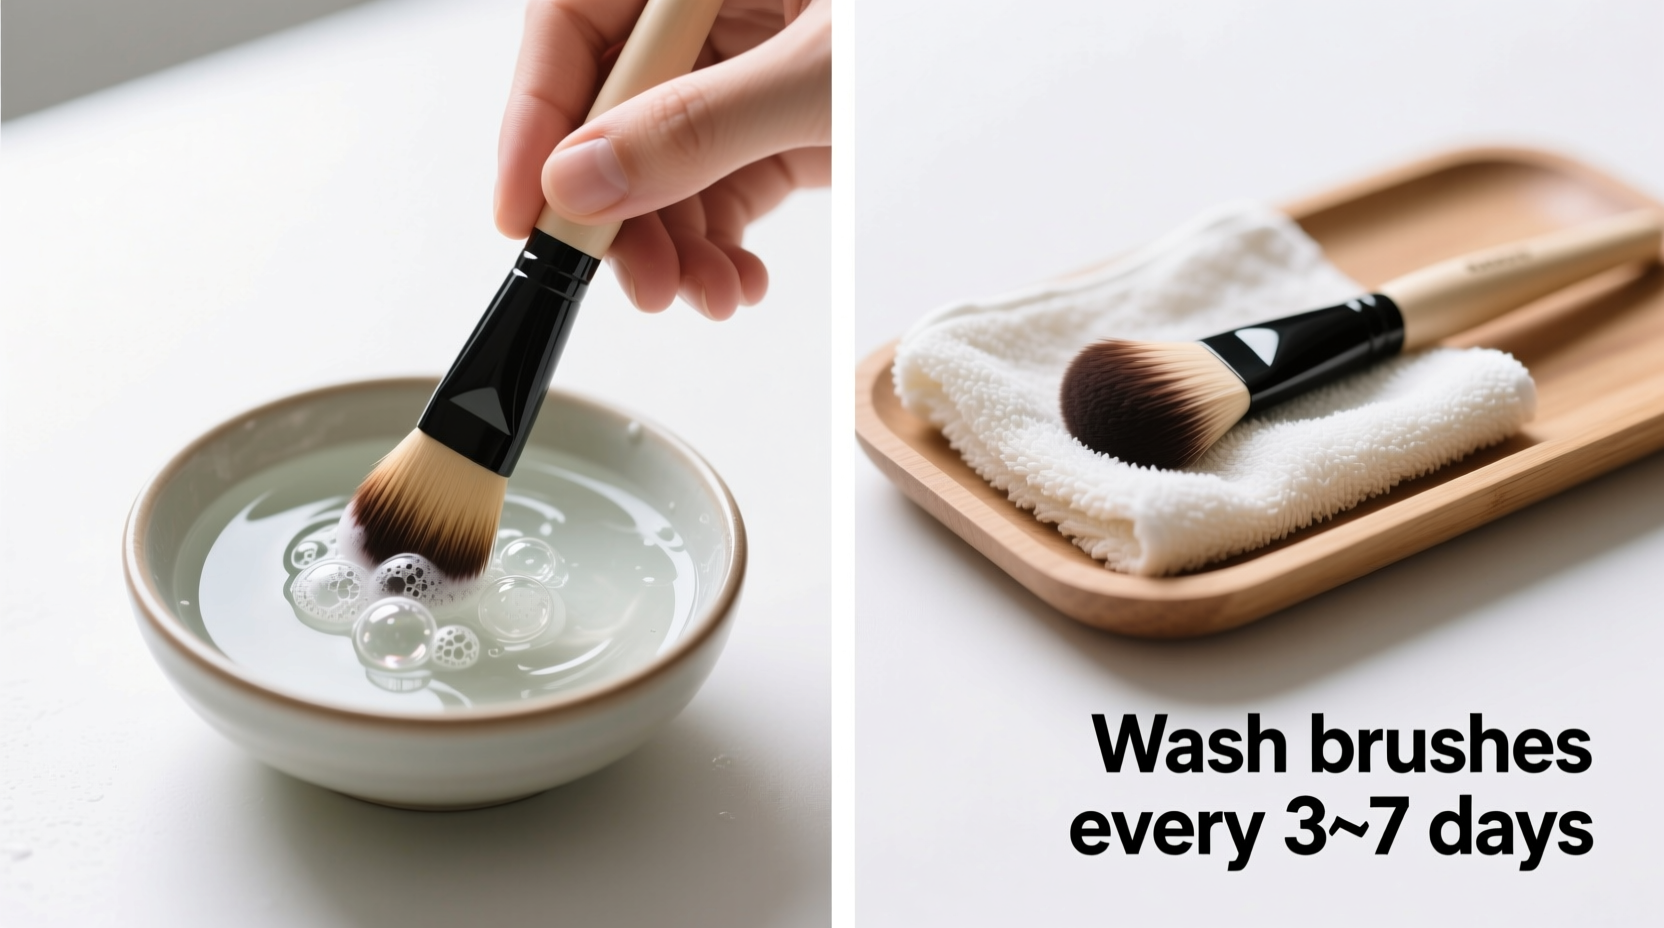
How Often Should You Wash Your Makeup Brushes?
The ideal cleaning frequency depends on usage, product type, and skin sensitivity. Here’s a practical breakdown:
| Brush Type | Recommended Cleaning Frequency | Rationale |
|---|---|---|
| Foundation, Concealer, Beauty Blender-style sponges | Every 5–7 days | These hold liquid products that trap bacteria quickly. |
| Powder, Blush, Bronzer Brushes | Every 2–3 weeks | Dry formulas are less hospitable to microbes but still collect oils and dust. |
| Eyeshadow, Eyeliner, Brow Brushes | Every 1–2 weeks | Eye area is sensitive; contamination risks styes or infections. |
| Spot-use or Hygienic Brushes (e.g., applying medicated creams) | After every single use | Prevents cross-contamination of bacteria or fungus. |
If you have oily or acne-prone skin, consider washing even powder brushes weekly. Seasonal changes—like higher humidity in summer—also accelerate microbial growth, warranting more frequent cleaning.
Step-by-Step Guide to Washing Makeup Brushes
Effective brush cleaning goes beyond a quick rinse. To truly sanitize and preserve bristle integrity, follow this detailed process:
- Gather Supplies: Mild shampoo (baby shampoo works well), zero-residue brush cleanser, lukewarm water, clean towel, brush cleaning mat (optional), and a drying rack or flat surface.
- Wet the Bristles: Hold the brush at an angle under lukewarm water. Only wet the bristles—never let water touch the ferrule. Moisture seeping into the glue can loosen bristles and cause shedding.
- Apply Cleanser: Place a small amount of shampoo or brush cleanser in your palm or on a silicone cleaning mat. Gently swirl the brush in circular motions to work up a lather. Focus on the base of the bristles where most buildup hides.
- Rinse Thoroughly: Rinse under running water until the water runs clear. Squeeze gently from base to tip to flush out trapped pigment and oils.
- Reshape and Dry: Gently squeeze excess water with a clean towel. Reshape the bristles to their original form. Lay brushes flat on a towel with the bristles hanging slightly over the edge to prevent water from pooling in the handle. Avoid upright drying unless using a specialized angled rack.
- Allow Full Drying: Let brushes air-dry for 6–12 hours. Never use a hairdryer—heat damages natural and synthetic fibers.
Do’s and Don’ts of Brush Cleaning
Avoid common mistakes that compromise hygiene or damage your tools. The following table outlines key behaviors to adopt and avoid:
| Do’s | Don’ts |
|---|---|
| Use gentle, sulfate-free cleansers | Use hot water—it weakens glue and warps bristles |
| Clean over a sink with a strainer to catch loose hairs | Soak entire brushes—water can loosen the ferrule |
| Rotate brushes to allow full drying between uses | Store damp brushes—they promote mold and mildew |
| Spot-clean between deep washes with a spray sanitizer | Use alcohol-based sprays daily—they dry out bristles |
| Replace brushes every 1–2 years or when shedding excessively | Share brushes—this spreads bacteria and viruses |
Real-Life Example: From Chronic Breakouts to Clear Skin
Sophia, a 28-year-old graphic designer, struggled with recurring chin and jawline acne for over a year. She followed a consistent skincare routine with salicylic acid and retinoids, avoided comedogenic products, and changed her pillowcase twice weekly. Despite these efforts, her breakouts persisted.
During a consultation, her esthetician asked about her makeup tools. Sophia admitted she washed her foundation brush “once every few months” and often borrowed her roommate’s brushes. The esthetician swabbed the brush for testing and found high levels of Propionibacterium and fungal spores.
After switching to a weekly brush-washing routine using baby shampoo and allowing full drying, Sophia noticed fewer new blemishes within three weeks. By the sixth week, her skin was significantly clearer. “I never thought my brush was the problem,” she said. “Now I treat cleaning it like brushing my teeth—non-negotiable.”
Best Products for Washing Makeup Brushes
Not all cleansers are created equal. While DIY solutions exist, choosing the right product ensures effective sanitation without damaging delicate bristles.
- Baby Shampoo: pH-balanced, gentle, and widely available. Ideal for sensitive skin users.
- Brush Cleansing Solutions: Brands like Cinema Secrets or BeautyBlender Solid Cleanser dissolve makeup quickly and disinfect without residue.
- Mild Dish Soap (sparingly): Effective for heavy buildup but can be drying. Always follow with a conditioner if used.
- DIY Mix: Combine one part olive oil with two parts liquid castile soap for a nourishing, deep-cleaning solution.
Avoid bar soaps—they leave waxy films—and harsh detergents like bleach or household cleaners, which degrade bristle fibers and irritate skin upon reuse.
Complete Weekly Brush Care Checklist
Stay consistent with this actionable checklist to maintain hygiene and prevent skin issues:
- Inspect each brush for visible product buildup or odor.
- Separate brushes by usage (face, eyes, spot treatment).
- Wash foundation and sponge applicators weekly.
- Spot-clean eyeshadow brushes with a sanitizing spray after use on dark or glittery shades.
- Deep clean at least one category of brushes each week (e.g., Monday: face brushes, Thursday: eye brushes).
- Reshape bristles and lay flat to dry overnight.
- Once monthly, inspect handles and ferrules for cracks or loosening.
- Replace any brush that sheds excessively or has a warped shape.
Frequently Asked Questions
Can I wash all my brushes at once?
Yes, but sort them by bristle type and product used. Natural hair brushes (like goat or sable) need gentler handling than synthetics. Wash similar types together to avoid cross-contamination and ensure appropriate care.
Is it safe to use vinegar or rubbing alcohol?
Vinegar diluted in water (1:4 ratio) can disinfect but should be rinsed thoroughly—residual acidity may irritate skin. Rubbing alcohol kills germs fast but dries out bristles and degrades adhesive over time. Use alcohol sprays only occasionally, never as a primary cleanser.
How do I know when it’s time to replace a brush?
Replace brushes when they shed more than a few hairs per wash, lose shape permanently, develop a sour smell after cleaning, or feel rough on the skin. Worn brushes not only perform poorly but also harbor bacteria in damaged fibers.
Final Thoughts: Make Brush Hygiene a Non-Negotiable Habit
Clear skin isn’t just the result of what you put on your face—it’s also about what you put *on* your face *with*. Makeup brushes are intimate tools that interact directly with your skin barrier. Treating them with care isn’t vanity; it’s preventive skincare.
By integrating proper cleaning into your weekly routine, you reduce the risk of breakouts, extend the lifespan of your tools, and ensure flawless makeup application every time. Think of it as a small investment with immediate returns: healthier skin, better performance, and peace of mind.


 浙公网安备
33010002000092号
浙公网安备
33010002000092号 浙B2-20120091-4
Comments
No comments yet. Why don't you start the discussion?