
Every holiday season, the centerpiece of festive decor is the Christmas tree. Yet, no matter how many ornaments you hang or how elegant your treetop star may be, a poorly lit tree can ruin the entire effect. The key to a stunning display isn’t just in the decorations—it’s in the foundation: how you wrap the tree in lights before adding ornaments.
Many people make the mistake of hanging ornaments first and then trying to weave lights around them, resulting in dark spots, tangled wires, and an uneven glow. The correct method—wrapping the tree in lights *before* placing any ornaments—ensures every branch catches the light, creating depth, warmth, and balance. When done right, the result looks professionally decorated, even if it’s your first time.
The Importance of Lighting Order
Lighting is not merely functional—it sets the mood. A well-lit tree appears fuller, more vibrant, and visually balanced. But achieving that look requires planning. The sequence in which you decorate matters immensely.
Wrapping lights before ornaments allows you to:
- See exactly where shadows or gaps exist
- Ensure consistent coverage from trunk to tip
- Prevent damage to fragile ornaments during wiring
- Reduce frustration from repositioning bulbs around decorations
- Save time during the decorating process
Think of lighting as the canvas and ornaments as the paint. You wouldn’t start painting a masterpiece without priming the surface. Similarly, your tree needs its base layer of illumination before any decorative elements are added.
Step-by-Step Guide to Wrapping a Christmas Tree in Lights
Properly wrapping a Christmas tree in lights is both an art and a science. Follow this detailed sequence to achieve a full, radiant glow that enhances every ornament you later add.
- Prepare Your Tree
Fluff the branches evenly, rotating each section outward to mimic natural growth. For artificial trees, take time to shape the limbs—don’t leave them compressed straight out from the center pole. A full silhouette ensures lights reach all areas. - Choose the Right Lights
Select LED string lights for energy efficiency, cooler operation, and longer lifespan. Warm white provides a classic glow; cool white offers brightness. For larger trees (7 feet and up), use multiple strands—typically 100 lights per foot of tree height. - Start at the Base—Plug End First
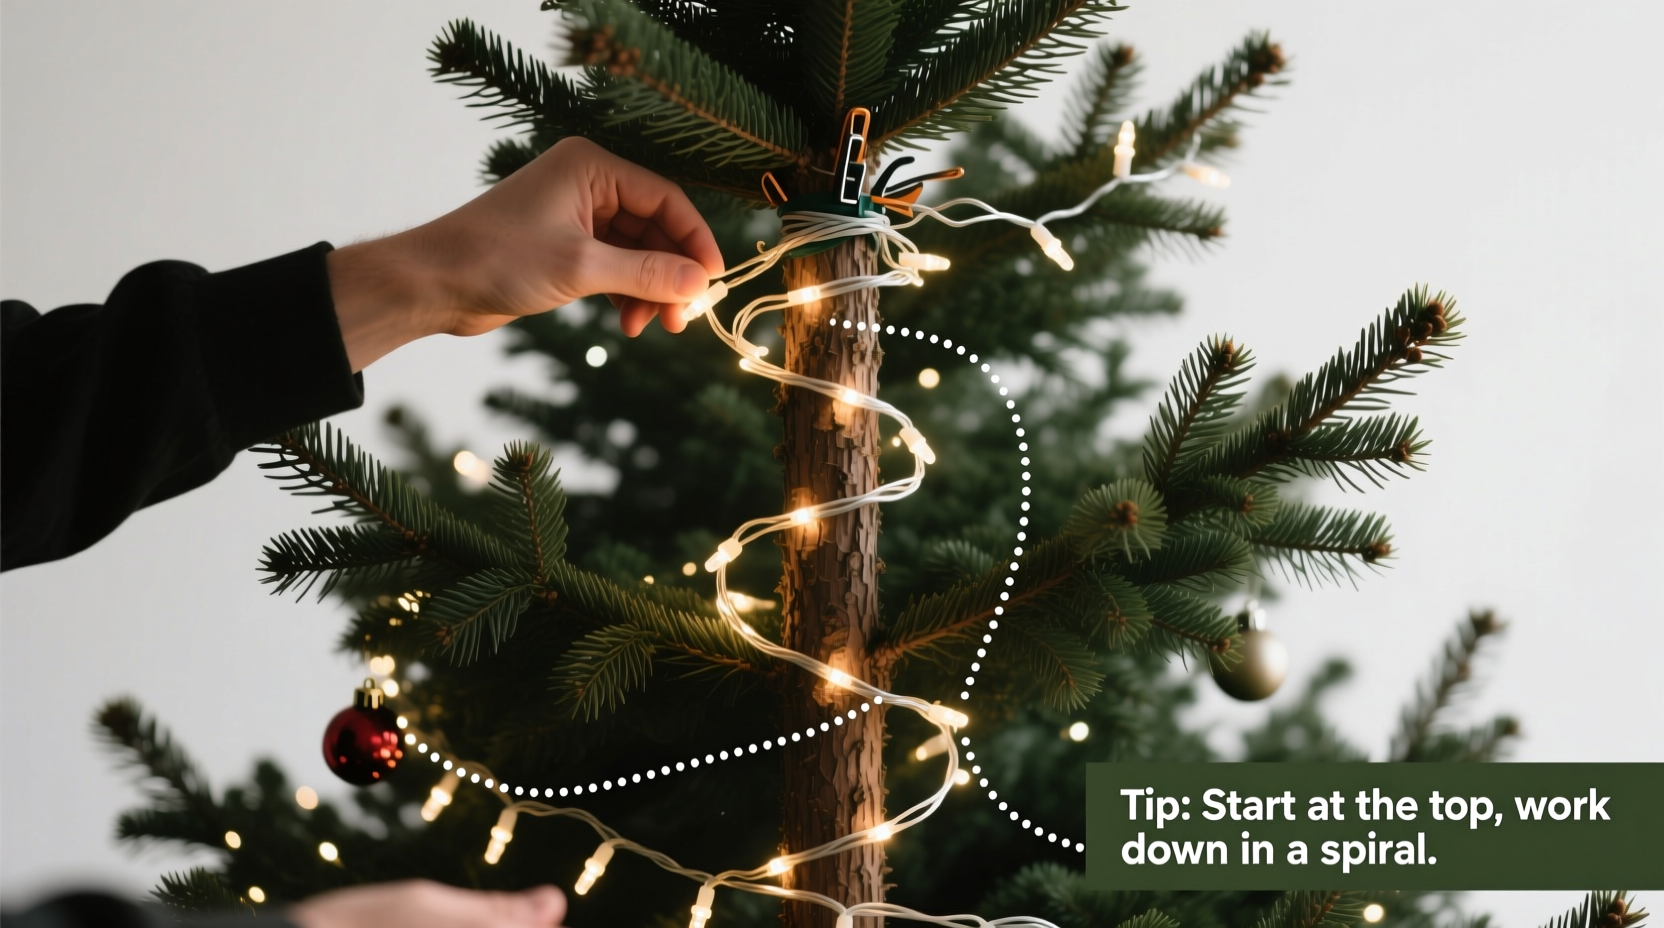
Begin with the end of the strand that contains the plug and locate your outlet. Run the plug down through the center of the tree to keep it hidden and accessible. This prevents tripping hazards and keeps cords concealed. - Work from Top to Bottom, Inside Out
Begin near the top of the tree, tucking the first bulb into the innermost branch close to the trunk. Wrap spirally downward, moving in a continuous path. With each loop around the tree, gently push the wire slightly outward so lights sit between layers of foliage—not just on the surface. - Maintain Even Spacing
Aim for approximately 3–6 inches between light groupings depending on bulb density. Avoid clustering or skipping large sections. Keep tension light—never stretch the strand—and allow flexibility for natural branch movement. - Weave, Don’t Drape
Instead of loosely draping lights over branches, actively weave them through. Insert the cord into the interior of one branch, bring it forward, then thread it back into the next level inward. This creates depth and prevents a “spiderweb” appearance. - Layer Multiple Strands Seamlessly
If using more than one string, connect them at different heights rather than stacking at the base. Overlapping connections at mid-levels hides junctions and distributes electrical load. Make sure male and female ends don’t dangle visibly. - Test Frequently
After every few feet, step back and view the tree from multiple angles. Plug in the strand intermittently to check for dark zones, tangling, or visibility of wires. Adjust as needed before proceeding. - Finish at the Base
End near the bottom rim of the tree, securing the final bulb inside a low branch. Conceal the end cap by tucking it behind foliage. Never leave loose ends exposed. - Final Inspection
Walk around the tree completely. View it from eye level, from above furniture height, and in dim lighting. Add supplemental mini-strands only if necessary, but avoid over-lighting, which can wash out ornaments.
Common Mistakes and How to Avoid Them
Even experienced decorators fall into traps that compromise the final look. Recognizing these pitfalls ahead of time saves effort and elevates your results.
| Mistake | Why It’s a Problem | Solution |
|---|---|---|
| Hanging ornaments before lights | Limits access to inner branches; creates shadowed zones | Always light first, decorate second |
| Starting at the top with the non-plug end | Plug ends up high or unreachable; safety hazard | Begin with plug end at base, feed upward |
| Draping lights instead of weaving | Creates flat, two-dimensional look; wires show easily | Weave lights through multiple branch layers |
| Using mismatched light colors or sizes | Breaks visual continuity; looks unprofessional | Stick to one color temperature and bulb style |
| Overloading one power strip | Fire risk; potential circuit trips | Follow manufacturer wattage limits; use surge protectors |
Expert Insight: What Professionals Do Differently
Interior designers and professional decorators follow strict protocols when lighting holiday trees. Their methods prioritize longevity, safety, and aesthetic precision.
“Amateurs focus on quantity—how many lights they can cram on. Pros focus on quality—how light moves through space. We always light before ornamenting because it gives us control over dimension.” — Daniel Reeves, Residential Lighting Designer
Reeves, who has styled trees for luxury hotels and celebrity homes, emphasizes layering: “Use warm white for depth and supplement with tiny fairy lights only on outer tips if extra sparkle is desired. But never sacrifice structure for sparkle.”
Another pro technique is the “triangle rule”: position three bulbs to form a triangle across different branch depths. This mimics how light naturally falls through foliage and avoids flat, linear patterns.
Checklist: Pre-Lighting Preparation
Before touching a single strand, ensure you’re fully prepared. Use this checklist to streamline the process:
- ✅ Test all light strings individually
- ✅ Count total bulbs needed (approx. 100 lights per foot of tree)
- ✅ Choose uniform bulb color, size, and finish (e.g., all warm white, frosted tips)
- ✅ Fluff and shape all tree branches
- ✅ Position tree near power source or plan extension cord route
- ✅ Gather clips or twist ties to secure excess wire (optional)
- ✅ Clear floor space around tree for easy access
- ✅ Have a stepladder nearby for tall trees
- ✅ Unpack ornaments but keep them aside until lighting is complete
Real Example: Transforming a Flat-Looking Tree
Sarah M., a teacher from Portland, had struggled for years with her 7.5-foot pre-lit tree looking sparse and dull. She followed the common habit of adding garlands and ornaments first, then tried to \"add more lights\" afterward. The result? Clusters of brightness near the front, darkness in the back, and tangled cords snagging on glass balls.
Last year, she reversed the process. After reading about professional techniques, she removed everything, started fresh, and wrapped four separate 350-bulb warm white LED strands from the inside out, beginning at the top with the plug fed down the center. She spent nearly 45 minutes carefully weaving lights through inner branches, stepping back frequently to assess coverage.
Once the lighting was complete and tested, she began hanging ornaments—placing larger ones deeper in the canopy and smaller ones toward the tips. The transformation was immediate. Friends commented that her tree looked “like it came from a department store display.” More importantly, it stayed lit evenly throughout the season without overheating or flickering.
“I wasted years doing it backward,” she said. “Now I’ll never wrap ornaments before lights again.”
Frequently Asked Questions
How many strings of lights do I need for my tree?
A general rule is 100 incandescent bulbs or 50 LED bulbs per foot of tree height. For example, a 6-foot tree needs about 600 LEDs or 1,200 incandescent bulbs. However, personal preference and bulb spacing play a role—some prefer a denser glow.
Can I use different types of lights together?
You can, but it’s not recommended for a cohesive look. Mixing cool white with warm white creates visual inconsistency. If combining styles (e.g., twinkle lights with steady ones), limit accents to 10–15% of total lighting and place them strategically on outer tips.
What should I do if my lights go out after installation?
First, check the fuse in the plug. Many strands have small replaceable fuses. Then inspect for loose bulbs or damaged sockets. Use a light tester to identify faulty sections. For LED strands, voltage drops in long runs can cause dimming—avoid chaining more than 3–4 strands unless rated for it.
Conclusion: Light First, Decorate with Confidence
Wrapping a Christmas tree in lights before adding ornaments isn’t just a suggestion—it’s the foundation of exceptional holiday decor. By reversing the common impulse to start with shiny baubles, you gain control over the tree’s overall presence, ensuring no corner remains dark and no decoration competes with poor visibility.
This method saves time, reduces stress, and produces consistently beautiful results year after year. Whether you're decorating a towering spruce in the living room or a tabletop fir in the hallway, the principle remains the same: light shapes perception, and perception defines memory. A well-lit tree becomes the heart of celebration, casting warmth across gatherings and anchoring traditions in glowing detail.


 浙公网安备
33010002000092号
浙公网安备
33010002000092号 浙B2-20120091-4
Comments
No comments yet. Why don't you start the discussion?