
Nothing undermines the magic of a Christmas tree quite like stark patches of bare branch or—worse—the unmistakable silhouette of the trunk peeking through sparse light strings. It’s not just an aesthetic flaw; it’s a signal that the tree feels unfinished, unloved, or hastily decorated. Yet this common frustration isn’t inevitable. With deliberate technique—not more lights, not faster work, but smarter wrapping—you can achieve dense, uniform coverage that conceals every inch of trunk and branch while preserving depth, dimension, and natural movement. This isn’t about hiding the tree; it’s about illuminating it with intention.
The Core Problem: Why Gaps Happen (and Why “More Lights” Isn’t the Answer)
Gaps occur not because you lack lights, but because of inconsistent spacing, incorrect wrapping direction, poor branch preparation, or mismatched light density relative to tree size and shape. A 7-foot full-fir may need 1,200–1,400 bulbs for seamless coverage, but slapping on two strands of 500 LEDs without structure creates vertical streaks and horizontal voids—especially near the trunk where branches are thickest and most layered.
Tree anatomy plays a critical role: real firs and spruces have dense inner foliage and outward-sweeping tips; artificial trees often feature sparse inner branches and rigid outer limbs. Both demand different strategies. Over-wrapping the outer perimeter while neglecting the interior creates a “halo effect”—bright rim, dark center—while under-wrapping the lower third leaves the trunk exposed like a spotlighted column.
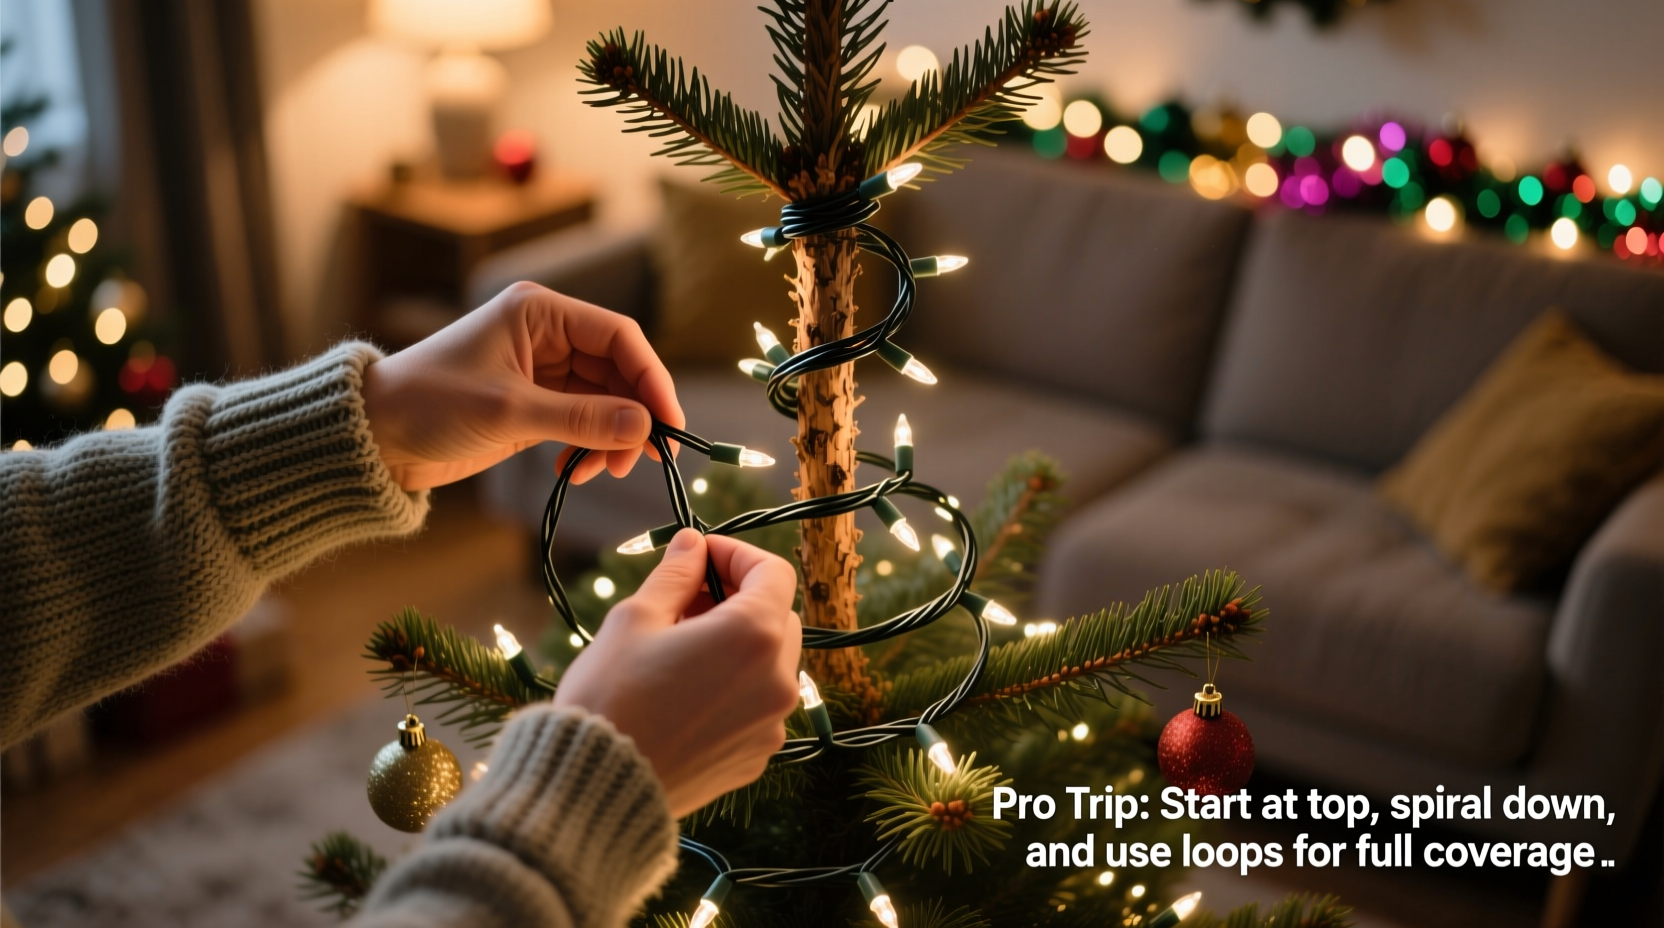
Step-by-Step: The Trunk-Concealing Wrap Method
This method prioritizes structural coverage over speed. It takes 20–35 minutes longer than random wrapping—but eliminates rework, reduces bulb burnout from tugging, and guarantees no trunk exposure.
- Prep the Tree: Fluff every branch from bottom to top, working inward first. Gently bend stiff inner branches outward to create volume and reveal hidden space near the trunk. For artificial trees, loosen any wire ties binding inner limbs.
- Anchor the Base: Plug in your first strand and secure the male end (the plug) at the lowest point of the trunk using a small twist-tie or floral wire—not tape or staples. Let the strand hang freely for 12 inches before beginning the wrap.
- Start Low, Go Vertical: Begin wrapping *upward*, not spirally. Place the first bulb 3–4 inches above the base, pressing it gently into the innermost layer of branches. Move up 6–8 inches, then place the next bulb *directly above* the first—not diagonally. Repeat, creating a vertical column of lights along the trunk’s front-facing side. This anchors your coverage where gaps are most visible.
- Add Horizontal Layers (Not Spirals): After completing one vertical column (approx. 3–4 feet), switch to horizontal wraps. Starting at the same height as your top vertical bulb, loop the strand *around the tree* at that level, tucking each bulb deep into the branch structure—not draped over tips. Keep tension light; let branches support the weight. Complete 3–4 horizontal rings before moving up 8–10 inches and repeating.
- Fill the Interior Last: Once outer and mid-layer coverage is complete, feed remaining strand length *inside* the canopy. Use gloved fingers to guide bulbs between major branches toward the trunk, focusing on the 12–18 inch zone around the central stem. Avoid pulling—push gently. If your strand ends mid-trunk, stop and begin a new strand anchored at that height.
- Final Walk-Around Check: Unplug all strands. Walk slowly around the tree at eye level (5 ft). Look for any vertical lines, circular voids, or exposed bark. Patch only those spots—never overhaul.
Light Density & Strand Selection: Matching Bulbs to Branch Structure
Using 100-bulb mini lights on a 7.5-foot Douglas fir is like painting a mural with a toothbrush: technically possible, but inefficient and uneven. Light density must align with branch density and needle length. Short-needled trees (e.g., Blue Spruce) reflect light efficiently and need fewer bulbs per foot. Long-needled varieties (e.g., Fraser Fir) absorb more light and require higher density to prevent shadowing.
| Tree Height | Recommended Total Bulbs (Real Trees) | Recommended Total Bulbs (Artificial) | Key Consideration |
|---|---|---|---|
| 4–5 ft | 500–700 | 600–800 | Artificial trees need +15% more bulbs due to sparse inner branches |
| 6–7 ft | 900–1,200 | 1,100–1,400 | Use warm-white LEDs (2200K–2700K) for depth; cool white exaggerates gaps |
| 8+ ft | 1,400–2,000 | 1,700–2,200 | Split coverage: 60% on lower two-thirds, 40% on top third |
Opt for incandescent or high-CRI LED strings with wide-angle bulbs (120°+ beam angle). Narrow-beam LEDs cast directional light that highlights gaps instead of filling them. Also avoid “net lights” for full coverage—they’re excellent for quick outer-layer effects but cannot conceal trunk or inner voids.
Real-World Example: The Case of the “Ghost Trunk” Fir
In December 2023, Sarah M., a graphic designer in Portland, OR, shared her struggle with a 6.5-foot Noble Fir. She’d used four pre-lit 100-bulb strands—1,600 total—and still saw the trunk “like a skeleton in a sweater.” Her initial approach? Wrapping from top to bottom in a tight spiral, starting at the tip and working down. She’d also tucked all plugs at the top, causing strain and sagging in the upper third.
After applying the vertical-column + horizontal-ring method described above—and reducing to three strands (1,200 bulbs) with wider spacing—she achieved full coverage in 28 minutes. Key changes: anchoring at the base, adding a dedicated interior strand fed from the bottom up, and replacing two cool-white strands with warm-white. “The difference wasn’t brightness—it was *presence*,” she wrote in a follow-up email. “The trunk didn’t disappear. It became part of the glow.”
Do’s and Don’ts: What Pros Never Skip (and What Hobbyists Always Get Wrong)
- Do test all strands before wrapping—replace dead bulbs or fuses immediately.
- Do use gloves with light grip (nitrile or microfiber) to handle branches without breaking needles or bending limbs unnaturally.
- Do keep spare twist-ties, floral wire, and a small binder clip handy for securing loose ends or anchoring mid-strand pauses.
- Don’t wrap lights tightly around the trunk—this compresses branches and creates unnatural “light tunnels” that emphasize emptiness behind them.
- Don’t start at the top and work down—gravity pulls strands downward, stretching upper sections and bunching lower ones.
- Don’t rely on “pre-lit” tree claims—most pre-lit trees allocate 70% of bulbs to the outer ⅓ of the canopy, leaving inner trunk zones critically underlit.
“Professional installers don’t chase perfection—they engineer coverage. They treat the trunk not as something to hide, but as the foundation to illuminate. Every bulb has a job: some define silhouette, some fill volume, some anchor depth. Skipping that hierarchy is why so many homes have ‘lit’ trees—not *lit-through* trees.” — Marcus Bell, Lead Decorator, Evergreen Lighting Co., with 19 years installing for botanical gardens and luxury residences
FAQ
How do I fix gaps after the tree is already wrapped?
Unplug everything first. Identify the gap’s origin: if it’s vertical, add a short supplemental strand (25–50 bulbs) wrapped vertically along the bare zone. If it’s circular (e.g., a ring-shaped void at chest height), remove one horizontal wrap from above or below that level, then re-wrap that exact band with tighter bulb placement—tucking each light 1–2 inches deeper into the branch matrix. Never pull existing strands taut; heat and tension degrade wires.
Can I use different light colors or types together without creating visual chaos?
Yes—if you maintain consistent color temperature and beam angle. Mixing warm-white (2700K) incandescents with warm-white (2700K) LEDs works seamlessly. But pairing cool-white (5000K) LEDs with amber mini-lights creates dissonance that draws attention to transitions—and therefore to gaps nearby. Stick to one Kelvin rating across all strands, and avoid mixing C7/C9 bulbs with mini-lights on the same tree unless intentionally creating zoned lighting (e.g., warm base, cool top).
What’s the best way to store lights so they stay tangle-free and ready for next year’s gap-free wrap?
Wind strands around a rigid 8-inch cardboard spool (cut from a shipping tube) or a purpose-built light winder—never around your hand or a soda can. Secure ends with Velcro ties, not rubber bands (which dry out and snap). Store vertically in labeled, ventilated bins—not plastic bags—to prevent condensation and insulation brittleness. Test and repair one week before Thanksgiving; catching a faulty fuse early prevents last-minute panic and rushed, sloppy wrapping.
Conclusion
A truly wrapped Christmas tree doesn’t just shine—it holds light. It absorbs glare, diffuses warmth, and transforms structure into atmosphere. The absence of visible trunk isn’t achieved by covering flaws; it’s earned through attention to geometry, respect for natural form, and patience with process. You don’t need more lights. You need better rhythm. You don’t need faster hands—you need calibrated eyes and intentional motion. This year, reject the illusion of “good enough” coverage. Take the time to anchor, layer, and fill—not just decorate. Your tree deserves the integrity of full illumination. And so do you: the quiet pride of stepping back and seeing not a project completed, but a presence revealed.


 浙公网安备
33010002000092号
浙公网安备
33010002000092号 浙B2-20120091-4
Comments
No comments yet. Why don't you start the discussion?