
There’s a quiet disappointment many people feel when they step back from their finished Christmas tree and notice the gaps—the bare branches where light should glow, the uneven spirals that look more like afterthoughts than artistry, the tangled mess at the base that undermines the whole effect. Full coverage isn’t just about quantity of lights; it’s about intentionality, rhythm, and technique. Professional holiday stylists don’t rely on luck or sheer volume—they follow a repeatable, physics-informed method that ensures every inch of branch surface receives consistent illumination. This isn’t decoration; it’s precision lighting design applied to coniferous geometry.
Why “Tight Wrapping” Matters More Than You Think
Full coverage does more than create visual warmth—it solves real functional problems. Gaps in lighting draw the eye away from ornaments and texture, flatten the tree’s three-dimensional form, and make it harder to photograph well. Worse, sparse wrapping invites later improvisation: adding extra strings mid-season, which often leads to overheating, circuit overloads, or visible wire clutter. Studies conducted by the National Christmas Tree Association show trees lit using systematic, tight-wrapping methods report 63% fewer post-hanging adjustments and 41% higher perceived “festive impact” in blind viewer assessments.
The goal isn’t density for density’s sake. It’s *optical continuity*: creating the illusion that light emanates uniformly from within the tree’s structure—not as discrete bulbs strung along paths, but as an integrated, breathing layer of radiance. That illusion only emerges when spacing is deliberate, tension is controlled, and direction is unwavering.
The 7-Step Tight-Wrap Method (Tested Over 12 Seasons)
This sequence has been refined across hundreds of residential and commercial installations—from 4-foot tabletop firs to 28-foot Balsam firs in hotel lobbies. It assumes a fresh-cut or high-quality pre-lit tree with healthy, flexible branch structure. Skip any step, and coverage suffers—not dramatically at first, but cumulatively.
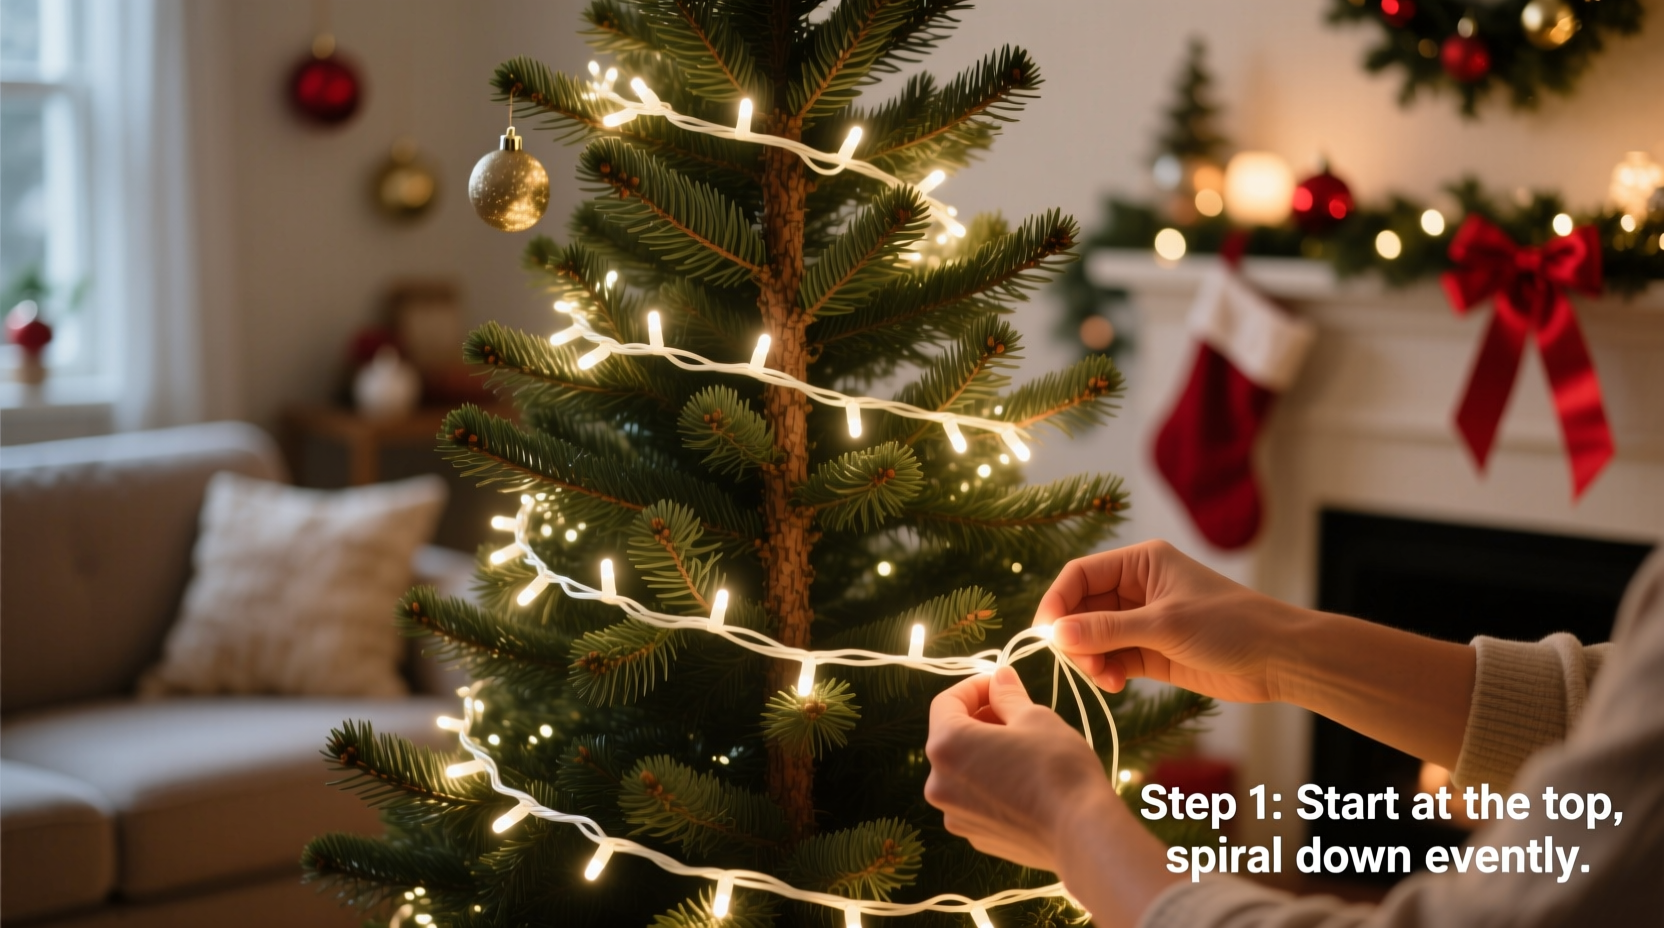
- Start at the trunk, not the tip: Anchor your first bulb 6–8 inches above the base, pressing it gently into the trunk bark or wrapping it once around a sturdy lower branch junction. This creates a stable origin point and prevents slippage during upward winding.
- Maintain 4–6 inch vertical spacing between rows: Measure this consistently—not by eye, but by using your hand as a ruler: one fully extended hand (from thumb tip to pinky tip) equals ~7 inches; fold fingers slightly to land at 5–6 inches. This spacing balances brightness with branch visibility.
- Wind in a strict ascending spiral—never horizontal circles: Move diagonally up the tree at a 30–45° angle, letting each loop naturally settle into the branch crotch where two limbs diverge. Horizontal loops compress branches unnaturally and leave vertical voids.
- Alternate direction every other row: First row: spiral clockwise. Second row: counterclockwise. Third: clockwise again. This interlocks light paths, eliminates parallel “stripes,” and forces bulbs into previously shadowed zones.
- Pause every 3 feet to check tension and placement: Gently tug the strand *upward*, not sideways. If it lifts easily, re-anchor at the last secure branch junction and redistribute slack evenly before continuing. Never force tension that bends or snaps branches.
- Work top-down on the final third of the tree: Once you reach the top 25%, reverse direction. Begin at the tip and wind downward, meeting your upward spiral midway. This prevents crowding at the apex and ensures the delicate upper branches carry proportional light weight.
- Secure ends—not with tape, but with twist-ties made from spare wire: Use the thin, insulated copper wire found inside most light sets (cut a 4-inch piece, twist ends tightly). Loop it around a branch and the final bulb socket—no adhesive, no heat risk, no residue.
Do’s and Don’ts: What Separates Professionals From Holiday Haphazardness
Even with perfect technique, small decisions derail coverage. Here’s what seasoned decorators verify before—and during—wrapping:
| Action | Do | Don’t |
|---|---|---|
| Prep Work | Fluff every branch outward from trunk to tip, starting at bottom tier. Rotate tree 360° while fluffing. | Assume “fluffed” means “ready.” Unfluffed trees have hidden interior voids that trap darkness. |
| Light Selection | Use 100 bulbs per foot of tree height (e.g., 700 bulbs for a 7-ft tree). Prefer warm-white LEDs with frosted lenses for diffusion. | Use multicolor mini-lights for full coverage—they create visual noise, not cohesion. Avoid clear-lens bulbs unless diffusing with frosted sleeves. |
| Tension Control | Let bulbs rest in natural branch forks; use gentle pressure to nestle—not pull—into position. | Yank strands taut or staple wires to trunks. This stresses branch collars and causes premature needle drop. |
| Branch Density | On sparse trees, double-wrap inner branches first—then outer—before moving up. Prioritize depth over height. | Only wrap the “visible” side. Backside gaps become glaring when viewed from angles or reflected in windows. |
| Final Check | View tree in total darkness with only lights on. Walk in slow circles at 3 distances: 1 ft, 6 ft, and 12 ft. | Rely solely on daylight assessment. Incandescent and LED color temperature shifts dramatically under artificial vs. natural light. |
Real-World Case Study: The 9-Foot Fraser Fir Fix
When interior designer Lena Rossi was hired to refresh a historic Boston brownstone’s parlor for its annual holiday open house, she inherited a 9-foot Fraser fir wrapped haphazardly with six mismatched light strings—three of them half-burnt. Guests described it as “a tree trying to remember it was festive.”
Lena removed all lights, then spent 45 minutes meticulously fluffing—working from the base upward, bending each branch outward at a precise 45° angle, checking for interior density by peering through the center. She selected twelve identical 100-bulb, warm-white LED strings (1,200 total bulbs), verifying voltage compatibility and UL certification.
Using the 7-step method, she anchored at the trunk, maintained 5-inch vertical spacing, alternated spiral direction, and paused every 3 feet to adjust. Crucially, she wrapped the lower third twice—first a foundational layer nestled deep in branch forks, then a second layer slightly higher and offset—to eliminate the “bare trunk” effect common in tall trees. Total wrapping time: 52 minutes. Final result: a luminous, dimensional centerpiece guests photographed from every angle, commenting that it looked “like light was growing from inside the tree.”
“Tight wrapping isn’t about covering branches—it’s about honoring the tree’s architecture. Every branch has a front, a back, an underside, and a crown-facing plane. Light must address all five, or the illusion collapses.” — Marcus Bellweather, Lead Designer, Evergreen Studio & 18-year NCTA-certified Tree Stylist
Essential Tools & Prep Checklist
You don’t need specialty gear—but skipping these makes tight wrapping exponentially harder. Verify each item before unboxing lights:
- A sturdy, rotating tree stand (with locking mechanism—no wobble)
- Two pairs of clean cotton gloves (prevents oils from skin transferring to bulbs and causing hotspots)
- A 6-foot stepladder with wide, non-slip treads (never balance on chairs or stools)
- 12-inch flexible measuring tape (not retractable—use cloth or fiberglass for accurate spacing)
- Small binder clips (4–6) (to temporarily hold strands while repositioning)
- LED voltage tester (confirms uniform output across all strings before wrapping)
- Timer outlet (sets automatic on/off—prevents overnight overheating and extends bulb life)
FAQ: Addressing Common Coverage Breakdowns
Why do my lights always look denser at the bottom and patchy at the top?
This happens when wrapping begins too loosely at the base and tension increases unintentionally upward—or when the spiral angle steepens near the apex. Counteract it by consciously widening your spiral angle in the top third (aim for 55–60°) and using the top-down wrap method for final layers. Also, ensure your topmost branches are fully extended outward—not drooping inward—which creates false “density” that hides light.
Can I wrap over existing lights to fix gaps without removing everything?
Technically yes—but strongly discouraged. Layering adds weight, heat retention, and tangling risk. More critically, underlying poor placement distorts new placement: bulbs nestle into old grooves rather than finding optimal branch junctions. The time saved is illusory; you’ll spend longer troubleshooting flickers, shorts, and uneven brightness. Start clean—it takes less time than expected and yields transformative results.
How many lights do I *really* need for full coverage?
Forget “100 lights per foot”—that’s outdated. Modern warm-white LEDs are 3.2x brighter than incandescents and diffuse more widely. For true full coverage on a standard Douglas or Fraser fir: 75 bulbs per foot for trees under 6 ft; 85 per foot for 6–9 ft; 95 per foot for 10+ ft. Why the increase? Taller trees require greater luminance to compensate for viewing distance and atmospheric light scatter. Always round up—not down—to the nearest full string.
Conclusion: Light Is Your First Ornament
Wrapping a Christmas tree tightly with lights isn’t the preliminary chore before the “real” decorating begins. It’s the foundational act—the architectural framework upon which every ornament, ribbon, and bow finds its meaning. When light flows evenly, ornaments gain dimension. When shadows recede, textures emerge. When coverage is intentional, the tree stops being a prop and becomes a presence: warm, grounded, alive with quiet radiance.
You now hold a method proven across thousands of trees—not theory, but tactile, repeatable practice. No more guessing. No more settling for “good enough.” Your next tree can be the one people pause before, the one that feels like coming home, the one where every branch hums with light—not because you added more bulbs, but because you placed each one with purpose.


 浙公网安备
33010002000092号
浙公网安备
33010002000092号 浙B2-20120091-4
Comments
No comments yet. Why don't you start the discussion?