
Wrapping a Christmas tree stand is rarely on anyone’s holiday to-do list—and for good reason. It’s bulky, angular, often metal or heavy plastic, with protruding bolts, threaded rods, or reservoirs that resist conventional gift-wrapping logic. Yet when it’s a gift—whether for a new homeowner, a newlywed couple, or a friend who just adopted their first real tree—it deserves the same thoughtful presentation as a sweater or a bottle of wine. Discreet wrapping isn’t about hiding the object; it’s about honoring its function while elevating its presentation. It signals care, intention, and respect for both the recipient and the ritual of giving. This guide distills field-tested techniques used by professional gift stylists, retail packaging designers, and seasoned holiday hosts—not theoretical suggestions, but methods refined through dozens of actual tree-stand wraps across urban apartments, rural cabins, and high-ceilinged lofts.
Why “discreet” matters more than “pretty” for functional gifts
A Christmas tree stand isn’t decorative in the traditional sense. Its value lies in utility: stability, water capacity, adjustability, and compatibility with trunk diameter. Overwrapping—layering excessive paper, bows, or ribbons—can obscure labeling, complicate assembly instructions, or even interfere with the stand’s base footprint during transport. “Discreet” here means: no visible tape, no crumpled seams at critical corners, no loose ends that snag on doorframes or coat hooks, and no materials that compromise grip or safety when carried. It also means preserving access points—like fill caps or leveling screws—without sacrificing aesthetic cohesion. In practice, discretion translates to clean lines, intentional negative space, and structural integrity beneath the surface.
“Gift-wrapping isn’t decoration—it’s communication. A well-wrapped functional item says, ‘I understand what this does, and I honored that in how I presented it.’ That builds trust far more than glitter ever could.” — Maya Lin, Packaging Design Director at The Holiday Collective (12+ years designing for premium home & seasonal brands)
Essential supplies: less is more, but precision is non-negotiable
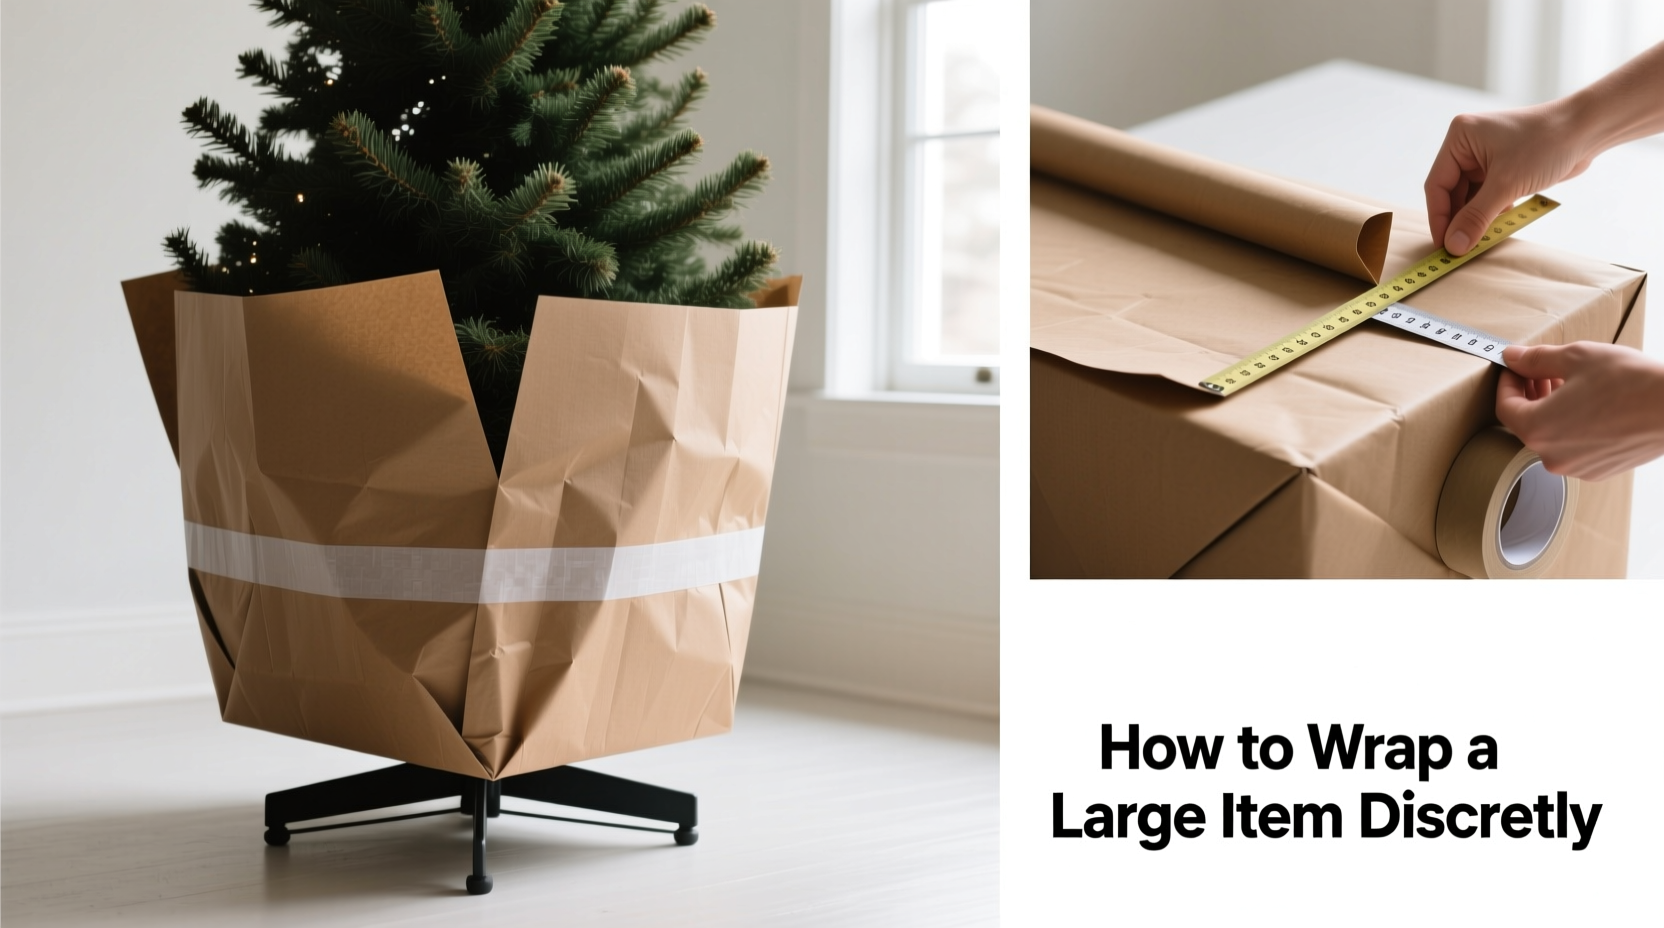
You don’t need a craft store haul. What you do need are carefully selected, purpose-built materials—each chosen for tensile strength, drape control, and visual neutrality. Avoid generic “gift wrap” rolls: most lack the weight and tear resistance needed for rigid, 15–25 lb objects with sharp edges.
| Item | Why It’s Required | Minimum Specs | What to Avoid |
|---|---|---|---|
| Heavyweight kraft paper (30–40 lb) | Provides structure without buckling; accepts twine and ink beautifully | At least 36\" wide; acid-free for archival safety | Thin newsprint, glossy holiday paper (slips, tears at folds) |
| 100% cotton or linen twine (2–3 mm) | Strong, matte, and tactile; knots hold under weight without cutting into paper | Unwaxed, undyed, 50+ ft per spool | Nylon cord (shiny, slippery), jute (too coarse, sheds fibers) |
| Double-sided tape runner (refillable) | Creates invisible seams; no curling, no residue, no visible adhesive lines | Width: ¼\" or ⅜\"; low-tack, paper-safe formula | Clear tape (shows glare), glue sticks (weak bond, warps paper) |
| Matte black or charcoal washi tape (optional) | For subtle reinforcement at stress points—e.g., where twine meets base edge | 15 mm width; cellulose-based, removable | Decorative patterned tape (distracts), duct tape (permanent, unprofessional) |
Step-by-step: the 7-phase discreet wrap method
This sequence works for stands ranging from compact tabletop models (12\" x 12\") to full-size reservoir stands (24\" x 24\", up to 30 lbs). It assumes the stand is fully assembled and dry—no water inside, no tools attached.
- Measure and map stress zones. Identify four critical points: the outermost corner of each foot (usually metal or rubberized), the center of the top ring or collar, and any exposed bolt heads or fill cap. Mark these lightly with pencil on your work surface—not on the stand.
- Cut paper with engineered excess. Unroll kraft paper. Measure the stand’s height + 6\", then multiply by 2. Add 4\" to that total for seam overlap. For a 16\"-tall stand: (16 + 6) × 2 = 44\", + 4\" = 48\". Cut one continuous strip 48\" long × 36\" wide. Do not cut separate panels.
- Position vertically, not horizontally. Lay the stand upright on its feet. Center the paper strip behind it so 3\" of paper extends above the top ring and 4\" below the lowest foot. Bring left and right edges toward the front—do not wrap around yet.
- Anchor the base first. Using double-sided tape, secure the bottom 2\" of paper tightly to the floor (not the stand) directly beneath the front edge of the feet. This creates a stable “platform” that prevents shifting during tightening.
- Apply tension with controlled rotation. Holding the paper taut, rotate the stand 90° clockwise *while keeping the paper flat and unwrinkled*. Repeat three more times until fully encircled. Use palms—not fingertips—to distribute pressure evenly. Stop if paper resists; reposition and restart.
- Seal the seam invisibly. Overlap the final edge by 1.5\". Apply double-sided tape along the inner ¾\" of the overlap. Press firmly with a bone folder or spoon back for 10 seconds. No visible tape line should appear from the front.
- Secure with minimalist twine. Wrap twine horizontally once at mid-height (just below the top ring), then again 3\" above the base. Tie square knots at the front center—trim ends to 1.25\". Tuck tail ends beneath the top wrap using tweezers or a blunt knitting needle.
Real-world application: The Brooklyn loft scenario
Last December, interior stylist Lena R. wrapped a 22-lb, 22\"-diameter Grand Noble reservoir stand for a client moving into a minimalist Soho loft. The stand had six adjustable feet, a brushed stainless steel fill cap, and a 1.5-gallon reservoir. Standard wrapping attempts failed: glossy paper tore at foot corners; ribbon slipped off smooth metal; tape lifted in the building’s heated hallway.
Lena adapted the 7-phase method: she used 36-lb kraft paper with a slight tooth finish, applied double-sided tape only at the floor anchor and seam (never on the stand itself), and added one vertical twine wrap at the back—hidden from the main entry view—to stabilize the paper during elevator transit. She skipped all embellishments. At the reveal, the client remarked, “It looks like it arrived from a Japanese woodworking studio—not a big-box store.” The stand was assembled in under 90 seconds because the paper peeled cleanly, the fill cap remained fully accessible, and the twine knots held firm through two flights of stairs. No tools were needed to unwrap—just gentle pulling at the seam.
Do’s and Don’ts: avoiding common pitfalls
- Do wrap the stand upright—not on its side. Laying it flat invites creasing at foot junctions and misaligns the reservoir seal.
- Do label contents discreetly: use a fine-tip archival pen to write “Tree Stand • Assemble Before Filling” on the bottom edge of the paper, facing inward.
- Do reinforce foot corners with a single 1\" strip of matte washi tape *under* the paper fold—not over it—to prevent splitting during handling.
- Don’t use scissors near bolt threads. Snagged threads compromise stability and frustrate assembly.
- Don’t wrap the water reservoir cap closed. Even if empty, sealing it risks condensation buildup or accidental pressure lock.
- Don’t rely on gift bags. Most lack structural rigidity, and handles tear under uneven weight distribution.
FAQ: practical questions from real gift-givers
Can I wrap a stand with a built-in light or timer?
Yes—but only if the electronics are fully detached and stored separately in a labeled pouch taped to the *inside* of the paper wrap. Never wrap live wiring, batteries, or circuit boards inside the paper envelope. Heat buildup and compression can damage components or create short-circuit risks. If the light is hardwired, consult the manufacturer before wrapping; many advise against full enclosure.
What if my stand has an irregular shape—like a tripod or folding model?
Tripod stands require modified anchoring: instead of a floor platform, use three small squares of double-sided tape placed precisely beneath each foot’s contact point. For folding stands, wrap *only when fully extended and locked*. Wrapping in folded position risks spring mechanism damage or unintended collapse during transit. Always include a printed note: “Please unfold completely before tightening.”
Is it okay to wrap the stand with the tree skirt included?
No. Tree skirts serve a functional role—covering the stand’s base and hiding cords—and must be sized and positioned *after* the tree is secured and balanced. Wrapping them together forces compression that warps fabric hems, melts synthetic linings, or misaligns elastic bands. Instead, wrap the stand alone, then place the skirt beside it in the same box or tote, secured with a single twine loop.
Advanced refinement: when presentation meets practicality
For recipients who appreciate craft and detail, add one silent upgrade: hand-stamp the paper with a custom motif using archival ink. Not a logo—a subtle symbol: a single pine bough, a geometric triangle (echoing the stand’s stability), or interlocking circles (representing water + tree). Use a ¾\" brass stamp and pigment ink—apply with even downward pressure, no dragging. Stamp only once, centered on the front panel, 4\" below the top ring. This adds personality without clutter, signals handmade care, and remains legible after unwrapping—making the paper reusable for notes or tags.
Conclusion: the quiet power of intentional presentation
Wrapping a Christmas tree stand discreetly isn’t about perfection—it’s about presence. It’s choosing materials that behave with integrity, following steps that honor the object’s engineering, and resisting the urge to over-decorate something whose beauty lies in reliability. When you execute this method, you’re not just concealing hardware—you’re affirming values: that function deserves reverence, that preparation matters as much as celebration, and that the best gifts carry meaning beyond the moment of opening. A well-wrapped stand arrives with dignity. It’s easy to assemble, simple to store, and quietly communicates that the giver understood both the weight of the object and the weight of the tradition it supports.
Start this season—not with another roll of shiny paper, but with one sheet of sturdy kraft, a spool of honest twine, and the confidence that restraint, when practiced with precision, is the most generous form of attention you can give.


 浙公网安备
33010002000092号
浙公网安备
33010002000092号 浙B2-20120091-4
Comments
No comments yet. Why don't you start the discussion?