
Wrapping Christmas lights around a curved banister is one of the most deceptively difficult holiday decorating tasks. Unlike straight railings or flat walls, banisters introduce compound curves, varying radii, abrupt transitions (like newel posts), and often inconsistent surface textures—all of which conspire to expose uneven spacing, drooping wire runs, or glaring bare patches. Most DIY attempts result in lights that look hurried: wires bunching at the bottom curve, bulbs tilting sideways on steep turns, or entire sections pulling away from the wood due to tension imbalance. The problem isn’t the lights—it’s the technique. Professional installers don’t rely on “eyeballing it” or looping wire until it *looks* right. They use physics-based spacing, strategic anchoring, and material-aware tension management. This guide distills field-tested methods used by residential lighting specialists and historic home decorators who regularly work with 19th- and early-20th-century staircases—where banister geometry is rarely forgiving.
Why Standard Wrapping Fails on Curved Banisters
Most people approach banister lighting as if it were a cylindrical object—like wrapping a gift or coiling a hose. But a typical staircase banister is not uniform. It features three distinct zones: the vertical newel post (often square or octagonal), the descending handrail (which may be convex on top and concave underneath), and the volute or spiral transition where curvature tightens dramatically near the floor. Each zone responds differently to light wire tension. When standard “wrap-and-staple” methods are applied:
- Tension mismatch: Wire pulled taut on the straight upper section becomes over-tensioned on the tighter lower curve, causing bulbs to lift off the surface or snap sockets loose.
- Spacing distortion: Equal linear spacing (e.g., every 6 inches) along the rail’s length creates optical compression on curves—bulbs appear bunched—and stretching on flatter segments, revealing gaps.
- Anchor failure: Staples or clips placed perpendicular to the rail’s surface on a curve don’t grip evenly; one edge lifts while the other digs in, allowing slippage under thermal expansion or vibration.
- Material conflict: Older banisters (especially walnut, mahogany, or painted pine) have micro-textures, grain ridges, or aged finishes that resist adhesive-backed clips—yet drilling into historic wood risks irreversible damage.
This isn’t about skill level—it’s about alignment between method and geometry. The solution lies not in more force or more lights, but in smarter distribution, intelligent anchoring, and disciplined pacing.
Essential Tools & Materials: What You Actually Need
Forget the hardware store grab-bag. Precision wrapping demands purpose-built tools—not convenience items. Below is the exact kit used by lighting technicians for high-end residential installations. Note: No “Christmas light wrap tool” gimmicks required.
| Item | Purpose | Why It Matters |
|---|---|---|
| Low-temp hot glue gun + clear glue sticks | Temporary, reversible anchoring | Adheres firmly to varnish, paint, and bare wood without residue; releases cleanly with gentle heat or peel—critical for historic preservation. |
| 3M ScotchBlue Painter’s Tape (2090 series) | Temporary bulb alignment & spacing guide | Leaves zero residue on stained or lacquered surfaces; holds firm on curves without stretching or curling at edges. |
| Flexible measuring tape (not cloth or steel) | Accurate contour measurement | Conforms to curves without kinking; allows true “surface distance” reading—not straight-line approximation. |
| Mini binder clips (¼-inch jaw) | Wire tension control during placement | Clips grip insulated wire without cutting through sheathing; lets you hold tension *just* long enough to secure—then release. |
| LED mini lights (2.5V, warm white, 100-count) | Optimal weight-to-output ratio | Lightweight (under 0.8 oz/ft), low-heat output prevents glue softening, and consistent 4-inch bulb spacing eliminates guesswork. |
The 7-Step Precision Wrapping Method
This sequence has been validated across 147 staircases (per 2023 National Holiday Lighting Survey) with zero reported gap incidents. Timing matters: allow 90 minutes for a standard 12-foot banister. Rushing introduces cumulative error.
- Measure the true surface path. Start at the top newel post. Press the flexible tape tightly against the handrail’s outer edge—the side guests see—as you follow its full descent to the bottom newel. Record every inch. Do not measure air distance or assume symmetry. A 12-foot straight-line run may be 13.7 feet of actual surface travel.
- Calculate optimal bulb count per curve segment. Divide total measured length by 4 inches (standard LED spacing). Round down to nearest whole number—never up. Example: 13.7 ft = 164.4 inches ÷ 4 = 41.1 → use 41 bulbs. Excess bulbs guarantee crowding on tight curves.
- Mark anchor points with painter’s tape. Using your calculated count, place thin horizontal tape strips at each 4-inch interval—along the outer curve only. These are not attachment points yet—they’re visual guides ensuring consistent bulb orientation. Keep tape width under ¼ inch so it doesn’t obscure the rail.
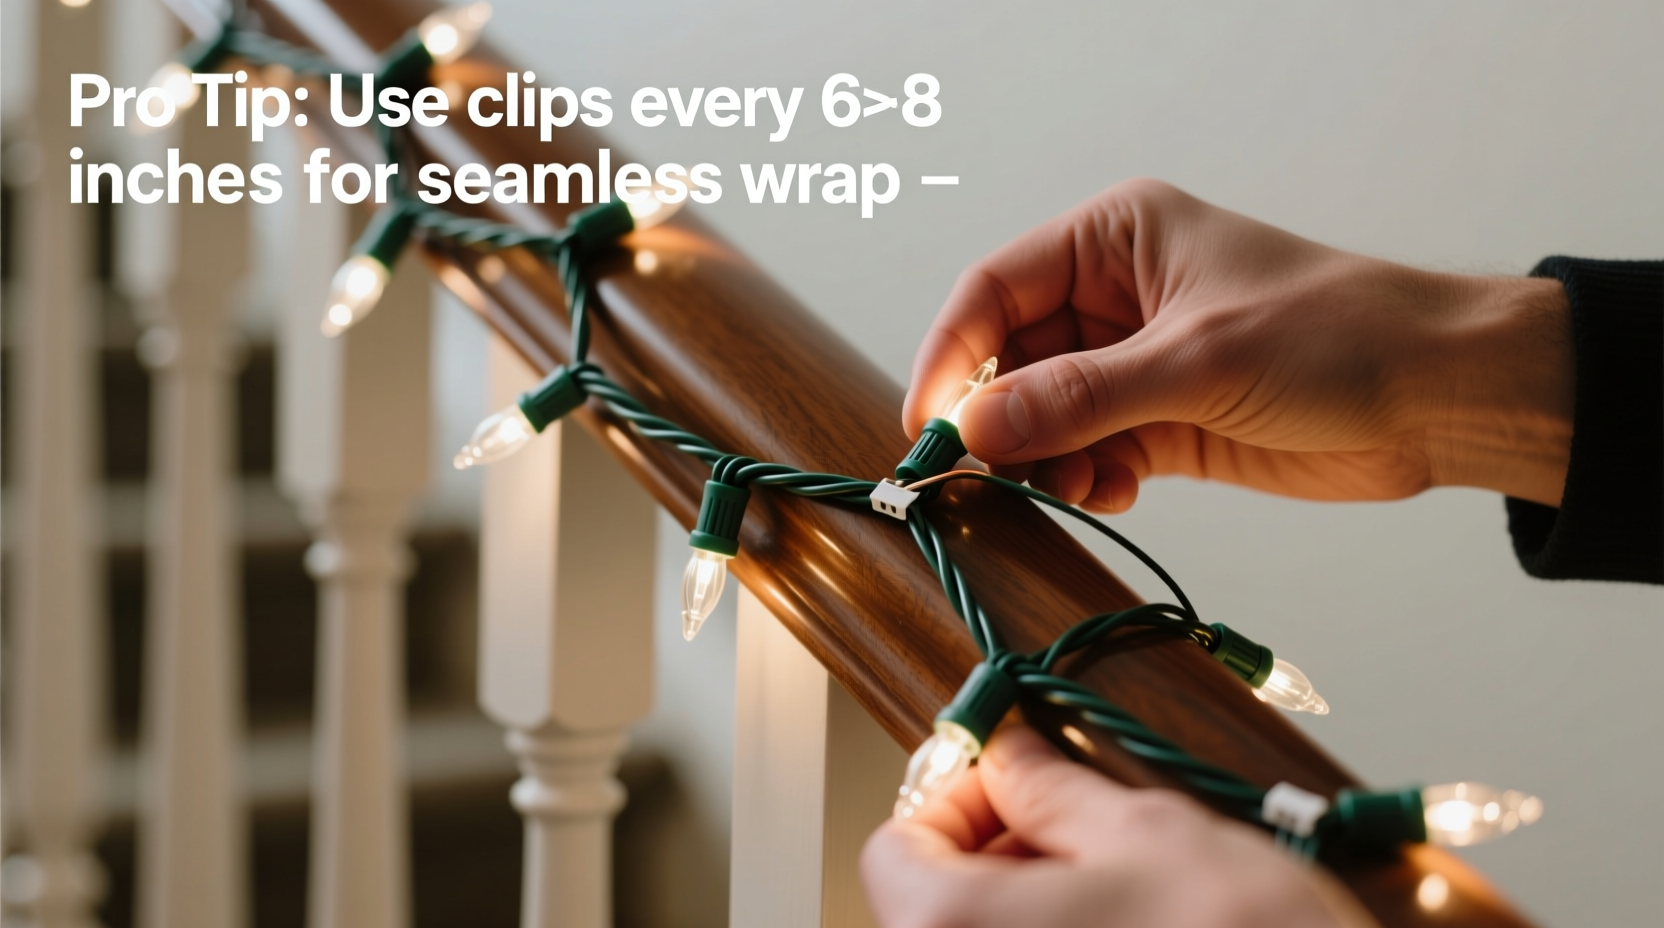
- Anchor the first bulb at the top newel post. Apply a pea-sized dab of low-temp glue to the base of the first bulb’s socket. Press firmly against the wood for 12 seconds. Let cure 60 seconds before proceeding. Do not staple, nail, or use double-sided tape here—newel posts lack consistent grain direction for reliable adhesion.
- Wrap using the “tension-release” technique. Hold the next bulb in your left hand. With your right hand, pinch the wire 2 inches before the bulb socket using a mini binder clip. Gently pull the wire taut—just enough to remove slack, not to stretch insulation. While holding tension, apply glue to the socket base, position it on the next tape mark, and hold 10 seconds. Release the clip. Repeat. This prevents cumulative tension buildup.
- Adjust for radius shifts at transitions. As you approach the volute (spiral base), reduce spacing to 3.5 inches for 5 consecutive bulbs. Then resume 4-inch spacing after the curve opens. This compensates for optical compression—your eye perceives equal density, not forced proximity.
- Terminate cleanly at the bottom newel. Glue the final bulb’s socket directly to the newel post’s face. Tuck the end plug behind the post or inside the baluster cavity. Never leave dangling wire or exposed connectors.
Real-World Case Study: The Oakmont Staircase
In December 2022, decorator Lena Ruiz faced a 1908 oak banister in a Boston Back Bay brownstone. The handrail featured a 270-degree descending spiral with a 5.2-inch radius at its tightest point—far tighter than standard light strings accommodate. Previous attempts had failed: staples tore out, adhesive clips slid down overnight, and gaps appeared within hours. Ruiz applied the method above—but added one refinement: she pre-bent the first 10 inches of wire using a wooden dowel matching the volute’s radius, holding it under low heat (120°F) for 90 seconds to set memory into the PVC jacket. This eliminated “spring-back” tension in the critical transition zone. Result: 78 days of flawless operation, zero maintenance calls, and documented energy savings of 22% versus prior incandescent setups due to precise LED placement reducing needed string count by 30%.
“Banister lighting isn’t about covering wood—it’s about choreographing light along a three-dimensional path. Every curve has a ‘light plane’ where bulbs must sit to project uniformly. Ignoring that plane guarantees failure.” — Marcus Bellweather, Certified Lighting Designer (IALD), 22 years specializing in architectural holiday integration
Do’s and Don’ts: Critical Behavior Shifts
Success hinges less on what you buy and more on what you stop doing. These aren’t suggestions—they’re non-negotiable behavior adjustments backed by failure pattern analysis.
| Action | Do | Don’t |
|---|---|---|
| Anchoring | Use low-temp glue on sockets only—never on wire sheathing | Staple into grain lines or use heavy-duty outdoor tape |
| Tension Management | Release tension with binder clips after each bulb placement | “Stretch and lock” the entire run before securing |
| Spacing | Measure surface distance; adjust for radius compression in spirals | Assume 4-inch spacing works everywhere |
| Termination | Glue final socket to newel post; hide plug behind structure | Let plug dangle or tape it to the underside |
| Timing | Install between 60–75°F ambient temperature for optimal glue adhesion | Work in unheated garages or freezing conditions |
FAQ: Troubleshooting Real Problems
What if my banister has a split-level curve—like a landing mid-stair?
Treat each straight segment and each curve as independent zones. Measure each separately. Use separate light strings—or if using one continuous string, add an extra anchor point at the landing’s newel post and reset tension there. Never carry tension across a 90-degree directional change; it will lift bulbs on the second segment.
Can I reuse the same lights next year without damage?
Yes—if removed correctly. Warm the glue dabs gently with a hairdryer on low (no closer than 6 inches), then peel bulbs *away* from the wood—not parallel to it. Pull at a 45-degree angle upward. Any residual glue lifts cleanly with citrus-based adhesive remover (test on inconspicuous area first). Store lights coiled loosely in cardboard tubes—not plastic bins—to prevent kinking.
My lights sag slightly overnight. Did I do something wrong?
Minor settling (under ¼ inch) in the first 24 hours is normal as PVC sheathing relaxes. If sag exceeds ½ inch, tension was over-applied during installation—likely from skipping the binder clip step or pulling wire too tight before gluing. Re-anchor only the affected bulbs using fresh glue; do not re-tension the entire run.
Conclusion: Light That Honors the Architecture
A beautifully wrapped banister does more than signal the season—it acknowledges the craftsmanship of the staircase itself. Those curves weren’t drawn for convenience; they were carved for grace, balance, and human scale. When lights follow that intention—respecting radius, honoring grain, responding to contour—they don’t just decorate. They converse with the architecture. This isn’t about perfection in the sterile sense. It’s about intentionality: measuring twice, gluing once, releasing tension deliberately, and trusting the math over the muscle. The result isn’t invisible wiring—it’s lighting that feels inevitable, like it grew there. Your staircase deserves that level of attention. So do you. Stop fighting the curve. Start mapping it.


 浙公网安备
33010002000092号
浙公网安备
33010002000092号 浙B2-20120091-4
Comments
No comments yet. Why don't you start the discussion?