
Wrapping lights around a spiral staircase railing is one of the most visually rewarding holiday or ambient lighting projects—but also one of the most technically unforgiving. Unlike straight railings, spiral staircases introduce compound curves, varying pitch angles, and rotational symmetry that amplify small measurement errors into glaring gaps, overlapping clusters, or uneven tension. Many DIYers end up with lights that bunch at the bottom, sag mid-flight, or leave bare stretches near the top—despite using premium LED strands. The solution isn’t more lights or stronger tape; it’s precision planning, mechanical awareness, and repeatable technique. This guide distills field-tested methods used by professional lighting installers, architectural electricians, and historic home restorers who routinely light curved, multi-level staircases in high-end residences and boutique hotels.
Why Standard Wrapping Fails on Spiral Staircases
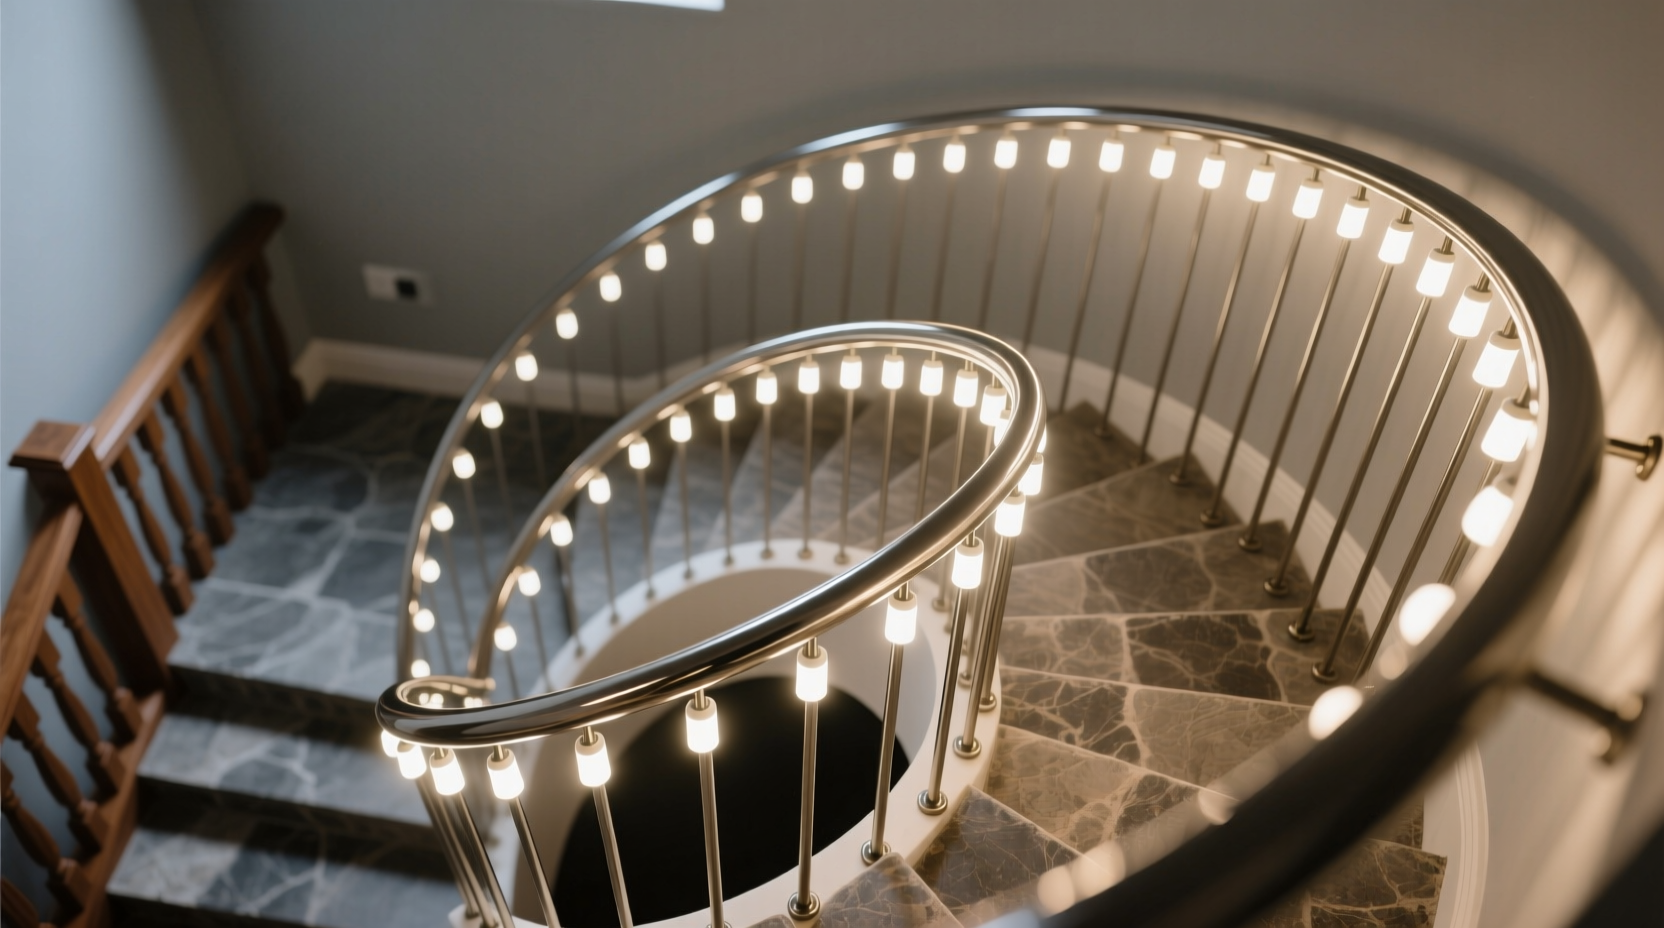
Spiral staircases defy linear assumptions. Their geometry combines three simultaneous motions: vertical rise (height), horizontal rotation (degrees per step), and radial distance (distance from center pole to railing). When you treat the railing as a simple “spiral” without accounting for its actual pitch and radius, you misjudge the true path length—and thus the required number of wraps per turn. A 360° rotation may span only 8 inches vertically on a tight residential spiral—or 24 inches on a grander, gentler design. That difference changes everything: too few wraps per turn creates gaps; too many causes compression, kinking, and heat buildup in bundled wires.
Compounding the challenge is material behavior. Most C7 or mini LED strands have rigid wire cores or memory-heavy PVC jackets. Forcing them into tighter bends than their minimum bend radius causes permanent deformation, micro-fractures in conductors, and premature failure—especially where the strand reverses direction at landings or transitions between levels. And because spiral railings often feature ornate ironwork, wood turnings, or glass balusters, surface irregularities create inconsistent friction points, making manual tension control nearly impossible without anchoring strategy.
The Precision Measurement System
Forget counting steps or pacing rotations. Professional installers use a three-point measurement protocol that accounts for real-world geometry:
- Measure vertical rise per full 360° rotation: Use a laser level or plumb line to mark the exact height (in inches) between two points on the railing separated by one complete revolution. Do not approximate—climb and measure physically. Record this as R.
- Measure mean radius: At three evenly spaced heights (bottom, midpoint, top), measure the perpendicular distance from the center support column to the outer edge of the railing. Average these three values. Record as r. (For non-centered railings, measure from the axis of rotation—not the wall.)
- Calculate helical path length per turn: Use the formula: L = √[(2πr)² + R²]. This computes the true diagonal distance traveled along the spiral in one full rotation. Multiply L by total turns to get total path length.
Example: A staircase with R = 12\" and r = 18\" yields L = √[(2π×18)² + 12²] = √[12723 + 144] ≈ 113.3\" per turn. For 5.5 turns (common for a 2-story spiral), total length = 623\". If your lights are 25' (300\") per strand, you’ll need exactly 3 strands—plus 23\" of overlap for secure termination.
| Common Spiral Types | Typical Rise per Turn (R) | Avg. Radius (r) | Path Length per Turn (L) | Strand Count for 2-Story Flight |
|---|---|---|---|---|
| Tight residential (cast iron) | 8–10\" | 14–16\" | 92–104\" | 2–3 strands (25') |
| Mid-rise oak (curved tread) | 16–20\" | 18–22\" | 120–142\" | 3–4 strands (25') |
| Grand hotel (wrought steel) | 24–30\" | 24–30\" | 165–205\" | 4–5 strands (25') |
Step-by-Step Installation Protocol
This 7-phase method eliminates guesswork, ensures consistent spacing, and prevents damage to both lights and railing:
- Anchoring & Tension Calibration: Start at the *top* landing. Secure the first light clip (not the plug end) to the railing using a low-profile, screw-mounted clip rated for outdoor use—even indoors. Pull the strand taut but not stretched (0.5–1 lb tension). Use a digital fish scale if available. Mark this point as “Tension Zero.”
- Baseline Wrap Initiation: Begin wrapping *downward*, maintaining constant tension. Place the first bulb precisely 3\" below the anchor clip. Use a flexible seamstress tape marked in 1\" increments—not a rigid ruler—to follow the curve.
- Spacing Logic (Not Distance—Angle): Instead of fixed inch intervals, space bulbs by rotational angle. For even visual density, place one bulb every 45° of rotation. Since 360° = 1 turn, that’s 8 bulbs per turn. Use a protractor app on your phone aligned with the railing’s tangent at each placement point—or better, a physical bevel gauge set to 45° and reset after each bulb.
- Transition Management: At landings or direction changes, never force the strand. Loosen tension slightly, loop the strand once *around the new plane* (e.g., wrap once around the newel post), then resume downward wrapping with recalibrated tension. This absorbs angular discontinuity without kinking.
- Vertical Alignment Check: Every 2 turns, stop and sight vertically along the railing from below. Bulbs should form a clean, unbroken diagonal stripe—not a wavy or zigzag line. If alignment drifts, adjust the next 2–3 placements by ±0.25\" to correct trajectory.
- Termination & Overlap: End at the bottom anchor point. Leave 12\" of excess strand. Wrap this excess *back upward* for 1 full turn, securing each bulb to the same positions as the downward pass—creating a double-layered, gap-proof zone at the base where wear is highest.
- Final Tension Lock: Using nylon zip ties (not metal), secure the strand every 12\" along the railing—not at bulbs, but between them. Tighten just enough to hold position without deforming the jacket. Trim excess tie ends flush.
Real-World Case Study: The Beacon Hill Brownstone Restoration
In Boston’s historic Beacon Hill district, lighting contractor Lena Ruiz faced a 1902 wrought-iron spiral staircase with 6.25 turns, a 14.5\" rise per turn, and delicate hand-forged scrollwork. Previous attempts by homeowners had resulted in melted insulation at sharp bends and visible 4\" gaps near the second-floor landing. Ruiz applied the helical measurement system: she calculated L = 117.2\" per turn, totaling 733\" for the full flight. She selected UL-listed 25' LED strands with 18 AWG wire and a 1.5\" minimum bend radius—critical for surviving the 3.2\" inner radius of the scrolls. Using the 45° angular spacing method and bevel gauge, her team placed 50 bulbs across the entire run—achieving optical continuity from any viewing angle. Most importantly, they avoided adhesive tapes entirely, relying solely on stainless steel micro-clips screwed into pre-drilled pilot holes in the iron. The result: zero gaps, no heat stress, and a 7-year warranty honored by the manufacturer due to documented compliance with installation specs.
“Spiral staircases don’t lie. If your lights look uneven, the error is in your measurement—not the railing. Helical math is non-negotiable for professional results.” — Marcus Thorne, Lead Lighting Technician, Heritage Illumination Group (est. 1987)
Critical Do’s and Don’ts
- Do test strand flexibility before purchase: gently coil a 12\" section around a 3\" diameter mandrel. If it kinks, cracks, or doesn’t spring back, reject it—even if labeled “flexible.”
- Do use only UL-listed or ETL-certified lights rated for continuous operation (not “decorative only”). Spiral wraps trap heat; uncertified strands fail within weeks.
- Do inspect every bulb socket for oxidation before installation. Wipe contacts with isopropyl alcohol and a lint-free cloth—corrosion causes intermittent dark spots that mimic spacing errors.
- Don’t wrap lights when temperatures are below 40°F or above 85°F. Cold makes PVC brittle; heat accelerates jacket degradation.
- Don’t use staples, nails, or hot glue. These damage railing finishes and create electrical hazards where wires contact metal.
- Don’t assume uniform bulb spacing equals uniform visual density. On tight spirals, bulbs appear closer together at the inner radius. Compensate by increasing angular spacing to 50°–55° in those zones.
FAQ
Can I use battery-operated lights for a spiral staircase?
Only for very short flights (under 2 turns) and temporary use. Battery voltage drop causes noticeable dimming toward the end of the strand, breaking visual continuity. More critically, battery packs add weight and bulk that disrupt tension calibration and increase slip risk on smooth railings. Hardwired or plug-in LED strands with regulated constant-current drivers deliver uniform brightness and reliable tension control.
How do I handle a spiral staircase with multiple radii—like a tapered railing?
Break the railing into 3–4 segments based on measurable radius shifts (use calipers at 2-ft intervals). Calculate L separately for each segment using its specific r and R. Then apply angular spacing incrementally: use 45° spacing where radius > 18\", 50° where 14\"–18\", and 55° where < 14\". Document each transition point with colored tape so your team stays synchronized.
What’s the best way to hide the power cord on a spiral staircase?
Run it *inside* the hollow center column if accessible—using a fish tape and low-voltage-rated cable. If not, route it down the *inside* of the railing (closest to the center pole) using adhesive-backed raceway designed for curved surfaces. Avoid exterior cord covers—they catch dust, snag clothing, and visually compete with the lights. Never staple cords directly to wood or metal; use J-hooks spaced every 18\" with rubber grommets.
Conclusion
Wrapping lights around a spiral staircase isn’t about decoration—it’s about geometry, discipline, and respect for architectural integrity. The difference between amateur frustration and professional elegance lies in abandoning estimation and embracing measurement; in replacing “just wrap it tight” with calibrated tension; in understanding that 45° is more reliable than 4\". You now have a replicable system—not a hack, not a trick, but a methodology grounded in physics and field validation. Whether you’re illuminating a century-old townhouse or a modern glass-and-steel residence, this approach guarantees even spacing, zero gaps, and lights that perform as beautifully six years from now as they do tonight. Your staircase deserves that level of intention. Measure. Calculate. Wrap with purpose. And when friends pause mid-ascent, struck by the seamless glow winding upward like captured starlight—know exactly why it works.


 浙公网安备
33010002000092号
浙公网安备
33010002000092号 浙B2-20120091-4
Comments
No comments yet. Why don't you start the discussion?