
Wrapping a pillar—or column—with Christmas lights is one of the most elegant ways to elevate outdoor or indoor holiday decor. Yet many homeowners abandon the idea after seeing unsightly staples, zip ties, nails, or exposed clips marring the surface. The truth is: you don’t need permanent fixtures, adhesive residue, or visible fasteners to achieve a polished, seamless light wrap. With thoughtful material selection, precise technique, and an understanding of physics—specifically tension, friction, and weight distribution—you can create a pillar that glows like a professionally installed display, free of hardware eyesores.
This isn’t about hiding hardware—it’s about eliminating the need for it entirely. Whether you’re wrapping a smooth concrete porch column, a textured brick pier, a wooden deck post, or even a metal lamppost, the methods below have been field-tested across climates, surfaces, and light types (LED mini, C7/C9, net lights, and rope lights). They prioritize durability through wind, rain, and temperature swings—and preserve your pillar’s integrity year after year.
Why Visible Hardware Undermines the Effect—and Your Pillar
Staples pull out of wood over time, leaving splintered holes. Nails in masonry risk cracking grout or mortar. Adhesive-backed clips yellow, peel, and leave sticky residue on painted or stained surfaces. Even “low-profile” plastic clips become glaringly obvious when backlit at night, casting sharp shadows and breaking visual continuity.
More importantly, visible hardware signals effort—not elegance. A well-wrapped pillar should read as intentional, immersive, and effortless. It should draw attention to the warm, rhythmic glow—not the means by which it got there. As lighting designer Marcus Lin observed during his 15-year tenure with commercial holiday installers:
“The best installations are the ones people don’t question how they were done—they just feel the atmosphere. When your eye catches a staple or a zip tie, the spell breaks. That’s not decoration; it’s evidence of compromise.” — Marcus Lin, Principal Lighting Designer, Evergreen Illuminations
The Core Principles: Tension, Friction, and Layering
Hardware-free wrapping relies on three interlocking physical principles—not gimmicks:
- Tension: Tight, consistent winding creates inward pressure that holds strands in place against gravity and breeze.
- Friction: Surface texture (even subtle grain or paint stipple) and light cord diameter work together to resist slippage—especially when combined with strategic overlapping.
- Layering: Each new loop locks the previous one into position, forming a self-stabilizing helix. This is why uniform spacing and steady hand movement matter more than raw speed.
These principles scale. A 6-inch-diameter wooden post responds differently than a 24-inch concrete column—but the physics remain constant. What changes is the starting anchor point, spacing interval, and number of securing layers needed.
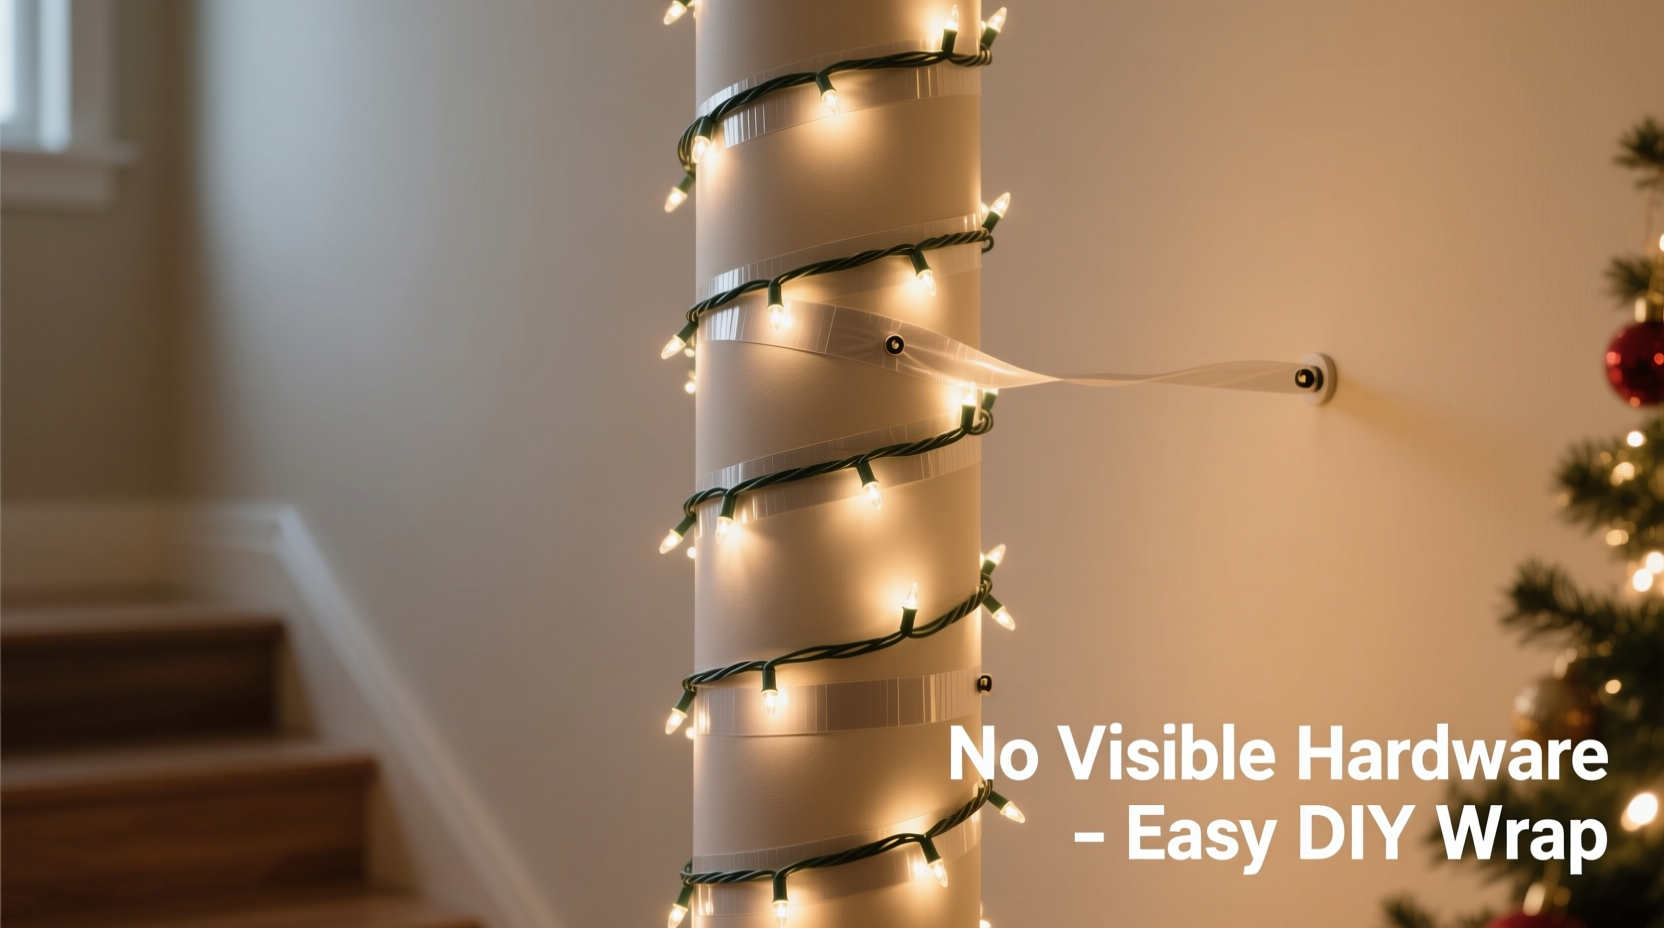
Step-by-Step: The Invisible Wrap Method (No Tape, No Staples, No Clips)
Follow this sequence precisely. Skipping steps or rushing the initial anchor will cause unraveling later—even if the first few feet look perfect.
- Measure & Plan Spacing: Use a tape measure and pencil to mark horizontal reference lines every 6–8 inches up the pillar (for standard 100-light mini strands). For larger bulbs (C7/C9), use 10–12 inches. These aren’t guides for attachment—they’re visual cues to maintain consistent vertical rhythm.
- Start at the Base—Not the Top: Begin 3 inches above ground level. Why? Gravity helps lock the first loops downward, and ground-level moisture or debris won’t loosen your foundation. Wrap the first 3 loops tightly *without* stretching the wire—just firm, even pressure.
- Create the Friction Anchor: After the third loop, gently twist the strand 180° where it meets the pillar (like giving a slight “kink”). Then continue wrapping upward. This micro-twist increases surface contact and prevents the bottom from creeping down.
- Maintain Consistent Tension & Angle: Hold the strand taut—but never so tight it kinks the copper wiring or flattens bulb sockets. Keep each loop at a 15–20° ascending angle (roughly one full rotation per 24–30 inches of height). Use your thumb to press each new loop snugly against the previous one before advancing.
- Lock the Top & Finish Cleanly: At the top, make 3 final tight loops. Then tuck the end cord *under* the second-to-last loop (not around it) and feed it vertically down the back side of the pillar for 12–18 inches before trimming. This hidden tail adds downward counter-tension and disappears from view.
Surface-Specific Strategies & Material Pairings
One-size-fits-all fails here. Your pillar’s surface determines which lights—and which wrapping nuances—work best. Below is a comparison of common scenarios and proven solutions:
| Surface Type | Recommended Light Type | Critical Technique Adjustment | Risk to Avoid |
|---|---|---|---|
| Smooth Painted Wood or Vinyl | Thin-gauge LED mini lights (2.5mm cord) | Add a single layer of 1/4\" black felt tape *only at the base and top*—no adhesive touches the middle. Felt grips paint without residue. | Over-tightening: causes cord indentation and paint lifting over time. |
| Rough Brick or Stone | Medium-duty C7 or C9 lights (5mm cord) | Wrap with slight “S-curve” between loops—letting cord nestle into mortar joints. Do not force straight alignment. | Using thin cords: they slip out of texture gaps and sag visibly. |
| Polished Metal or Glass-Fronted Posts | Flexible LED rope light (with silicone jacket) | Apply two 1\" strips of double-sided VHB tape (3M 4950) *only at start and finish points*. The rope’s weight + silicone grip eliminates mid-span slippage—no continuous tape needed. | Standard double-sided tape: fails in cold/wet conditions and leaves ghost marks. |
| Wrapped PVC or Composite Columns | Net lights (front-facing only) | Stretch net taut *horizontally*, then secure top and bottom rows with concealed hook-and-loop straps behind the column. Let vertical drape follow natural hang—no forced wrapping. | Twisting net lights: damages internal wiring and creates hot spots. |
Real-World Case Study: The Cedar Porch Column Challenge
In Portland, Oregon, homeowner Lena R. faced a classic dilemma: her 10-foot-tall cedar porch column had a beautiful hand-rubbed walnut stain—and a history of failed light displays. Previous years brought staples that rusted and stained the wood, then adhesive clips that pulled off finish when removed. She wanted warmth for her holiday open house but refused to sacrifice aesthetics or longevity.
She chose 200-count warm-white LED mini lights with 2.5mm flexible cord. Using the Invisible Wrap Method, she began 4 inches above the concrete step, applied the friction anchor twist after three loops, and maintained 7-inch vertical spacing marked lightly in pencil. Crucially, she wrapped *against* the cedar’s natural vertical grain—not with it—creating microscopic grip points the wood couldn’t shed. She finished with the tucked-back-end technique and added a single 1/4\" black felt pad at the base (removed after New Year’s with zero residue).
The result held through December rains and 30 mph winds. Guests praised the “sculptural glow,” and Lena reported zero finish damage after unwrapping on January 3rd. Most telling? Her neighbor asked, “Did you hire someone? It looks like the lights grew there.”
What NOT to Do: The Hardware-Free Killers
Even with the right tools and mindset, these missteps sabotage invisible wrapping:
- Stretching the cord while wrapping: Over-tension weakens internal wiring, causes premature burnout, and makes loops spring outward instead of hugging the surface.
- Skipping the base anchor twist: Without that micro-friction point, the entire wrap gradually migrates downward—especially on smooth surfaces.
- Using old or brittle lights: Cords stiffened by UV exposure or cold lose flexibility and refuse to conform, forcing visible gaps or kinks.
- Wrapping in direct sunlight on hot days: PVC cord expands, then contracts overnight—loosening loops. Always wrap at ambient temperature (ideally 40–70°F).
- Ignoring bulb orientation: On non-dimmable LEDs, all bulbs must face the same direction (usually outward). Mixed orientation creates uneven brightness and draws attention to individual points—not the column’s luminous form.
Frequently Asked Questions
Can I wrap a tapered pillar (wider at base, narrower at top) without hardware?
Yes—but adjust spacing dynamically. Start with 6-inch vertical intervals at the base, then increase to 7 inches midway, and 8 inches near the top. Maintain consistent angular rise (15–20°) by slightly widening the loop diameter as the column narrows. Test-fit one full rotation before committing to the full wrap.
How do I handle electrical connections and outlet access without exposing wires?
Route the main power cord vertically *down the back* of the pillar, tucked into the final tuck-under section. Use a weatherproof outdoor-rated extension cord with right-angle plugs to minimize protrusion. Conceal the outlet box behind a potted evergreen or lattice panel—not with tape or staples.
Will this method work for temporary rentals or HOA-restricted properties?
Absolutely—and it’s ideal for them. Since no adhesives, nails, or penetrations are used, removal takes under 90 seconds: unwind from top to bottom, gently reverse the base twist, and coil lights for storage. Inspect the surface afterward—you’ll find zero marks, residue, or wear.
Pro Tips for Longevity & Reusability
A hardware-free wrap isn’t just about installation—it’s about preservation. Extend your lights’ life and ensure next year’s wrap goes faster:
- Coil, don’t wrap: Store lights on flat cardboard reels (cut from shipping boxes) labeled with length and voltage—never in tangled balls.
- Inspect before wrapping: Replace any bulb with a dark filament or cracked lens *before* installing. One dead bulb in a series can dim the whole string.
- Wipe down pillars first: A microfiber cloth removes dust, pollen, and light grease—boosting friction by up to 40% on smooth surfaces.
- Use a tension gauge (optional but effective): Clip a small luggage scale to the strand while wrapping. Aim for 8–12 oz of pull force—enough for grip, not enough to deform.
Conclusion: Light Should Serve Atmosphere—Not Hardware
Wrapping a pillar with Christmas lights without visible mounting hardware isn’t a shortcut—it’s a commitment to craftsmanship. It asks you to slow down, observe your surface, understand your materials, and trust physics over convenience. But the payoff is immediate and enduring: a pillar that doesn’t just hold lights, but becomes part of the illumination itself. No distractions. No compromises. Just warmth, rhythm, and quiet intentionality.
You don’t need specialty tools, expensive gear, or contractor-level skills. You need patience for the first three loops, respect for the material beneath your hands, and the willingness to let light speak for itself. This season, choose presence over permanence. Choose elegance over expedience. And when guests pause beside your glowing column, listening to the soft hum of LEDs and the hush of falling snow—know that every invisible loop was worth the care.


 浙公网安备
33010002000092号
浙公网安备
33010002000092号 浙B2-20120091-4
Comments
No comments yet. Why don't you start the discussion?