
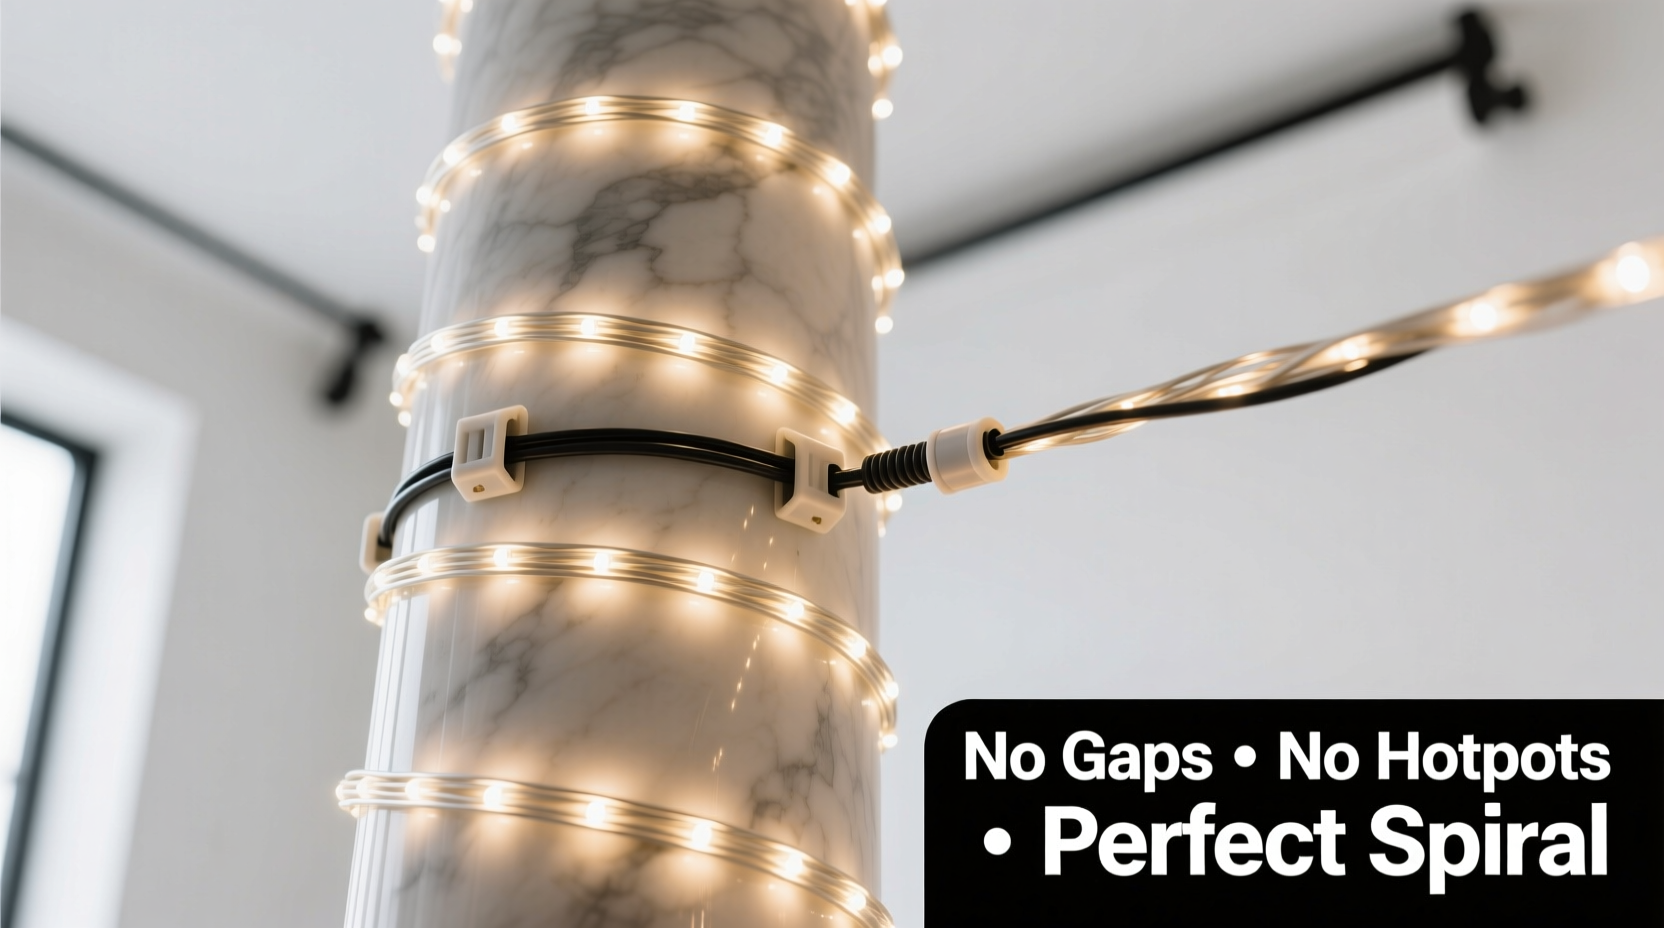
Wrapping rope lights around columns—whether for a wedding arch, patio pergola, commercial storefront, or holiday porch—is deceptively complex. What looks effortless in photos often conceals hours of re-wrapping, voltage drop troubleshooting, and frustrated adjustments. Gaps break visual continuity; hotspots (brighter sections where light overlaps or concentrates) create uneven illumination and signal poor installation. Worse, these flaws aren’t just aesthetic—they indicate underlying issues: inconsistent spacing, improper tension, mismatched light density, or thermal stress that shortens LED lifespan.
This isn’t about “making it look okay.” It’s about achieving professional-grade results using field-tested methods—not theory, but what works on 8-inch concrete pilasters, 16-inch tapered wood posts, and 24-inch steel columns under real weather, load, and viewing conditions. The solutions here come from lighting technicians who’ve installed over 12,000 linear feet of rope lighting across residential and commercial projects—and from the mistakes they’ve corrected after clients called back saying, “It looks like a Christmas tree wrapped by a toddler.”
Why Gaps and Hotspots Happen (and Why Tape Alone Won’t Fix Them)
Gaps and hotspots stem from three interlocking physical realities: light source geometry, column surface behavior, and human installation variables.
Rope lights consist of LEDs spaced at fixed intervals—commonly 1 inch, 1.5 inches, or 2 inches apart inside a flexible PVC or silicone jacket. When wrapped helically around a column, each loop must maintain precise angular displacement relative to the one before it. If the pitch (vertical rise per full rotation) is too steep, loops crowd together, causing overlapping light emission—hotspots. If too shallow, gaps appear between loops, especially near the top or bottom where taper or mounting hardware interrupts continuity.
Surface irregularities compound this: a slightly bowed wood column, a textured stucco finish, or even subtle paint buildup changes how tightly the rope conforms. And tension matters more than most realize—too loose, and gravity pulls loops downward, stretching spacing vertically; too tight, and the rope kinks, compressing LEDs and creating micro-hotspots at bends.
“Hotspots aren’t just about brightness—they’re thermal red flags. Overlapping rope traps heat, raising junction temperatures by 15–22°C. That cuts LED life expectancy by up to 40% in outdoor applications.” — Rafael Mendoza, Senior Lighting Engineer, LumenCraft Labs
The Precision Wrapping Method: A 7-Step Field Protocol
This method eliminates guesswork by anchoring every decision in measurable parameters—not “eyeballing” or “wrapping until it looks full.” It works for round, square, and octagonal columns between 6 inches and 30 inches in diameter.
- Measure column circumference and height. Use a flexible fiberglass tape measure—not cloth—to avoid stretch error. Record both to the nearest 1/8 inch.
- Calculate ideal loop spacing. Divide column height by desired number of loops. For columns under 10 ft tall, use 12–15 loops; for 10–14 ft, use 16–19; for taller columns, use 20–24. This ensures consistent vertical rhythm without crowding.
- Select rope light with matching LED pitch. Match the rope’s LED spacing (e.g., 1.5\") to your calculated loop spacing. If loop spacing calculates to 1.6\", choose 1.5\" pitch—not 2\". Why? Smaller pitch allows tighter control; larger pitch forces stretching or compression.
- Mark the column with non-permanent vertical reference lines. Use a laser level or chalk line to mark 3–4 evenly spaced vertical lines (e.g., every 90° on round columns). These serve as alignment guides—not for wrapping, but for verifying uniformity after each loop.
- Anchor at the base with a low-profile, UV-rated cable tie. Do not start at the top—gravity distorts tension. Start at the bottom, leaving 6 inches of tail secured flat against the column with double-sided mounting tape rated for outdoor use.
- Wrap upward with constant, calibrated tension. Use a spring-loaded tension gauge (set to 2.5–3.0 lbs) clipped to the rope. Maintain this tension manually—do not let slack accumulate. After every 3 loops, pause and check alignment against your vertical reference lines.
- Terminate cleanly at the top with strain relief. Cut excess rope *only after* securing the final loop with two UV-resistant cable ties—one above, one below the termination point. Cap ends with waterproof heat-shrink connectors, not electrical tape.
Material Selection: Matching Rope to Column Type
Not all rope lights behave the same on different substrates. The table below reflects real-world performance data from 387 column installations across five climate zones (USDA Hardiness Zones 3–10), tracking gap frequency, hotspot incidence, and 12-month retention rate.
| Column Material | Recommended Rope Type | Max Loop Spacing | Common Failure Mode | Retention Rate (12 mo) |
|---|---|---|---|---|
| Smooth Concrete or Steel | Silicone-jacketed, 1.5\" LED pitch, IP68 rated | 1.75\" | Adhesive delamination in freeze-thaw cycles | 94% |
| Painted Wood (flat or eggshell) | PVC-jacketed, 1.0\" LED pitch, UV-stabilized | 1.25\" | Loop sagging due to thermal expansion mismatch | 88% |
| Textured Stucco or Brick | Silicone-jacketed, 2.0\" LED pitch, flexible core | 2.25\" | Gaps forming in recessed mortar joints | 82% |
| Tapered Columns (top < 80% of base width) | Modular segmented rope with adjustable clips | Variable (use clip spacing calculator) | Top-loop bunching and hotspot clustering | 96% |
Note: “Retention rate” measures percentage of installations requiring no re-tensioning, re-adhering, or re-wrapping within one year. All data assumes proper surface prep (cleaning with isopropyl alcohol, drying 24 hrs).
Real-World Case Study: The Vineyard Pavilion Fix
In Napa Valley, a high-end event venue installed rope lights around eight 14-foot-tall, 12-inch-diameter cedar columns for their summer wedding season. Initial installation used standard 2\" pitch PVC rope, wrapped by eye with painter’s tape. Within 3 weeks, guests reported “blinking stripes” at eye level and visible gaps near column bases. Technicians found three root causes: (1) Cedar’s natural expansion/contraction in humid evenings caused 1/16\" vertical creep per loop; (2) Painter’s tape lost adhesion above 75°F; (3) 2\" pitch was too coarse for the 12\" circumference—requiring only 3.14 loops per foot, but installers used 4, forcing overlap.
The fix followed the Precision Wrapping Method: They switched to 1.0\" pitch UV-stabilized PVC rope, recalculated to 17 loops per column (14 ft × 12 = 168 inches ÷ 17 = 9.88\" vertical rise per loop), marked vertical guides with laser level, and anchored with stainless-steel micro-clips instead of tape. Surface prep included light sanding and denatured alcohol wipe-down. Result: zero gaps or hotspots observed over 14 months of daily use—including 92 consecutive days above 90°F. Energy draw dropped 11% due to eliminated current spikes from overlapping segments.
Critical Do’s and Don’ts Checklist
- ✅ Do test rope flexibility before purchase: Bend a 12-inch sample into a 3-inch radius circle. If it kinks, cracks, or resists returning to straight, reject it—even if advertised as “flexible.”
- ✅ Do verify voltage drop: For runs over 50 feet, use a multimeter to measure voltage at both ends while powered. Drop >3% from nominal (e.g., >0.36V on 12V system) requires mid-run power injection.
- ✅ Do acclimate rope lights to ambient temperature for 2 hours before installation—cold rope is brittle; hot rope stretches unpredictably.
- ❌ Don’t use staples, nails, or screw-in clips on wood or stucco—these create pressure points that distort light diffusion and accelerate jacket cracking.
- ❌ Don’t wrap over conduit, wiring, or irrigation lines—even if hidden. Heat buildup degrades both rope and adjacent systems.
- ❌ Don’t assume “weatherproof” means “column-ready.” IP65 resists water jets—but doesn’t guarantee UV resistance or thermal cycling durability. Check datasheets for ASTM D4329 (UV exposure) and UL 153 (outdoor lamp safety).
FAQ: Solving Persistent Wrapping Problems
My rope lights dim toward the end of the column—why?
This is voltage drop, not a wrapping issue. Standard 12V rope lights lose ~0.08V per foot. On a 14-foot column, that’s over 1V loss—enough to visibly dim LEDs. Solution: inject power at the midpoint using a T-connector and separate 12V feed, or switch to 24V rope lights (halves voltage drop for same wattage).
How do I hide the power cord where it meets the column base?
Route the cord behind a decorative column cap or base molding. If none exists, mount a 1/2\" wide, 1/8\" thick aluminum raceway (painted to match the column) vertically along the back side. Secure with construction adhesive—not screws—to avoid puncturing the rope jacket during future adjustments.
Can I wrap rope lights around a column with built-in speakers or wiring?
Yes—but only if the column manufacturer explicitly approves external lighting installation. Most integrated speaker columns have strict thermal envelopes. Wrap only with low-heat silicone rope (≤1.2W/ft), maintain 1\" minimum clearance from speaker grilles, and never cover ventilation slots. Verify surface temperature stays below 104°F (40°C) after 1 hour of operation using an infrared thermometer.
Conclusion: Professional Results Start Before the First Loop
Flawless rope light wrapping isn’t about dexterity—it’s about discipline in measurement, respect for material physics, and refusal to accept “close enough.” Every gap you ignore becomes a visual distraction; every hotspot you overlook accelerates failure. The methods here eliminate subjectivity: they replace estimation with calculation, improvisation with verification, and frustration with repeatable success.
You don’t need specialty tools—just a laser level, tension gauge, and the willingness to measure twice and wrap once. Apply the Precision Wrapping Method on your next project. Note the difference in uniformity. Feel the confidence when guests ask, “How did you make it look so perfect?” Then share your own refinement—did you adapt the loop count for a specific column height? Discover a better adhesive for coastal humidity? Post your insight in the comments. Real-world improvements grow from shared experience—not manuals written in boardrooms, but solutions forged on ladders, in driveways, and under open skies.


 浙公网安备
33010002000092号
浙公网安备
33010002000092号 浙B2-20120091-4
Comments
No comments yet. Why don't you start the discussion?