
Projection mapping a Christmas tree transforms a traditional holiday centerpiece into a dynamic, immersive experience—shifting colors, animating ornaments, simulating snowfall, or even telling a seasonal story—all without physical decorations. Unlike outdoor laser shows or pre-programmed LED strands, indoor projection mapping offers real-time control, infinite customization, and surprising accessibility for beginners. Yet many assume it requires expensive gear, coding skills, or professional AV training. It doesn’t. With under $300 in equipment and free open-source tools, anyone with basic tech literacy can project synchronized visuals onto a 6- to 7-foot live or artificial tree in their living room. This guide distills years of community-tested practice—from hobbyist forums to university media labs—into a grounded, no-jargon roadmap. We focus exclusively on *indoor* setups: ambient lighting conditions, typical ceiling heights, standard tree shapes, and realistic space constraints—not warehouse-scale installations.
Why Indoor Tree Mapping Is More Achievable Than You Think
Indoor environments offer distinct advantages over outdoor or large-venue projection mapping. Controlled lighting eliminates sun-wash concerns. Fixed mounting points (bookshelves, mantels, ceiling hooks) simplify projector positioning. And most importantly: Christmas trees are remarkably consistent in form—a conical silhouette with predictable branch density and surface texture. That consistency means you don’t need complex 3D scanning or photogrammetry. A well-placed projector and calibrated software can achieve compelling results using simple 2D warping and masking techniques.
Industry professionals confirm this shift in accessibility. “Five years ago, tree mapping meant renting a $5,000 projector and hiring a technician,” says Maya Lin, interactive media designer and instructor at RISD’s Digital Craft Lab. “Today, the bottleneck isn’t hardware—it’s clarity of intent. Beginners succeed when they start small: one color pulse, one gentle rotation, one animated star—then build outward. The magic is in the rhythm, not the resolution.”
Essential Gear: What You Actually Need (and What You Can Skip)
You do not need a high-lumen commercial projector or proprietary software. Here’s what delivers reliable results for under $350:
| Item | Minimum Requirement | Recommended Model (Budget-Friendly) | Why It Matters |
|---|---|---|---|
| Projector | 2,500+ lumens, native 1080p, keystone correction, HDMI input | Epson Home Cinema 1060 ($349) | Lumens ensure visibility against ambient light; native 1080p avoids upscaling blur; keystone correction saves critical setup time |
| Computer | Intel i5 / AMD Ryzen 5, 8GB RAM, dedicated GPU (GTX 1050 or better) | Refurbished Dell XPS 13 (2021 model, $420 used) | Real-time rendering demands GPU muscle—integrated graphics often stutter during animation playback |
| Mounting | Sturdy tripod or shelf placement (no ceiling mount required) | AmazonBasics Adjustable Tripod ($25) | Height and angle flexibility matter more than fixed mounts—trees vary in height and position |
| Cables | HDMI 2.0 cable (6 ft), extension cord with surge protection | Monoprice Certified HDMI 2.0 (6 ft, $12) | Poor cables cause flicker, audio sync loss, or blackouts mid-show |
| Tree | Artificial or real, full-cone shape, minimal dense inner foliage | N/A (use your existing tree) | Dense interior branches scatter light—opt for “slim” or “full” profiles over “bushy” varieties |
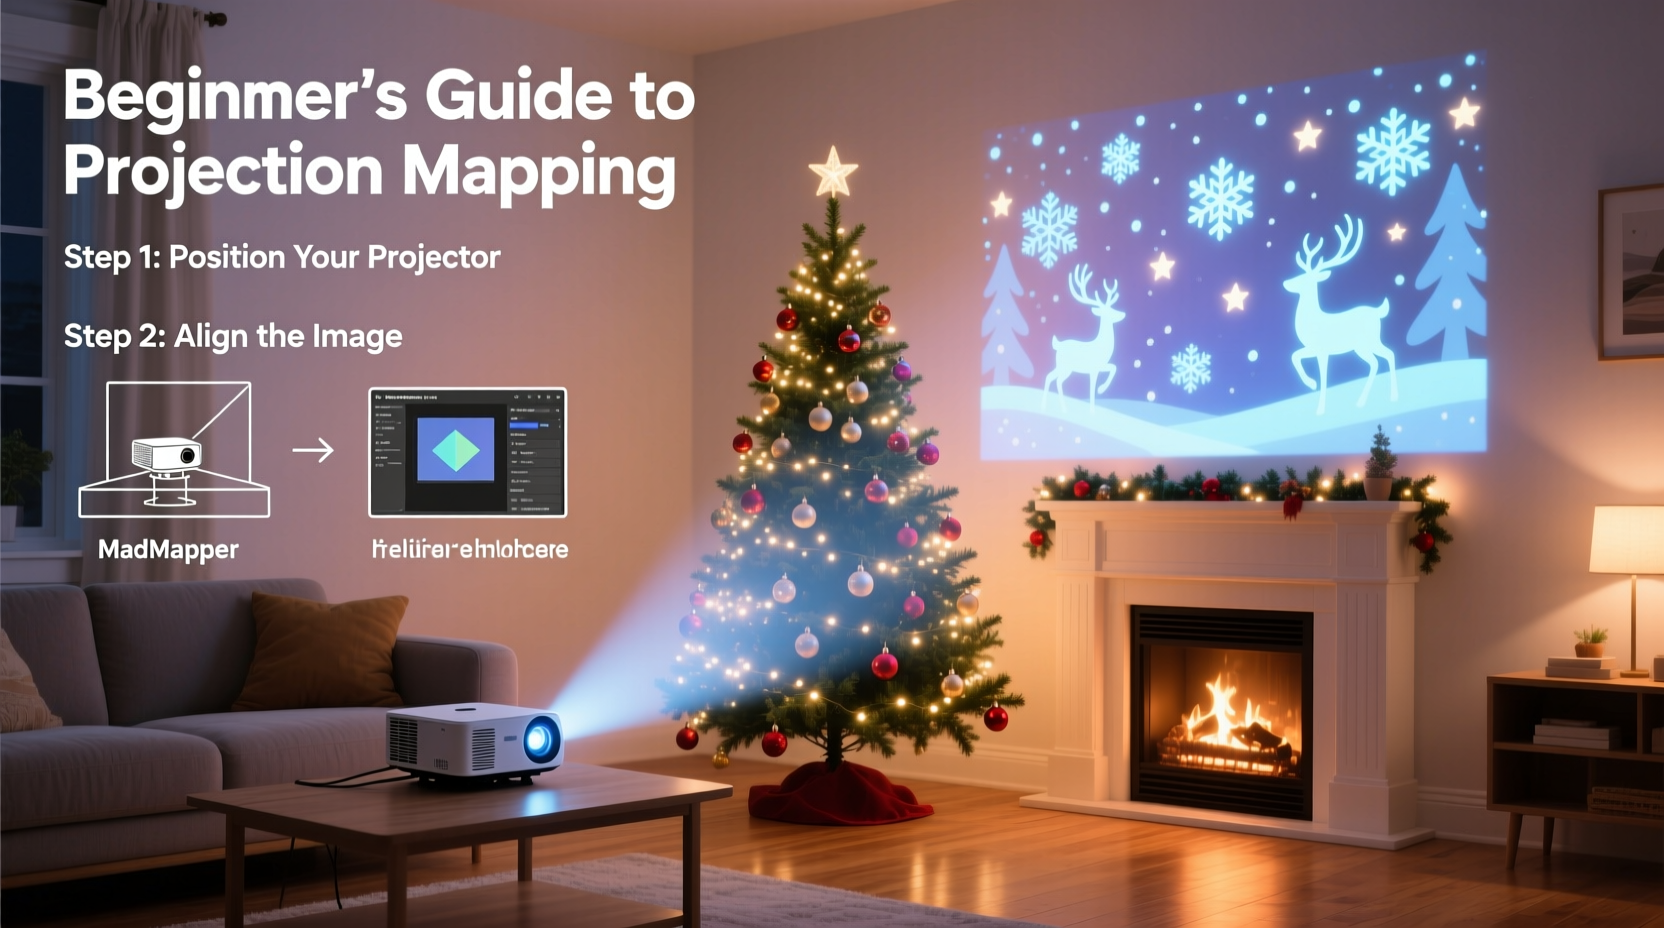
Your First Projection Session: A Step-by-Step Setup Timeline
This sequence takes 90 minutes max—including testing and adjustments. Follow it exactly the first time. Later, you’ll compress steps—but precision early builds confidence.
- Prep the Space (10 min): Turn off overhead lights. Close blinds. Clear a 3 ft × 3 ft floor area directly in front of your tree. Place your tripod 8–10 feet back from the tree base, centered horizontally. Adjust tripod height so projector lens sits at tree’s midpoint (roughly 3.5 ft high for a 7-ft tree).
- Connect & Power On (5 min): Plug projector into power and connect HDMI to laptop. Power on projector first, then laptop. Wait for full boot—do not skip this. Projector firmware needs 30 seconds to stabilize internal optics.
- Initial Projection (15 min): Display a plain white image. Use keystone correction (vertical only) to fit the rectangle tightly within the tree’s outer cone—top edge aligned with tip, bottom edge just above base stand. Do not crop with software yet. If keystone exceeds ±15°, reposition tripod closer/farther—excessive correction degrades sharpness.
- Masking & Warping (25 min): Open free software (see next section). Import your white test image. Draw a polygon mask matching the tree’s actual silhouette—include visible trunk and base. Then apply a gentle “cone warp”: pull top vertices inward slightly to match natural taper. Save preset as “Tree_Base_Warp”.
- Content Test (20 min): Load a simple animated .mp4 (e.g., slow color gradient loop). Play full-screen. Observe brightness uniformity. If lower branches appear dimmer, raise projector angle 2° and re-keystone. If tip glares, reduce projector brightness setting by 10% (not lamp mode—use menu brightness control). Record one 30-second video of your result for reference.
- Final Calibration (15 min): Dim room lights further. Run a black-level test video (solid black frame). Check for light bleed beyond masked edges—tighten mask if needed. Then play a high-contrast animation (e.g., white star pulses on black). Confirm crisp edges and smooth motion. Your setup is ready.
Free Software That Works—And How to Use It Right
Paid platforms like MadMapper or Resolume Arena offer polish—but their learning curves and subscription fees stall beginners. Three free tools deliver professional-grade output with intuitive workflows:
- MapMap (macOS/Windows, open-source): Designed specifically for object-based mapping. Drag-and-drop masking, real-time preview, and built-in holiday templates (snowfall, ornament spin, candle flicker). Best for absolute beginners.
- VDMX (macOS only, freemium): Free version includes full mapping engine. Steeper initial curve but unmatched real-time control—ideal if you plan to add music sync later.
- TouchDesigner (Windows/macOS, free non-commercial license): Industry-standard for generative visuals. Overkill for static effects, but unbeatable for custom snow physics or reactive audio visuals. Requires basic node logic—start with pre-built “Christmas Tree” example files.
Avoid these common software pitfalls:
- Don’t render animations at 4K: Your projector outputs 1080p. Exporting at 4K wastes GPU resources and causes playback stutter. Stick to 1920×1080, H.264, 30fps.
- Don’t use JPEG sequences: They introduce frame timing drift. Always use MP4 or MOV containers with constant frame rate.
- Don’t ignore gamma settings: Set software gamma to 2.2 (standard for indoor displays). Incorrect gamma flattens contrast and dulls red/green tones critical for holiday palettes.
Mini Case Study: The Johnson Family’s First-Year Success
The Johnsons—a couple in Portland with two young children—tried projection mapping last December with zero technical background. Their living room has low ceilings (7.5 ft), north-facing windows (minimal daylight), and a 6.5-ft artificial Noble Fir. They spent $312 on an Epson 1060, a refurbished MacBook Air (M1, 8GB), and a basic tripod. Using MapMap’s tutorial videos, they completed setup in 72 minutes—not including coffee breaks.
They started with three 10-second clips: a slow gold-to-red fade, a gentle “snowfall” particle effect, and a rotating silver star. Each played on loop via VLC’s playlist function (no advanced software needed). Their breakthrough insight? Timing mattered more than complexity. They discovered that switching between clips every 45 seconds—using a simple phone timer—created the illusion of a curated, evolving show. Neighbors reported seeing “different lights every time they walked past the window.” By New Year’s Eve, their kids were choosing which animation played during bedtime stories. This year, they’re adding audio-reactive pulsing using VDMX’s free FFT analyzer—proof that momentum builds fast once fundamentals click.
Do’s and Don’ts: Critical Habits for Consistent Results
| Do | Don’t |
|---|---|
| Use matte-finish ornaments (glass or frosted plastic) — they reflect light evenly | Hang shiny metallic baubles—they create hotspots and glare that break immersion |
| Position projector on same side as your main seating area—viewing angle affects perceived brightness | Place projector behind the tree or at extreme side angles—light scatters, warping becomes unstable |
| Run a 5-minute “burn-in” test before guests arrive—heat stabilizes projector optics and reveals thermal drift | Start projecting 30 seconds before guests enter—unstable initial frames look unpolished |
| Keep spare HDMI cable and power strip nearby—connection failures happen most during peak usage | Assume your laptop battery will last 2+ hours—always plug in; power dips cause frame drops |
| Label your saved presets clearly: “Tree_Warm_White_Fade”, “Tree_Snow_Slow”, etc.—avoid generic names like “proj1” | Save over original project files—always use “_v2”, “_final”, or date stamps |
FAQ: Answering Real Beginner Questions
Can I project onto a real (live) Christmas tree?
Yes—but with caveats. Live trees have variable needle density and moisture levels. Avoid spraying water or mist near the projector lens. More critically: pine resin vapor can coat lenses over multi-day use. Wipe lens gently with microfiber cloth daily. Also, real trees shed—place a dark cloth beneath the base to catch debris and prevent slip hazards near cables.
My tree looks washed out—even with brightness maxed. What’s wrong?
Three likely causes: (1) Ambient light spill—check for reflections off mirrors, glass tables, or white walls behind the tree; drape those surfaces with dark fabric. (2) Projector lamp aging—if unit is >2 years old, lamp output may have dropped 30–40%. Replace lamp or rent a newer model. (3) Incorrect color profile—ensure software and OS display settings both use sRGB (not Adobe RGB or DCI-P3).
Do I need special content—or can I use YouTube videos?
You can repurpose YouTube videos—but download them legally (via YouTube’s own download option for offline viewing) and convert to MP4 using HandBrake (free). Avoid copyrighted music tracks unless you hold rights. Better: use royalty-free holiday loops from Pixabay Audio or FreePD. For best results, edit clips to exact 10- or 15-second durations—this creates rhythmic predictability your audience subconsciously enjoys.
Conclusion: Your Tree Is Ready—Now Make It Meaningful
You now hold everything needed to turn light into memory. Not flashy spectacle—authentic, warm, human-centered moments: the quiet awe on a child’s face as snowflakes swirl across pine boughs; the shared laughter when a projected reindeer “nudges” a real ornament; the calm focus of a parent watching light breathe softly through branches after a long day. Projection mapping isn’t about replacing tradition—it’s about deepening it. Every adjustment you made—the tripod height, the mask refinement, the careful gamma tweak—was an act of attention. And attention, especially during the holidays, is the rarest gift of all.
Start tonight. Not “when you have more time.” Not “after the decorations go up.” Plug in the projector. Load one gradient. Watch how light finds its way through the spaces between branches—and how those spaces, once empty, now hold meaning. Share your first result. Tag someone who’d appreciate the glow. Leave a comment below with your biggest surprise, your first “aha” moment, or the song you’ll pair with your first animation. Because the most beautiful projections aren’t measured in lumens—they’re measured in shared presence.


 浙公网安备
33010002000092号
浙公网安备
33010002000092号 浙B2-20120091-4
Comments
No comments yet. Why don't you start the discussion?