
Clutter in the car isn't just unsightly—it's a safety hazard. Loose pens, tangled cords, forgotten receipts, and snack wrappers can make driving stressful and distracting. While organizers and storage bins exist, they often come with a price tag and may not fit perfectly in every vehicle. But what if one of the simplest household items could transform your car’s interior? Enter: the humble tissue box.
Familiar, lightweight, and universally available, tissue boxes are more than just packaging—they're versatile organizers waiting to be repurposed. With a little creativity, you can turn them into custom storage solutions that keep essentials within reach and chaos at bay. This guide explores practical, cost-effective, and surprisingly elegant ways to use tissue boxes to declutter your car and enhance your daily drive.
Why Tissue Boxes Work as Car Organizers
Tissue boxes are uniquely suited for automotive organization due to their size, rigidity, and open-top design. Most are made from sturdy cardboard that holds its shape, even when loaded with small items. Their rectangular footprint fits neatly into door pockets, under seats, or behind headrests. The open top allows for quick access—no zippers or flaps to fumble with while driving.
Unlike plastic containers, tissue boxes are easy to modify. You can cut, fold, paint, or tape them without special tools. They’re also disposable or recyclable, making them ideal for temporary or seasonal setups. Whether you drive a compact sedan or a spacious SUV, there’s a tissue box solution tailored to your needs.
“Sometimes the most effective organizational tools aren’t bought—they’re already in your pantry.” — Jordan Lee, Automotive Lifestyle Consultant
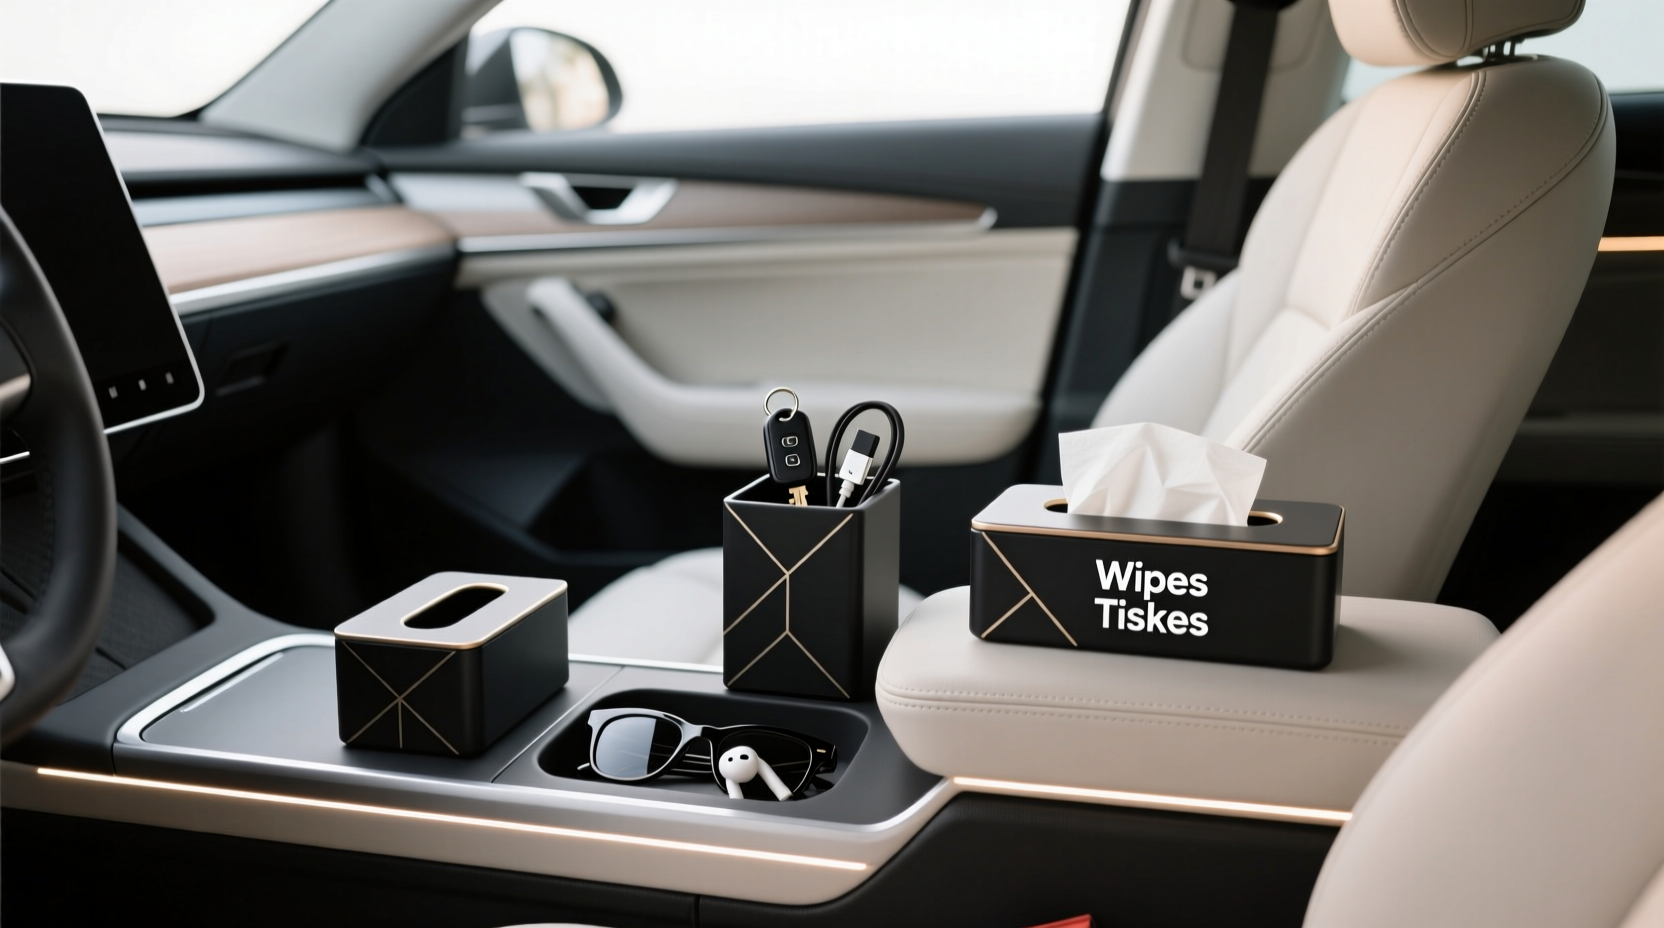
5 Creative Uses for Tissue Boxes in Your Car
1. Door Pocket Organizer
Most cars have shallow door pockets that swallow up phones, sunglasses, and keys. A standard tissue box fits snugly in many of these spaces. Remove the tissues, reinforce the bottom with duct tape for durability, and stand it upright inside the pocket.
- Store pens, lip balm, hand sanitizer, or parking tickets vertically for easy visibility.
- Use washi tape to label sections if you’ve modified the interior with dividers.
- For added protection, line the inside with fabric or contact paper.
2. Seat-Back Storage for Kids
Parents know how quickly backseats become junk zones. Attach a tissue box to the back of a front seat using zip ties or Velcro straps through the handle holes (if present). This creates an instant activity station.
Kids can store crayons, small books, headphones, or travel games. For extra stability, place a non-slip mat between the box and the seat. Choose brightly colored boxes or let children decorate them to encourage tidy habits.
3. Center Console Cable Management
Chargers, earbuds, and power banks often tangle in consoles. Place a tissue box on its side near the console or armrest compartment. Feed charging cables through the opening so only the tips are exposed.
This prevents tangling and keeps cords dust-free. Label each cable by wrapping a small tag around the plug or using colored tape. When not in use, retract the cord back into the box.
4. Emergency Kit Holder
Instead of scattering emergency items across the glovebox and trunk, consolidate them in a reinforced tissue box stored under a passenger seat. Include:
- Flashlight
- Bottled water tabs or mini purification tablets
- Whistle
- First-aid bandages
- Reflective vest
- Energy bar samples
Wrap the exterior in waterproof tape or laminated paper to protect against moisture. Use a permanent marker to write “Emergency Only” on the side.
5. Trash and Recycling Separator
Prevent litter buildup by designating a tissue box as a temporary trash bin. Line it with a small grocery bag or compostable sack. Mount it using adhesive hooks or rest it on the floor behind the front seat.
For eco-conscious drivers, create two compartments: cut a divider down the middle to separate recyclables from general waste. Replace the inner liner weekly or after long trips.
Step-by-Step Guide: Transforming a Tissue Box into a Car Organizer
- Gather Supplies: Empty tissue box, scissors, duct tape or packing tape, ruler, fabric scraps or contact paper (optional), markers for labeling.
- Reinforce Structure: Tape all seams and the bottom flap for durability. Double-layering prevents sagging when filled.
- Customize Size: Measure your target space (e.g., door pocket depth). Trim the box height accordingly using straight cuts.
- Add Dividers (Optional): Cut cardboard strips to create compartments. Tape them vertically inside the box to separate items like coins, toll passes, and pens.
- Waterproof It: Wrap exterior edges with clear packing tape or apply a coat of Mod Podge for spill resistance.
- Label Clearly: Use stickers or permanent markers to identify contents—especially useful for shared vehicles.
- Install Securely: Place in designated spot. For moving parts, secure with non-damaging adhesive putty or seatbelt-strapped loops.
Do’s and Don’ts: Maximizing Tissue Box Utility
| Do’s | Don’ts |
|---|---|
| Reinforce the bottom with tape to prevent collapse | Overload the box beyond its structural limit |
| Use washable liners for food or messy items | Leave flammable materials like aerosols inside |
| Rotate contents monthly to avoid forgotten clutter | Place near direct sunlight for extended periods (can warp cardboard) |
| Decorate with non-toxic paints for personalization | Block air vents or obstruct driver movement |
Real-Life Example: Sarah’s Commute Upgrade
Sarah, a nurse and mother of two, used to dread her 45-minute commute. Her car was littered with loose gloves, granola bar wrappers, and misplaced phone chargers. After reading about DIY car hacks, she tried repurposing old tissue boxes.
She placed one in each door pocket—one for sanitizers and lip balms, another for pens and sticky notes. A third, decorated by her daughter, hung behind the passenger seat with crayons and coloring books. Within a week, she noticed less stress during drives and faster cleanup after drop-offs.
“It sounds silly,” she said, “but having everything in little labeled boxes made me feel more in control. I’m not digging under seats anymore—I actually enjoy my drive now.”
Checklist: Launch Your Tissue Box Car Organization System
- ☐ Identify three clutter-prone areas in your car
- ☐ Collect 3–5 empty tissue boxes
- ☐ Reinforce each box with tape
- ☐ Measure and trim boxes to fit designated spaces
- ☐ Assign a purpose to each organizer (e.g., snacks, documents, cables)
- ☐ Label clearly for quick identification
- ☐ Install securely and test accessibility while seated
- ☐ Review and refresh contents every two weeks
Frequently Asked Questions
Can tissue boxes withstand heat inside a car?
Cardboard can warp in extreme heat, especially above 100°F (38°C). To minimize risk, avoid placing tissue box organizers on dashboards or in direct sunlight. Use UV-resistant tape or store them out of sun exposure when possible. For hotter climates, consider switching to plastic containers seasonally.
Are tissue box organizers safe during sudden stops?
If left unsecured, any loose object—including tissue box organizers—can become a projectile. Always anchor them using non-slip mats, adhesive pads, or placement in confined spaces like door pockets. Never place them on the dashboard or where they could slide into foot pedals.
Can I recycle the boxes after use?
Absolutely. Once worn out or no longer functional, remove any tape or liners and flatten the box for recycling. If covered in waterproof coatings, check local guidelines—some laminated cardboard isn’t accepted curbside.
Final Thoughts: Small Changes, Big Impact
Organizing your car doesn’t require expensive accessories or major overhauls. Sometimes, the best solutions come from overlooked corners of your home. By reimagining tissue boxes as functional organizers, you gain accessible storage, reduce visual noise, and reclaim mental clarity on the road.
The beauty of this system lies in its simplicity and adaptability. Try one box today—maybe in your driver’s door or under the passenger seat—and observe the difference. Chances are, you’ll want to add more. Before long, your car will reflect intentionality, efficiency, and peace of mind.


 浙公网安备
33010002000092号
浙公网安备
33010002000092号 浙B2-20120091-4
Comments
No comments yet. Why don't you start the discussion?