
When you take a selfie using your iPhone, the front-facing camera shows you a mirrored preview—meaning your left appears on the right, just like in a bathroom mirror. But after you snap the photo, the final image is flipped back to normal orientation. This can be disorienting. Suddenly, your hair part is on the opposite side, text appears backward, and your face seems subtly \"off.\" You're not imagining things. The iPhone camera mirror effect is real, intentional, and rooted in both design logic and user psychology. Understanding why this happens—and how to control it—can save you time, confusion, and frustration every time you capture a self-portrait.
The Science Behind the Mirror Effect
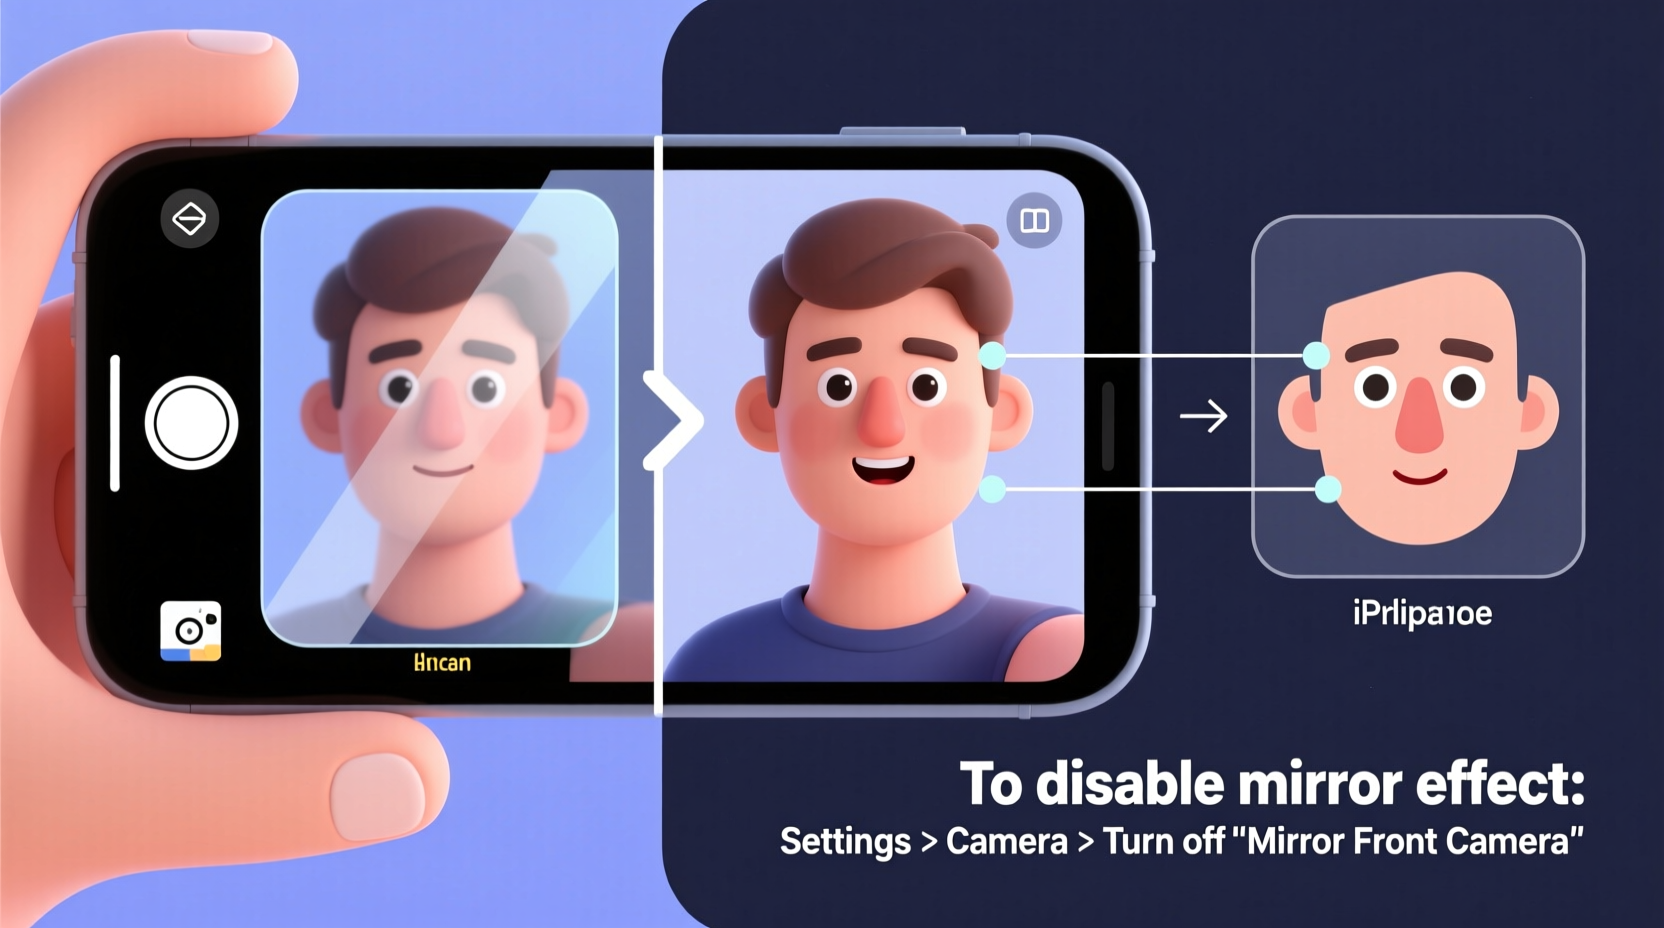
When you look in a physical mirror, your reflection reverses left and right. Your brain adapts to this over time, so when you see yourself in a mirror, you recognize your appearance instantly—even though it's reversed. Apple replicates this experience in the iPhone’s front-facing camera by showing a mirrored live preview. This makes movements feel intuitive: if you raise your right hand, the person on screen raises what appears to be their right hand too. Without this mirroring, the preview would feel unnatural, like watching someone else mimic you with delayed reactions.
However, when you actually take the photo, iOS captures the scene as others see you—not as you see yourself in the mirror. This means the saved image is no longer mirrored. To most users, this feels like the camera “flipped” their selfie, but technically, it was never meant to stay reversed. The final photo represents reality: how friends, family, and cameras perceive you in daily life.
“People are accustomed to their mirrored selves—the version they see brushing their teeth or applying makeup. When that changes in photos, it triggers mild cognitive dissonance.” — Dr. Lena Patel, Cognitive Psychologist specializing in self-perception
Why Apple Designed It This Way
Apple didn’t implement the mirror effect randomly. It’s a deliberate user experience decision based on decades of human-computer interaction research. The goal is to make real-time interaction with the camera feel natural. Consider these key reasons:
- Familiarity: Users expect mirrors to reverse their image. Seeing a non-mirrored live feed would feel alien and disrupt muscle memory (e.g., adjusting hair or glasses).
- Usability: For tasks like applying makeup, checking outfits, or framing a video call, a mirrored view helps users correct asymmetries more intuitively.
- Consistency: Most smartphones use this same behavior. Deviating from the norm could confuse new users.
Still, many users remain unaware that the captured photo differs from the preview. This disconnect leads to surprise when reviewing images later—especially if they’re posting online or sending them to others.
How to Fix or Work Around the Mirror Effect
You can't disable the mirrored preview in the default Camera app, but several strategies let you control or eliminate the flipping issue depending on your needs.
Option 1: Use the Front Camera in Photo Mode and Flip Manually
If you want full control, take the photo normally and flip it afterward using editing tools.
- Open the Camera app and switch to the front-facing camera.
- Take your selfie (preview is mirrored, output is not).
- Go to Photos, open the image, tap Edit, then tap the crop icon.
- Select the flip horizontal option (represented by two opposing arrows).
- Tap Done to save the mirrored version.
This gives you the \"mirror look\" in your final image—the way you saw yourself during capture.
Option 2: Use Third-Party Camera Apps
Some third-party apps allow you to disable mirroring entirely or offer a true mirror mode for both preview and capture. Popular options include:
- Halide Mark II: Offers professional controls including mirror settings.
- ProCamera: Allows toggling between mirrored and non-mirrored modes.
- Instagram or Snapchat: These apps often keep the preview and output consistent for Stories, reducing confusion.
These apps bypass Apple’s default behavior and give creators more flexibility, especially for content creators who need predictable framing.
Option 3: Use Portrait Mode or Video Mode Strategically
In some cases, the mirror effect behaves differently across modes. For example:
| Mode | Mirrored Preview? | Saved Image Flipped? | Notes |
|---|---|---|---|
| Photo (Front Camera) | Yes | No | Standard behavior; saved image matches real-world view |
| Portrait Mode | Yes | No | Same as regular photo mode |
| Video Recording | Yes | No | Final video is not mirrored |
| Slo-Mo / Time-Lapse | Yes | No | All front-camera recordings follow same rule |
| Rear Camera | No | No | Never mirrored; shows accurate orientation |
Knowing these differences helps avoid surprises when switching between modes.
Mini Case Study: The Influencer Who Lost Followers Over a Logo Mix-Up
Jamie Rivera, a lifestyle influencer with 85K Instagram followers, once posted a selfie wearing a custom jacket with her brand name embroidered on the chest. In the photo, the text appeared backward. Fans noticed immediately. Comments flooded in: “Is your brand name spelled wrong?” “Did you flip the image?” “Are you trying to be cryptic?”
Jamie hadn’t realized the front camera reversed the preview. She composed the shot carefully, ensuring the logo faced forward in the mirror-like display—but forgot the final image would correct the orientation. By the time she caught the error, the post had thousands of views and dozens of confused replies.
She deleted the post, retook the photo using a third-party app with consistent mirroring, and added a lighthearted caption explaining the mistake. While she regained goodwill, the incident taught her a crucial lesson: always verify how text and asymmetrical elements appear in the final output, not just the preview.
Checklist: Avoiding Mirror-Related Mistakes
Follow this simple checklist every time you plan to share a front-camera selfie:
- ✅ Test the final image by taking a quick shot and reviewing it in Photos.
- ✅ Check for reversed text, jewelry, or hairstyle parts.
- ✅ Use a third-party app if consistent mirroring is essential.
- ✅ Flip the image manually if you prefer the mirrored look.
- ✅ Disable filters or edits until orientation is confirmed.
- ✅ For professional content, shoot with the rear camera held at face level (non-mirrored, accurate).
FAQ: Common Questions About the iPhone Selfie Flip
Why does my iPhone flip selfies but my Android doesn’t?
Most modern Android phones behave similarly—they show a mirrored preview but save a non-mirrored photo. However, some Android manufacturers allow users to change this setting directly in the camera app. iPhones do not offer this toggle natively, which makes the behavior feel less transparent.
Can I turn off the mirror effect permanently on iPhone?
No, there is no built-in setting in iOS to disable the mirrored front-camera preview. Apple maintains this behavior across all devices for consistency. However, third-party apps can override this behavior, giving you full control over mirroring.
Is the mirror effect the same in FaceTime and Zoom?
Yes, video calling apps typically mirror your video feed during the call to simulate a mirror-like experience. However, when someone screenshots your video, they capture the unmirrored version—just like a regular photo. This can lead to similar confusion if you’re wearing text-based clothing or have asymmetrical styling.
Expert Insight: What Photographers Know That Most Don’t
Professional photographers often point out that everyone sees you non-mirrored in real life. The version of your face that feels “strange” in iPhone photos is actually how people around you perceive you every day.
“The discomfort people feel when seeing their non-mirrored photo isn't about accuracy—it's about familiarity. You've spent years looking at your mirror twin. But the flipped version? That’s the real you.” — Marcus Tran, Portrait Photographer & Visual Storyteller
Over time, frequent selfie-takers tend to adapt. They begin recognizing their non-mirrored appearance as normal. Some even prefer it because it eliminates the mental translation between mirror and camera.
Step-by-Step Guide: How to Get a True Mirror Selfie on iPhone
If you want your saved photo to match exactly what you see in the preview (a true mirror image), follow these steps:
- Open the Camera app and ensure you’re using the front-facing camera.
- Frame your shot as desired. Remember: this preview is mirrored.
- Take the photo. The saved image will now be flipped to real-world orientation.
- Open the Photos app and select the image you just took.
- Tap Edit, then tap the crop icon (two overlapping squares) in the toolbar.
- Tap the flip horizontal button (arrows pointing left and right).
- Tap Done to save the mirrored version.
Now your photo matches the preview you saw while taking it. This method works for all iPhone models running iOS 13 and later.
Conclusion: Master the Mirror, Own Your Image
The iPhone camera mirror effect isn’t a bug—it’s a feature designed to make real-time interaction feel natural. But without awareness, it can lead to embarrassing mistakes, branding errors, or simple frustration. By understanding how and why the flip occurs, you gain control over your digital self-presentation. Whether you choose to embrace the real-world orientation or manually mirror your selfies for consistency, the power is in your hands.


 浙公网安备
33010002000092号
浙公网安备
33010002000092号 浙B2-20120091-4
Comments
No comments yet. Why don't you start the discussion?