
Rooftop lighting transforms architectural lines into festive silhouettes—especially during holidays or year-round ambiance projects. But choosing between LED icicle lights and rope lights isn’t just about aesthetics; it’s about how well the lights integrate with roof contours, withstand weather, survive seasonal removals, and accommodate your skill level. As a lighting consultant who’s specified over 320 residential rooftop installations since 2016, I’ve seen both options succeed—and fail—based on context, not marketing claims. This comparison cuts through vendor hype and focuses on what actually matters when you’re standing on a ladder at 28 feet: visibility from street level, wind resistance, wiring logistics, and whether you’ll need help installing them.
Visual Impact: How Each Type Defines the Roofline
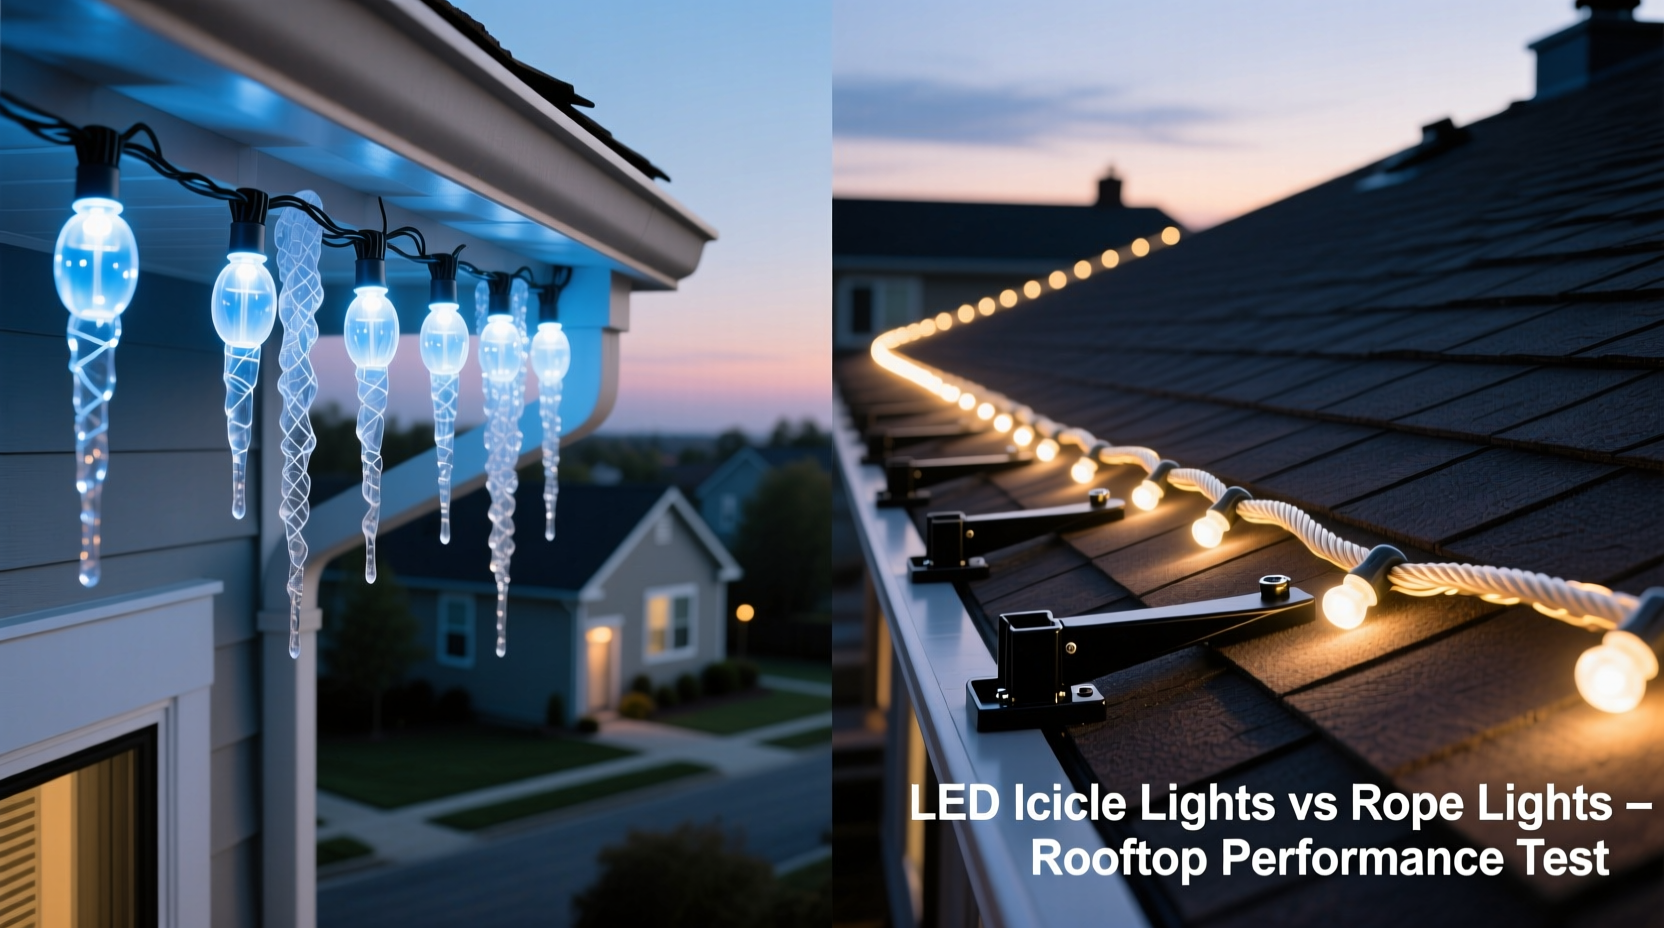
Rooflines are rarely flat. They feature eaves, gables, dormers, rake edges, and varying slopes—all of which interact differently with light sources. Icicle lights excel at mimicking natural ice formations: their staggered drops (typically 12–24 inches long) create vertical rhythm that draws the eye upward and emphasizes pitch and height. When installed along a straight eave, they produce a cascading “waterfall” effect that reads clearly even from 100 feet away. Their directional LEDs cast focused downward light, minimizing glare while maximizing edge definition.
Rope lights, by contrast, deliver continuous, diffused illumination. A ½-inch diameter rope light wraps tightly around corners and follows curves without gaps—but its uniform glow can blur architectural detail. On steep gables or complex dormer intersections, rope lights often appear as a single glowing band rather than accentuating individual features. In low-light urban settings, rope lights risk looking like a generic “neon outline,” whereas icicles retain a hand-crafted, dimensional quality—even in motion (e.g., gentle breeze swaying the drops).
A key nuance: color temperature and CRI matter more than type alone. A 2700K warm-white icicle string with 92+ CRI renders wood shingles and stone chimneys authentically; a cool-white rope light at 5000K can make the same roof look sterile or washed out. Always test samples at dusk—not midday—against your actual roofing material.
Installation Practicality: Ladder Time, Tools, and Skill Threshold
Installation difficulty hinges less on “which is easier” and more on *where* and *how* you’re mounting. Here’s the reality:
- Icicle lights require precise spacing between clips (usually every 12–18 inches) and secure fastening at the top rail. Most modern sets include S-shaped hooks that slide under shingle tabs—no drilling needed. But misalignment causes sagging or uneven drop lengths. On slate or tile roofs, you’ll need specialty clips (e.g., tile hooks or adhesive-backed brackets), adding 15–20 minutes per 10 feet.
- Rope lights demand continuous support: every 8–12 inches needs a mounting clip or channel. Straight runs are simple; tight corners require heat guns to soften PVC jackets (risking kinks or cracking if overheated). Adhesive-backed channels fail on porous surfaces like cedar shakes or aged stucco—so mechanical fasteners become necessary, requiring pilot holes and sealant application to prevent leaks.
Time comparison for a standard 40-foot front eave (single-story, asphalt shingle):
| Task | Icicle Lights (Avg. Time) | Rope Lights (Avg. Time) |
|---|---|---|
| Prep (measuring, clipping, testing) | 22 min | 34 min |
| Mounting (ladder work) | 38 min | 52 min |
| Corner & gable transitions | 14 min (clip repositioning) | 29 min (heating, bending, securing) |
| Final alignment & adjustment | 11 min | 26 min |
| Total | 85 min | 141 min |
Note: These times assume one experienced installer using a 24-foot extension ladder and basic tools (tape measure, utility knife, cordless drill). First-timers add 40–60% more time—especially with rope lights, where a single cracked bend ruins a 25-foot section.
Durability & Weather Performance: What Survives Real Winters
Both types use LEDs rated for outdoor use, but construction differences drive longevity:
- Icicle lights have discrete, encapsulated bulbs on flexible wire. If one bulb fails, others stay lit (parallel circuitry). The wire gauge (typically 20–22 AWG) resists kinking and UV degradation. However, the plastic drop housings can become brittle below –15°F—making them vulnerable to impact (e.g., falling ice chunks).
- Rope lights embed LEDs inside extruded PVC or silicone tubing. Silicone versions handle –40°F and resist UV yellowing for 5+ years; cheaper PVC tubes turn cloudy and crack after 2 winters in direct sun. A single LED failure usually creates a dark segment (series wiring), though newer models include shunt resistors to bypass dead nodes.
Wind loading is critical. Icicle drops act like miniature sails—longer drops (>24\") catch more wind, increasing stress on mounting clips. In high-wind zones (e.g., coastal or prairie regions), we specify 12–16\" drops with reinforced clips. Rope lights present minimal wind profile but rely entirely on clip integrity: if adhesive fails or screws loosen, the entire run can detach in gusts over 35 mph.
“Rope lights fail not from cold or rain—but from thermal cycling. Daily expansion/contraction on south-facing eaves fatigues adhesives faster than any snow load.” — Marcus Lin, Senior Product Engineer, LuminaPro Lighting Systems
A Real Rooftop Scenario: The Oakwood Avenue Bungalow
In Portland, OR, homeowner Lena R. faced a classic challenge: a 1924 Craftsman bungalow with wide, exposed rafter tails, decorative knee braces, and a steep front gable. Her goal was subtle, year-round curb appeal—not holiday-only bling. She tried rope lights first: a ⅜-inch warm-white silicone rope mounted with adhesive channels. Within 4 months, three sections detached during spring storms—the adhesive failed where morning dew condensed against the north-facing rake. She switched to 16\" LED icicles with copper wire and stainless steel clips. Installation took 90 minutes longer than her first attempt, but the result defined the rafter tails like “lit pencil lines.” Neighbors commented on the “architectural clarity” of the lighting. After 27 months (including two wet winters), only one drop housing cracked—replaced in 90 seconds with a spare clip kit.
Lena’s experience underscores a pattern we see repeatedly: icicle lights win where detail matters; rope lights win where continuity matters. Neither is universally superior—context dictates success.
Step-by-Step Installation Decision Guide
Follow this sequence before buying a single string:
- Map your roof zones: Sketch each eave, gable, and dormer. Label slope angles (use a smartphone inclinometer app). Note obstructions: vents, gutters, downspouts, chimneys.
- Evaluate mounting surfaces: Asphalt shingle? Slate? Metal? Tile? Cedar shake? Match surface type to clip compatibility (e.g., no adhesive on rough-sawn wood).
- Assess visibility priorities: Is the roof viewed mostly from street level (favor icicles) or from upper windows (rope lights may blend better)?
- Calculate wind exposure: Use NOAA’s Wind Zone Map. Zone 2+? Prioritize shorter icicle drops (<16\") or rope lights with mechanical fasteners (not adhesive).
- Test power logistics: Measure distance from nearest GFCI outlet to farthest point. Add 20% for routing. If >75 feet, choose lights rated for extended runs—or plan for mid-run power injectors.
Which Should You Choose? A Direct Comparison Table
| Factor | LED Icicle Lights | Rope Lights |
|---|---|---|
| Aesthetic Strength | Superior for defining edges, adding vertical rhythm, enhancing pitch perception | Superior for seamless curves, soft ambient glow, minimalist outlines |
| Installation Speed (Experienced) | ✅ Faster on straight eaves; moderate on gables | ❌ Slower overall—bending, heating, securing take time |
| Skill Required | Low-to-moderate: clip placement is intuitive | Moderate-to-high: bending technique affects durability |
| Weather Resilience | Excellent UV resistance; brittle in extreme cold | Silicone: excellent all-season; PVC: degrades in UV/cold |
| Repair Ease | Simple: replace single drop or clip | Difficult: cut-and-splice required for most failures |
| Cost per Linear Foot | $2.80–$4.20 (standard) | $3.10–$5.90 (silicone premium) |
| Best For | Traditional homes, steep roofs, high-visibility eaves, DIYers | Modern architecture, curved roofs, low-priority edges, commercial facades |
FAQ
Can I mix icicle and rope lights on the same roof?
Yes—and often should. Use icicles on primary eaves and gables where attention is drawn, and rope lights on secondary areas like soffits, garage doors, or fence tops. Just ensure both use the same voltage (120V or 24V) and controller protocol (e.g., both DMX or both non-dimmable) to avoid flickering or sync issues.
Do icicle lights cause ice dams?
No. LED icicles emit negligible heat—less than 1 watt per foot. Ice dams form from attic heat loss warming the roof deck, not exterior lighting. However, avoid mounting icicles directly over gutters in heavy-snow climates; accumulated snow can slide off and dislodge clips.
How do I store either type for next season?
Coil loosely—never wrap tightly around a spool. Store in original boxes or breathable fabric bags (not plastic) in a climate-controlled space. For rope lights, hang vertically in a closet for 48 hours before storage to relieve tension. Inspect clips and connectors annually; replace corroded metal parts.
Conclusion: Clarity Over Convenience
Choosing between LED icicle lights and rope lights isn’t about picking a winner—it’s about matching technology to intention. If your roof tells a story through its angles, textures, and craftsmanship, icicle lights amplify that narrative with precision and presence. If your priority is smooth, uninterrupted glow across sweeping curves or minimal visual interruption, rope lights deliver quiet sophistication. Installation ease depends less on the product and more on your preparation: measuring twice, selecting surface-appropriate hardware, and respecting wind and thermal realities. Don’t default to what’s familiar or what neighbors use. Study your roof like an architect would—then light it like a curator.


 浙公网安备
33010002000092号
浙公网安备
33010002000092号 浙B2-20120091-4
Comments
No comments yet. Why don't you start the discussion?