
Drawing a lightning bolt may seem simple at first glance—a jagged line streaking across the sky—but capturing its energy, motion, and realism requires more than just sketching sharp angles. Whether you're illustrating a superhero emblem, a weather phenomenon, or a symbolic burst of inspiration, mastering the lightning bolt means understanding form, contrast, and visual rhythm. With the right approach, even beginners can create compelling, dynamic sketches that leap off the page.
Anatomy of a Lightning Bolt: Structure and Flow
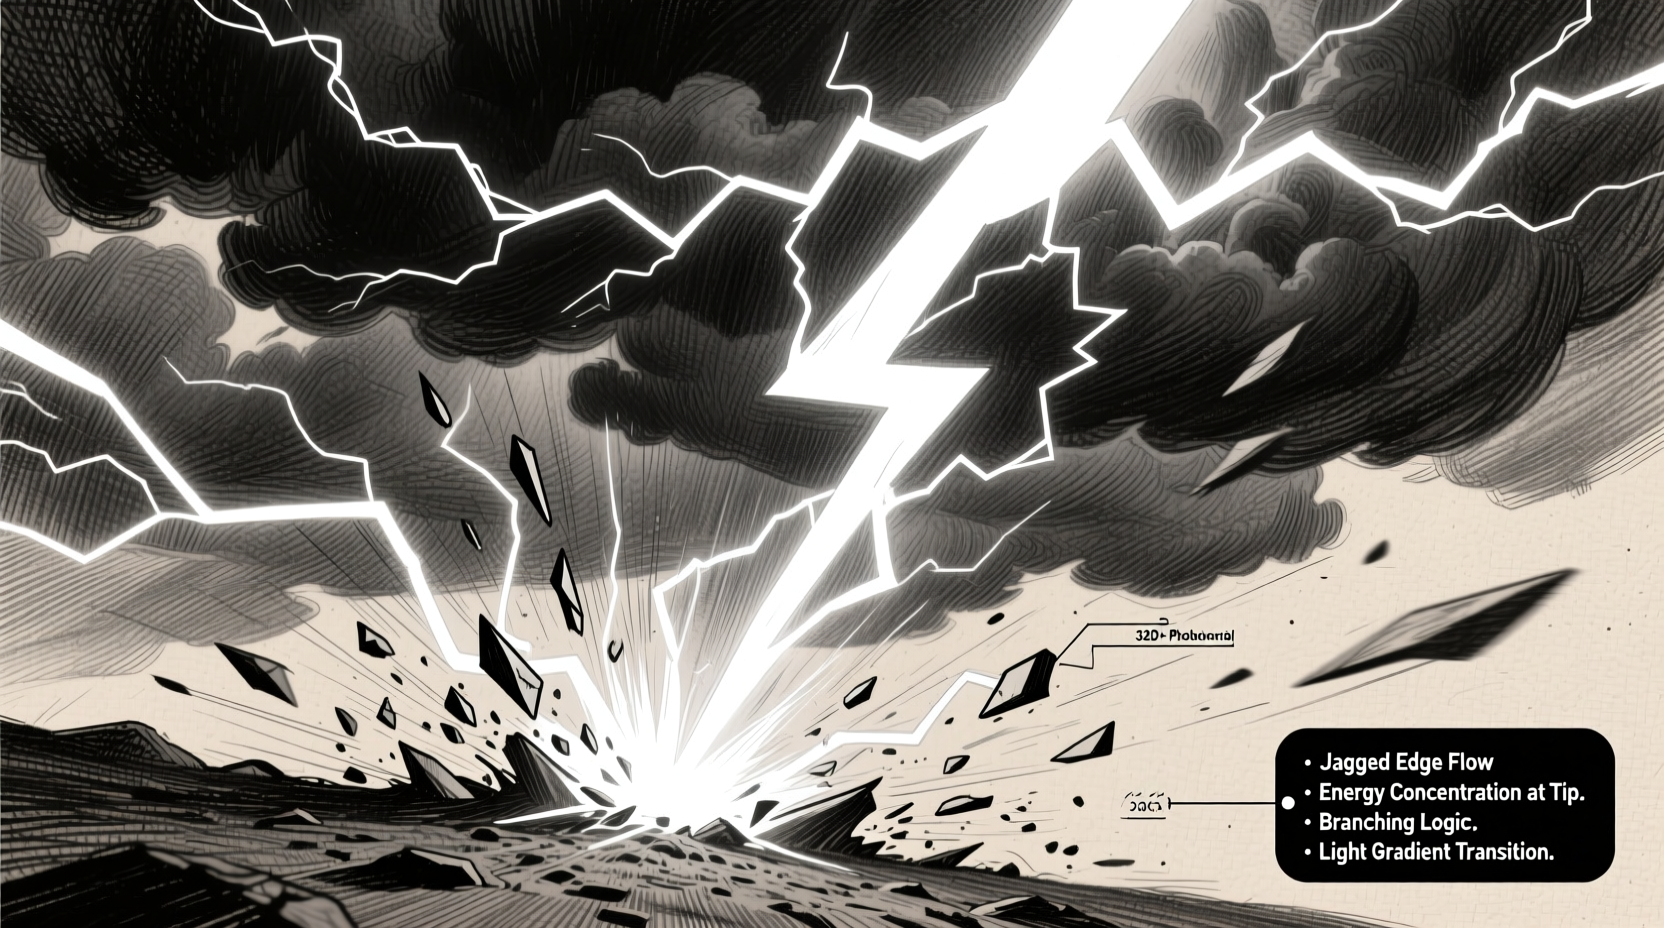
A lightning bolt isn’t random chaos; it follows a distinct branching pattern governed by physics. Real lightning forms when electrical charges seek the path of least resistance through the air, creating a stepped leader that forks unpredictably before connecting with an upward streamer. While artistic stylization allows for creative liberties, grounding your drawing in this natural logic adds authenticity.
The core structure typically includes:
- Main trunk – The thickest, central channel carrying the primary discharge.
- Primary branches – Major offshoots extending from the main trunk, often angular and shorter.
- Secondary sparks – Smaller, finer lines suggesting ionized trails or residual energy.
- Tapered ends – Tips should narrow sharply to imply speed and dissipation.
Beginners often draw symmetrical zigzags, but real lightning is asymmetrical and irregular. Study photographs of actual lightning strikes—notice how one side may branch heavily while the other remains clean. This imbalance creates visual tension and movement.
Step-by-Step Guide to Drawing a Dynamic Lightning Bolt
Follow this structured process to build a convincing lightning bolt from concept to finish:
- Choose your direction: Decide whether the bolt will descend, rise, or strike sideways. Vertical downward bolts are most common and convey power.
- Sketch the main path: Use a series of short, broken lines to indicate the rough trajectory. Avoid perfect 45-degree angles; vary the turns between sharp (30°) and moderate (60°).
- Add primary branches: Introduce 2–4 major forks, usually on one side of the trunk. These should be shorter than the main stroke and angled outward.
- Incorporate secondary details: Lightly sketch tiny flickers near the base or along high-stress bends where energy concentrates.
- Refine line weight: Thicken the central trunk and gradually taper toward the ends. Use bolder lines where the bolt appears closer to the viewer.
- Add glow and contrast: Surround the bolt with a faint aura using soft shading or leave white space if working digitally. Darken the background around it to enhance luminosity.
This method ensures your drawing feels intentional and energetic rather than mechanical.
Stylization vs. Realism: Finding Your Approach
Artistic interpretation plays a crucial role in how you render a lightning bolt. Comic book logos favor bold, simplified shapes with uniform thickness, while scientific illustrations prioritize fractal complexity and branching accuracy. Consider your purpose before committing to a style.
| Style | Characteristics | Best For |
|---|---|---|
| Cartoon/Iconic | Straight segments, sharp corners, uniform width | Logos, emblems, children’s illustrations |
| Realistic | Irregular branching, tapered lines, subtle flickers | Nature scenes, concept art, educational diagrams |
| Abstract/Expressive | Curved elements, multiple overlapping layers, exaggerated glow | Album covers, posters, digital art |
Hybrid approaches work well too. A logo might use a clean outline but incorporate a faint inner glow to suggest luminosity. The key is consistency within your chosen aesthetic.
Expert Insight: What Professionals Look For
Seasoned illustrators emphasize that a great lightning bolt isn’t just about shape—it’s about implication. It should suggest force, speed, and transient brilliance.
“A lightning bolt isn’t just drawn—it’s felt. The best ones make you flinch. That comes from contrast, asymmetry, and implied motion.” — Rafael Torres, Concept Artist at Stormfront Studios
Torres advises students to study not just the bolt itself, but its interaction with the environment: how it casts momentary shadows, illuminates clouds from within, or reflects in wet surfaces below. Even without rendering those elements fully, implying them strengthens the illusion.
Common Mistakes and How to Avoid Them
Even experienced artists fall into traps when drawing lightning. Recognizing these pitfalls early improves results significantly.
- Over-symmetry: Perfect left-right balance makes the bolt look artificial. Favor uneven branching and varied segment lengths.
- Uniform thickness: Real discharges pulse and fluctuate. Vary line weight to simulate intensity changes along the path.
- Ignoring perspective: If the bolt is part of a scene, consider depth. Distant bolts appear thinner and paler; close ones dominate the frame.
- Too many branches: Excessive detail can turn your bolt into static. Prioritize clarity over complexity.
Mini Case Study: Designing a Superhero Emblem
Jess Lin, a freelance illustrator, was commissioned to design a new emblem for a local comic convention. The client wanted a \"modern take on classic electricity motifs.\" Jess began by researching vintage Thunderbolt logos but found them too rigid. She then studied time-lapse lightning footage to understand natural flow.
Her breakthrough came when she sketched the bolt as if it were frozen mid-strike—slightly curved, with one dominant fork and micro-sparks trailing behind like afterimages. She used variable line weights, thickening the center and fading the tip, then added a subtle halo effect in post-processing.
The final design was praised for feeling both powerful and fluid. “I didn’t want it to look like a clipart arrow,” Jess said. “I wanted people to feel the zap.”
Essential Drawing Checklist
Use this checklist before finalizing your lightning sketch:
- ✅ Direction of travel is clearly defined (downward, diagonal, etc.)
- ✅ Main trunk has varied thickness, thickest near the origin
- ✅ Branches are asymmetrical and limited in number
- ✅ Ends taper sharply to suggest speed
- ✅ Background contrast enhances brightness (darkened surroundings)
- ✅ Optional glow or aura reinforces luminous quality
- ✅ No unnecessary details cluttering the core shape
Frequently Asked Questions
How do I make my lightning bolt look bright or glowing?
Create contrast by darkening the area immediately around the bolt. Leave thin gaps between the core line and surrounding shadow to simulate emitted light. In digital work, use soft outer glows set to screen or overlay blending modes.
Should lightning bolts be straight or curved?
While traditionally depicted with sharp zigzags, real lightning often has slight curves due to atmospheric turbulence. A hybrid approach—mostly angular with gentle bends at junctions—adds realism without losing impact.
What tools work best for drawing lightning?
For traditional media, fine-tipped markers or technical pens offer precision. Graphite pencils allow for easy correction and layering. Digitally, a pressure-sensitive tablet with a hard-edged brush gives maximum control over line variation.
Conclusion: Charge Up Your Sketchbook
Drawing a compelling lightning bolt combines observation, technique, and a sense of drama. It's not merely about replicating a shape—it's about capturing a split-second event charged with raw energy. By studying natural patterns, embracing asymmetry, and refining your line work, you can transform a simple sketch into a striking visual statement.


 浙公网安备
33010002000092号
浙公网安备
33010002000092号 浙B2-20120091-4
Comments
No comments yet. Why don't you start the discussion?