
Drawing can be both relaxing and rewarding, especially when you're creating something joyful like a little pony. For beginners, the idea of sketching an animal with expressive features and flowing mane might seem intimidating. But with structured guidance and consistent practice, anyone can learn to draw a charming little pony from scratch. This guide breaks down the process into manageable steps, offering practical tips, visual descriptions, and expert-backed methods to help you create a clean, balanced, and appealing drawing—no prior experience required.
Understanding the Basics of Pony Anatomy
Before putting pencil to paper, it helps to understand the basic structure of a pony. Unlike horses, ponies have shorter legs, stockier bodies, and often thicker manes and tails. Their heads are slightly rounder, and their proportions give them a more approachable, friendly appearance—perfect for stylized drawings.
The key areas to focus on include:
- Head: Rounded muzzle, large eyes placed toward the front, small ears on top.
- Neck: Arched and thick, connecting smoothly to the body.
- Body: Compact barrel, short back, and strong shoulders.
- Legs: Straight and sturdy, ending in hooves that are rounded at the bottom.
- Mane and Tail: Flowing and wavy, often exaggerated in cartoon-style illustrations.
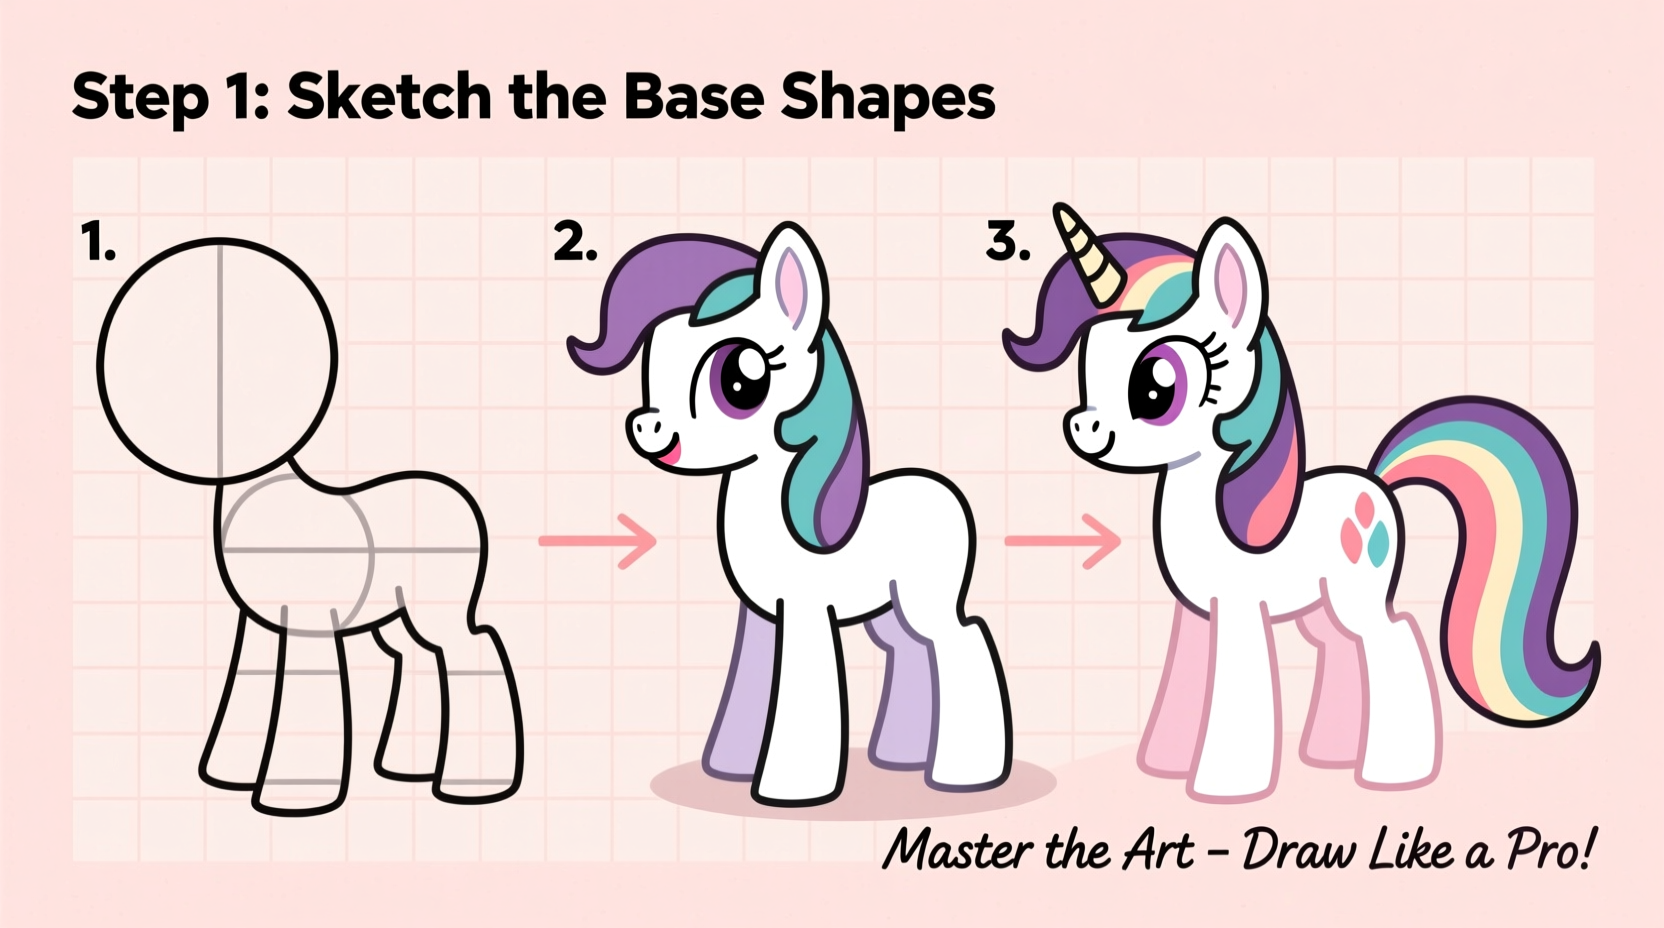
Beginners should think of the pony as a series of connected shapes: circles for joints and head, ovals for the body, and curved lines for the neck and tail. This simplification makes the drawing process far less overwhelming.
Step-by-Step Guide to Drawing a Little Pony
Follow this structured sequence to create a balanced and recognizable little pony illustration. Each step builds on the previous one, allowing you to refine your sketch gradually.
- Draw the Head Shape: Begin with a medium-sized circle near the top third of your page. This will form the base of the pony’s head.
- Add the Muzzle: Below the circle, draw a smaller oval tilted slightly downward. Connect it smoothly to the main head circle.
- Suggest the Ears: On top of the head circle, add two small triangles or teardrop shapes pointing upward. Space them slightly apart for a natural look.
- Sketch the Body: Draw a large horizontal oval below and slightly behind the head. This represents the chest and ribcage.
- Outline the Neck: Use two gently curving lines to connect the head to the body. The neck should arch gracefully.
- Add the Legs: Draw four vertical rectangles for the legs—two in front, two behind. Taper them slightly toward the bottom. Add small ovals at the base for hooves.
- Shape the Tail: From the rear of the body, extend a long, wavy line outward. At the end, add volume with soft, irregular curves to suggest hair.
- Refine the Features: Inside the head, draw two large circles for eyes, place pupils toward the center for a friendly gaze. Add a small shaded circle for the nostril on the muzzle.
- Draw the Mane: Starting from the top of the neck, sketch jagged, flame-like shapes extending backward. Vary the length and direction for a dynamic effect.
- Finalize and Clean Up: Trace over your final lines with a darker pencil or pen. Erase any unnecessary construction lines gently.
This method emphasizes gradual layering—starting with rough forms and finishing with details. It reduces the pressure of getting everything perfect on the first try.
Common Mistakes and How to Avoid Them
Even with a clear plan, beginners often fall into predictable traps that affect the realism and balance of their drawings. Awareness is the first step toward improvement.
| Mistake | Why It Happens | How to Fix It |
|---|---|---|
| Uneven leg lengths | Rushing the leg construction phase | Use light guidelines and measure spacing with your pencil |
| Overly stiff mane or tail | Using straight, uniform lines | Draw wavy, varied strokes with loose motion |
| Disproportionate head | Placing too much detail too early | Stick to basic shapes before adding facial features |
| Flat-looking body | Lack of contour shading | Add subtle shadows under the belly, legs, and neck |
Expert Insight: The Role of Practice and Observation
Drawing isn’t just about technique—it’s also about training your eye. Artists who excel at animal sketches spend time observing real animals or high-quality illustrations to internalize proportions and movement.
“Drawing from reference doesn’t mean copying—it means learning. Even simple cartoons are grounded in real anatomy.” — Daniel Reyes, Illustrator and Art Instructor
For little ponies, studying children’s books, animated shows, or even photos of Shetland ponies can sharpen your understanding of how their features relate spatially. Over time, this observational skill translates into greater confidence when drawing freehand.
Mini Case Study: From First Attempt to Confident Sketch
Sophie, a 12-year-old beginner, tried drawing a pony after watching a tutorial online. Her first attempt had a lopsided head, legs of different lengths, and a mane that looked like spikes instead of flowing hair. Discouraged, she nearly gave up.
Her art teacher suggested breaking the process into steps and practicing each component separately: drawing just heads for five minutes, then legs, then manes. After three days of focused drills, Sophie combined the elements. Her fourth sketch showed noticeable improvement—balanced proportions, smoother curves, and a lively expression. By week two, she was adding color and creating her own pony characters.
This example shows that progress isn’t about talent—it’s about targeted practice and patience.
Essential Drawing Checklist for Beginners
Keep this checklist handy whenever you start a new drawing session:
- ✅ Use a sharp pencil for clean lines
- ✅ Start with light construction shapes
- ✅ Check proportions frequently (use the pencil-measuring trick)
- ✅ Focus on one section at a time
- ✅ Keep your wrist relaxed for smooth curves
- ✅ Shade lightly to add depth (under belly, inside ears, beneath legs)
- ✅ Step back occasionally to assess the overall balance
Frequently Asked Questions
Can I draw a little pony without any artistic experience?
Absolutely. This step-by-step method is designed specifically for beginners. As long as you follow the stages and allow room for mistakes, you’ll see improvement with each attempt.
What kind of pencil should I use?
A standard HB pencil is ideal for sketching. If you want darker outlines, switch to a 2B or 4B for the final lines. Always keep an eraser nearby for corrections.
How can I make my pony look more expressive?
Facial features make all the difference. Slightly raised eyebrows (curved lines above the eyes), a small smile (a gentle curve on the muzzle), and larger, forward-facing eyes can make your pony look cheerful and friendly.
Conclusion: Start Drawing Today
Learning how to draw a little pony is more than just a fun creative exercise—it’s a gateway to building foundational art skills. With the right approach, even total beginners can produce satisfying results in a single session. The key is consistency: draw regularly, embrace imperfections, and celebrate small victories.


 浙公网安备
33010002000092号
浙公网安备
33010002000092号 浙B2-20120091-4
Comments
No comments yet. Why don't you start the discussion?