
Changing a watch strap is one of the simplest yet most transformative things you can do to refresh your timepiece. Whether you're switching from a worn leather band to a sleek metal bracelet or upgrading to a sporty rubber strap for weekend adventures, knowing how to install a watch strap properly ensures both comfort and longevity. For many, the process seems intimidating—tiny springs, tight tolerances, and the fear of launching a spring bar across the room. But with the right tools and technique, anyone can master it. This guide breaks down the entire process into clear, manageable steps, equipping even complete beginners with the confidence to handle their own watch strap changes.
Understanding Watch Strap Attachments
Before picking up any tools, it’s essential to understand how watch straps attach to the case. Most wristwatches use spring bars—small metal rods with spring-loaded ends that fit into drilled lugs on either side of the watch case. When compressed, the spring bar shortens, allowing insertion or removal from the lug holes. Once released, the spring expands, securing the strap in place.
The width of the spring bar must match the distance between the lugs, commonly referred to as the \"lug width.\" This measurement is usually printed on the back of the strap or listed in the watch manual. Typical widths include 18mm, 20mm, and 22mm. Using an incorrect size can damage the lugs or result in a loose, unstable fit.
“Precision matters when handling small components like spring bars. A steady hand and proper tools make all the difference.” — Daniel Reyes, Horology Technician at Precision Timeworks
Essential Tools You’ll Need
While it's possible to swap a strap using improvised tools like toothpicks or paperclips, doing so risks scratching the case or losing a spring bar. Investing in the right tools not only makes the job easier but also protects your watch.
- Spring Bar Removal Tool (Horn Tool): A forked or pointed tool designed to push in the spring bar end and release tension.
- Tweezers: Useful for retrieving dropped spring bars or repositioning them during installation.
- Soft Cloth or Mat: Provides a safe surface to work on, preventing scratches and containing small parts.
- New Watch Strap: Ensure it matches your watch’s lug width and has compatible spring bars or comes with them.
- Magnifying Glass (optional): Helps inspect tight spaces and alignment, especially for smaller watches.
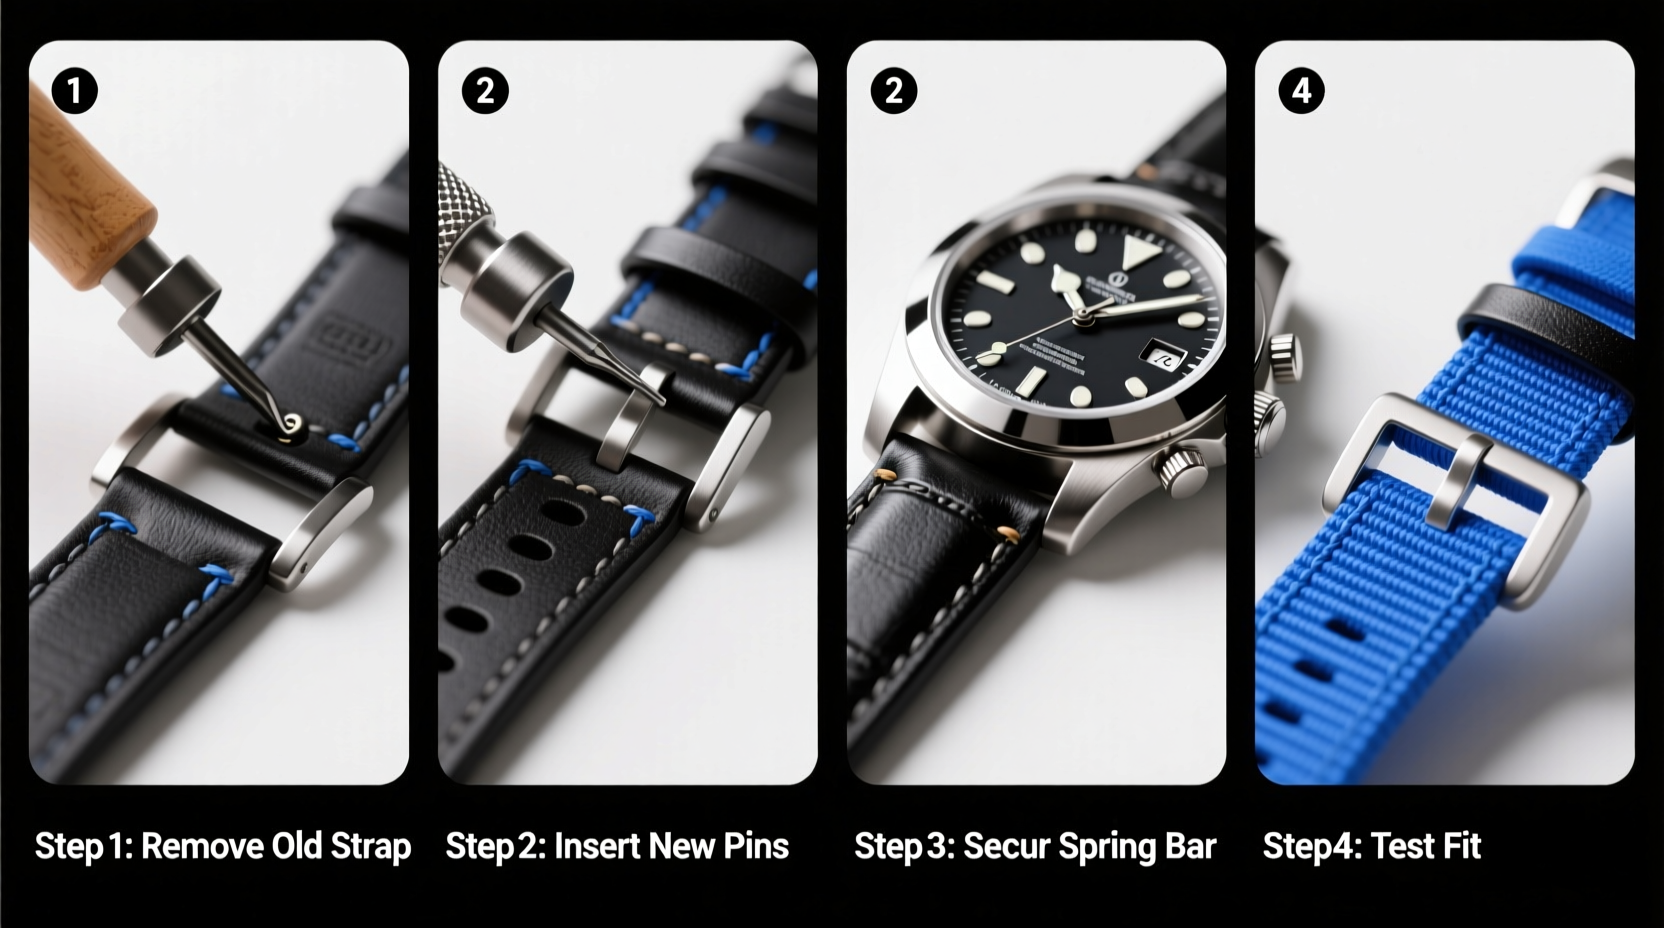
Step-by-Step Guide to Removing and Installing a Watch Strap
Follow this sequence carefully to avoid damaging your watch or injuring yourself. Patience is key; rushing increases the risk of mistakes.
- Prepare Your Workspace: Lay out your tools on a clean, well-lit surface. Place a soft cloth underneath the watch to protect the crystal and case.
- Remove the Old Strap: Insert the spring bar tool into the gap between the strap end and the watch lug. Gently press inward to compress the spring bar. As it retracts, slide the strap away from the lug. Repeat on the other side.
- Inspect the Spring Bars: Check if they’re bent, corroded, or worn. If damaged, replace them. Many new straps come with fresh spring bars—use those instead of reusing old ones.
- Insert New Spring Bar into Strap: Slide one end of the spring bar into the attachment hole of the new strap. Hold it in place with tweezers or fingers, ensuring the spring end faces outward.
- Attach First Side: Align the strap with one set of lugs. Compress the exposed end of the spring bar and insert it into the first lug hole. Release gently—you should feel it snap into place.
- Attach Second Side: While holding the strap steady, compress the other end of the spring bar and align it with the opposite lug. Push until it clicks. Do not force it—if resistance occurs, realign and try again.
- Test the Fit: Gently tug on the strap to ensure it’s secure. It should move slightly side-to-side (normal for spring bars) but not detach.
Common Mistakes to Avoid
| Mistake | Why It’s Problematic | How to Avoid |
|---|---|---|
| Using excessive force | Can bend spring bars or crack lugs | Apply steady, even pressure; stop if something feels stuck |
| Reusing damaged spring bars | Increases risk of sudden strap failure | Replace with new, high-quality spring bars |
| Ignoring lug width | Causes misalignment and stress on the case | Double-check measurements before purchasing straps |
| Working on hard surfaces | Increases chance of scratches or lost parts | Always use a padded mat or cloth |
Real-Life Example: Upgrading a Daily Wearer
Consider Sarah, a graphic designer who wears her stainless steel watch every day. After six months, the original leather strap began cracking at the lugs due to sweat and frequent use. Instead of buying a new watch, she decided to switch to a breathable nylon NATO strap. She purchased a 20mm NATO band with matching hardware, laid out her spring bar tool and tweezers, and followed the steps above. The entire process took less than ten minutes. Not only did the new strap offer greater durability and comfort, but the bold color also gave her watch a fresh, modern look suitable for both office and outdoor settings. This small upgrade extended the life and versatility of her favorite timepiece.
Checklist for Successful Strap Installation
Pre-Installation Checklist:
- Confirm lug width compatibility
- Gather necessary tools
- Clean watch case and lugs
- Inspect new strap and spring bars
- Work on a soft, contained surface
Frequently Asked Questions
Can I install a metal bracelet the same way as a leather strap?
Yes, the attachment mechanism is identical—most metal bracelets use spring bars just like leather or rubber straps. However, metal bands are heavier and may require more precise alignment. Some high-end models use proprietary screws or pins, so always check the manufacturer’s specifications.
What if my spring bar disappears when I remove the strap?
This is common. Spring bars are under tension and can “jump” when released. Always work over a soft surface or inside a small container. Use tweezers to retrieve it from crevices. Consider investing in a magnetic mat to catch metal parts automatically.
How often should I replace my spring bars?
It’s wise to replace them every 2–3 strap changes or whenever they show signs of wear. Over time, repeated compression weakens the spring, increasing the risk of detachment. Fresh spring bars cost little and significantly improve safety.
Final Thoughts and Next Steps
Installing a watch strap is more than a simple repair—it’s an act of personalization. With minimal investment in tools and practice, you gain the freedom to adapt your watch to different occasions, seasons, or styles. What once seemed like a delicate procedure becomes second nature with experience. Beyond aesthetics, proper strap maintenance contributes to overall watch care, reducing strain on the case and improving wearing comfort.
Now that you’ve learned the fundamentals, don’t hesitate to experiment. Try a vintage-inspired leather band for formal events, a rugged rubber strap for swimming, or a colorful fabric option for casual days. Each change deepens your connection to your timepiece and enhances its functionality.


 浙公网安备
33010002000092号
浙公网安备
33010002000092号 浙B2-20120091-4
Comments
No comments yet. Why don't you start the discussion?