
Swapping your Apple Watch band is one of the easiest ways to refresh your look, improve comfort, or adapt to different activities—from workouts to formal events. While it seems straightforward, many new users hesitate, fearing they might damage their device. The truth is, Apple designed its watches with user-replaceable bands in mind. With the right knowledge and technique, anyone can master band installation in minutes. This guide walks you through every step, from selecting compatible bands to installing them safely and confidently.
Understanding Apple Watch Band Compatibility
Before attempting installation, confirm that your chosen band fits your Apple Watch model. Bands are not universally compatible across all sizes and generations. Apple uses a spring-loaded attachment system, but physical dimensions vary between models.
The key factor is case size: 38mm, 40mm, 41mm, 42mm, 44mm, 45mm, and 49mm (for Apple Watch Ultra). Bands are labeled according to these measurements. For example, a 40/41mm band works with Series 4 through Series 9 of that size, while a 44/45mm band fits larger models. Always double-check packaging labels or product descriptions before purchasing.
Tools and Materials You’ll Need
Luckily, no special tools are required. Apple’s band attachment system is entirely mechanical and tool-free. However, having a clean workspace improves precision and reduces the risk of losing small components.
- Your Apple Watch
- A compatible replacement band
- A soft, lint-free cloth (to protect the screen during handling)
- Well-lit, clutter-free surface
Some third-party bands may include a small removal tool, but it’s optional. Your fingers are usually sufficient.
Step-by-Step Guide to Installing an Apple Watch Band
Follow this precise sequence to install or replace your Apple Watch band safely.
- Power down your Apple Watch (optional but recommended). While not required, turning off your device prevents accidental touches or inputs during handling.
- Place your Apple Watch face-down on a soft surface. Use a microfiber cloth to avoid scratches.
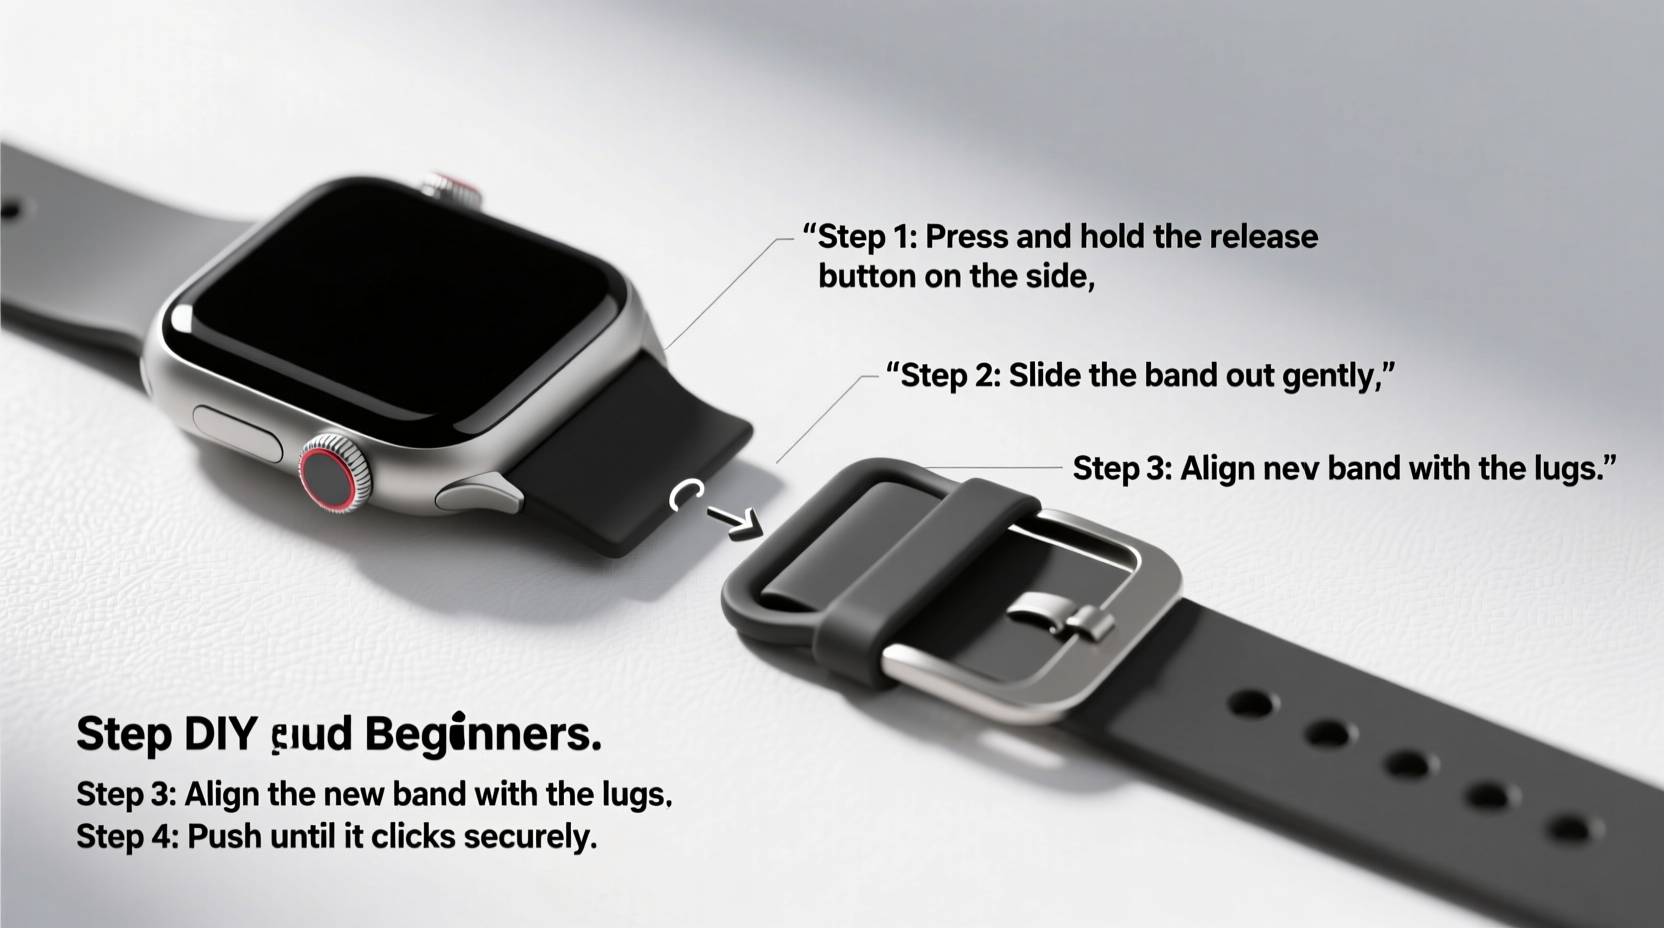
- Locate the band release button on the watch case. On the left side (when viewing from front), you’ll see a small circular pinhole near where the band attaches. Press this gently with your fingertip or a small tool.
- Slide the current band outward. As you press the release, pull the band away from the case. It should detach smoothly. Repeat on the opposite side to fully remove the band.
- Align the new band’s connector with the slot. Ensure the flat side of the band’s end is facing the correct direction—usually matching the curvature of the watch case.
- Insert one end of the band into the attachment slot. Push until you hear a soft click, indicating it’s locked in place.
- Attach the second side using the same method. Press the release button and slide the other end in until it clicks securely.
- Inspect both sides for even alignment and firm attachment. Gently tug each end to test stability.
- Turn your Apple Watch back on and wear it. Confirm comfort and proper fit.
“Apple’s band system is intuitive, but rushing increases the chance of misalignment. Take five slow minutes instead of two frantic ones.” — Jordan Lee, Wearable Tech Specialist
Do’s and Don’ts of Band Installation
| Do’s | Don’ts |
|---|---|
| Wash your hands before handling to avoid transferring oils | Use excessive force when inserting or removing bands |
| Check alignment before snapping the band into place | Ignore the directionality of asymmetric bands (e.g., Nike Sport Loop) |
| Clean the attachment slots occasionally with a dry brush | Leave the watch exposed to dust during band changes |
| Store removed bands in a protective pouch | Mix bands between incompatible case sizes |
Choosing the Right Band for Your Lifestyle
The best band depends on how you use your Apple Watch. Consider these options based on daily needs:
- Sport Band: Lightweight, breathable, ideal for workouts and daily wear.
- Modern Buckle: Stylish leather option for professional or formal settings.
- Link Bracelet: Premium metal band with adjustable links; perfect for durability and elegance.
- Nylon Sport Loop: Soft, washable, and secure—great for active users or sensitive skin.
- Aluminum Solo Loop: Seamless silicone design with stretch-fit technology for a snug, customizable fit.
Mini Case Study: Sarah’s First Band Swap
Sarah, a teacher and new Apple Watch owner, bought her device with a standard Sport Band. After two weeks, she noticed irritation during long school days due to trapped moisture. She purchased a breathable Nylon Sport Loop online but hesitated to install it, worried about breaking her watch. After watching a short tutorial and reading safety tips, she followed a calm, methodical process at home. Using a folded towel as padding, she removed the old band and installed the new one in under four minutes. The difference in comfort was immediate. Now, she swaps bands weekly depending on her schedule—using a Solo Loop for gym classes and a leather band for parent-teacher meetings.
Frequently Asked Questions
Can I damage my Apple Watch when changing bands?
It’s unlikely if done correctly. The attachment mechanism is durable and designed for frequent changes. Avoid forcing the band or pressing the release pin too hard. Use gentle, steady pressure for best results.
How often should I clean my Apple Watch bands?
Clean fabric and silicone bands every 1–2 weeks, especially after sweating. Leather bands should be wiped monthly with a slightly damp cloth and conditioned occasionally. Metal bands can be rinsed under water and dried thoroughly. Regular cleaning prevents odor, staining, and material breakdown.
Are third-party bands safe to use?
Many third-party bands are high quality and safe, but ensure they’re labeled as “Made for Apple Watch” and match your case size. Poorly made connectors may loosen over time or scratch the case. Stick to reputable brands with strong customer reviews.
Essential Checklist for Safe Band Installation
Before starting, go through this quick checklist to ensure a smooth process:
- ✅ Verify band compatibility with your Apple Watch size
- ✅ Power off the watch (recommended)
- ✅ Prepare a clean, soft surface
- ✅ Wash and dry your hands
- ✅ Inspect the new band for defects
- ✅ Align the band connector correctly before insertion
- ✅ Test both sides for secure attachment
- ✅ Store the old band properly for future use
Conclusion: Confidence Through Practice
Changing an Apple Watch band is more than just a cosmetic upgrade—it’s a simple act of personalization and maintenance. Once you’ve done it once, you’ll realize how effortless it truly is. Whether you're switching to a sleek metal bracelet for a night out or swapping in a sweat-resistant band for the gym, mastering this skill enhances your ownership experience. With the right technique and a little care, you can enjoy multiple looks and improved comfort without ever visiting a store.


 浙公网安备
33010002000092号
浙公网安备
33010002000092号 浙B2-20120091-4
Comments
No comments yet. Why don't you start the discussion?