
A well-functioning aquarium filter is the backbone of a thriving aquatic environment. Without it, toxins accumulate, algae bloom, and fish become stressed or ill. Yet, many beginners overlook the importance of proper filter selection and setup—leading to murky water, unstable parameters, and avoidable losses. Mastering your aquarium filter isn’t about complexity; it’s about understanding biological, mechanical, and chemical filtration and applying them correctly. This guide walks you through every essential step to set up, maintain, and optimize your aquarium filter for consistently clear and healthy water.
Understanding the Three Types of Filtration
Filtration in an aquarium occurs in three distinct forms: mechanical, chemical, and biological. A high-performing filter integrates all three to create a balanced ecosystem.
- Mechanical Filtration: Removes physical debris like uneaten food, plant matter, and fish waste using sponges, floss, or foam pads. This keeps the water visibly clear.
- Chemical Filtration: Uses media such as activated carbon, phosphate removers, or ion-exchange resins to absorb dissolved pollutants, odors, and discoloration from the water.
- Biological Filtration: Supports colonies of beneficial bacteria that convert toxic ammonia (from fish waste) into nitrite, then into less harmful nitrate. This process, known as the nitrogen cycle, is essential for long-term tank stability.
Each type plays a unique role. Neglect one, and the entire system suffers. For example, skipping biological filtration may result in ammonia spikes even if the water looks clean.
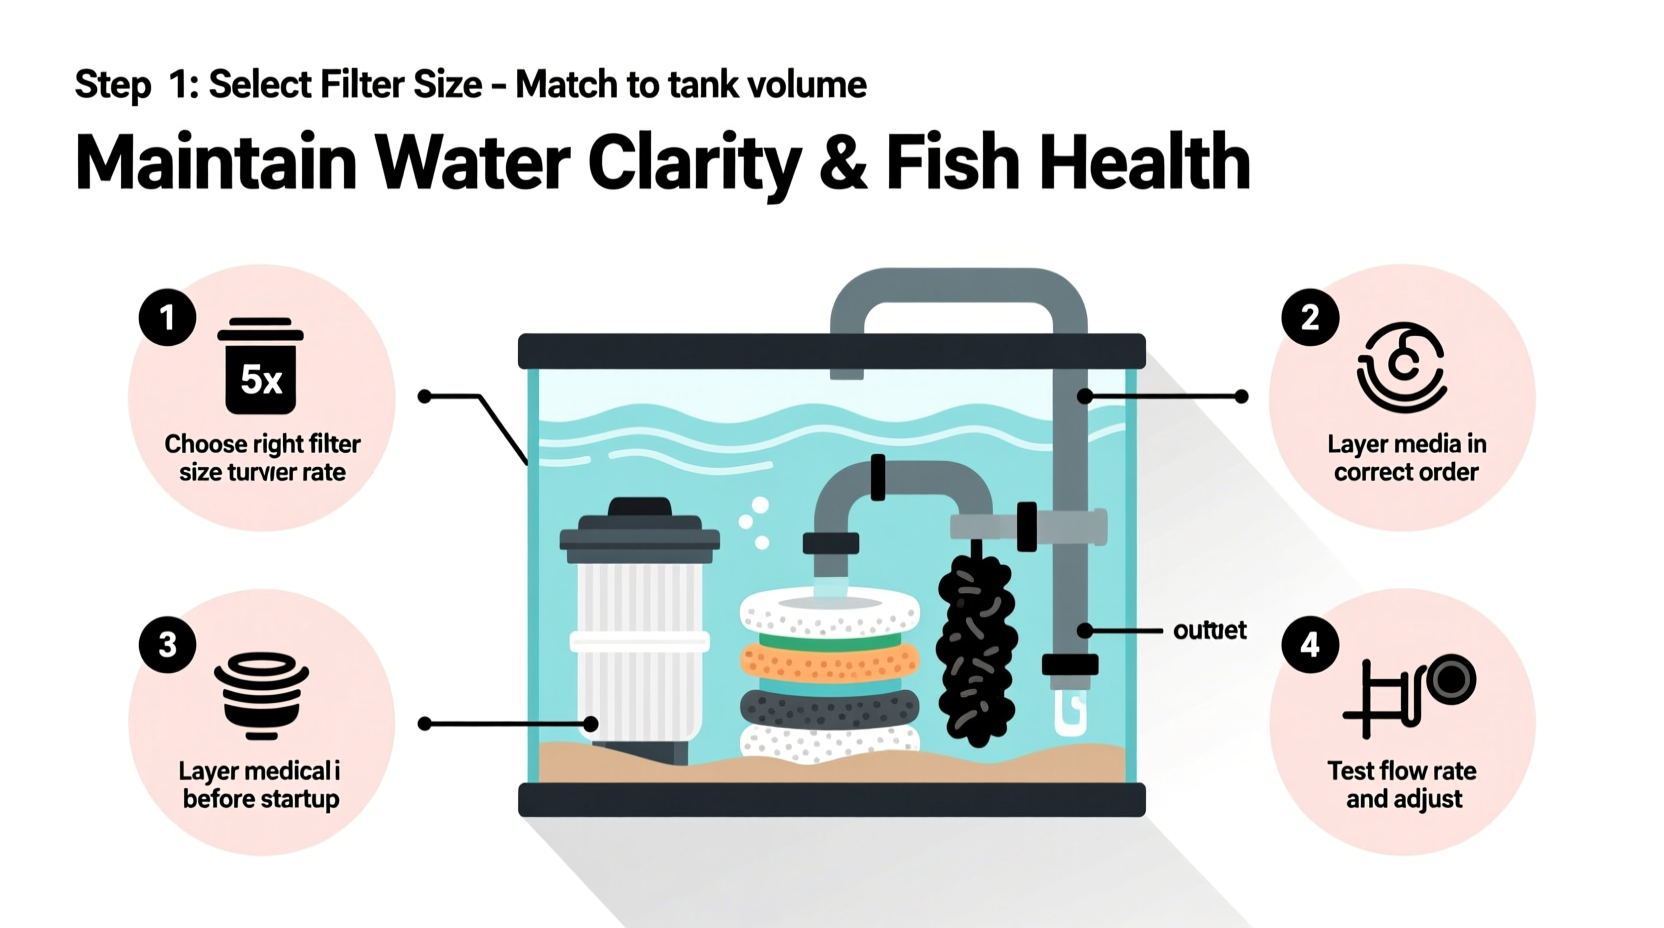
Choosing the Right Filter for Your Tank
Selecting the appropriate filter depends on tank size, fish load, and desired maintenance level. The wrong choice can lead to over-circulation, dead zones, or insufficient turnover.
| Filter Type | Best For | Flow Rate (GPH) | Pros | Cons |
|---|---|---|---|---|
| Sponge Filter | Small tanks, breeding setups, shrimp tanks | 50–200 | Inexpensive, safe for fry, excellent biofiltration | Minimal chemical/mechanical filtration |
| HOB (Hang-On-Back) | Tanks 10–75 gallons | 4x tank volume per hour | Easy to install, combines all filtration types | Noisy, limited space for media |
| Canister Filter | Larger tanks, planted or heavily stocked aquariums | 6–10x tank volume per hour | High flow, customizable media chambers | Expensive, complex maintenance |
| Internal Filter | Small to mid-sized tanks, nano setups | 3–5x tank volume | Compact, quiet, good for tight spaces | Limited capacity, harder to service |
A general rule: your filter should circulate the full volume of your tank at least four times per hour. For a 30-gallon tank, that means a minimum flow rate of 120 GPH (gallons per hour). Heavily stocked or planted tanks benefit from higher turnover—up to 6–10x per hour.
“Filtration isn’t just about cleaning water—it’s about cultivating life-supporting microbial ecosystems.” — Dr. Laura Simmons, Aquatic Biologist
Step-by-Step Aquarium Filter Setup
Proper installation ensures optimal performance from day one. Follow these steps whether you're setting up a new tank or replacing an old filter.
- Choose the correct location: For HOB filters, ensure the intake tube reaches the bottom without touching substrate. Canister filters should be placed below the tank for gravity feed.
- Rinse all media in dechlorinated water: Never use tap water, which contains chlorine that harms beneficial bacteria.
- Layer media strategically: In canister or HOB filters, order matters. Start with coarse sponge (mechanical), then finer floss, followed by biomedia (ceramic rings, bio-balls), and finally chemical media like carbon.
- Prime the filter if required: Canister filters must be filled with water before turning on to prevent air locks.
- Turn on and check for leaks: Monitor the first 30 minutes closely. Adjust tubing or seals if needed.
- Allow time for cycling: Run the filter continuously for 2–6 weeks with ammonia source (fish food or pure ammonia) to establish bacterial colonies.
Real Example: Solving Chronic Cloudiness in a 40-Gallon Community Tank
Tom, a beginner aquarist, struggled with persistently cloudy water in his 40-gallon community tank housing tetras and Corydoras. Despite weekly water changes, the water turned milky within days. After testing, he discovered elevated nitrites and low oxygen levels.
The root cause? An undersized HOB filter rated for only 20 gallons. It couldn't handle the bioload or provide adequate turnover. Tom upgraded to a canister filter with a 400 GPH rating and layered ceramic rings, sponges, and activated carbon. Within two weeks of re-cycling, the water cleared, nitrite dropped to zero, and fish activity improved noticeably.
This case illustrates how mismatched filtration leads to systemic issues—and how correcting the setup resolves multiple problems simultaneously.
Essential Maintenance Checklist
To keep your filter running efficiently, follow this monthly routine:
- ✅ Inspect impeller and housing for clogs or wear
- ✅ Rinse mechanical media (sponges, floss) in old tank water removed during water change
- ✅ Replace chemical media (carbon, phosphate pads) every 4 weeks
- ✅ Check water flow—reduced output indicates blockage
- ✅ Test water parameters (ammonia, nitrite, nitrate) monthly
- ✅ Rotate biological media replacement—never replace all at once
Over-maintenance can be as harmful as neglect. Replacing all filter media at once wipes out bacterial colonies and risks mini-cycle crashes.
Frequently Asked Questions
How often should I clean my aquarium filter?
Clean mechanical components every 2–4 weeks, depending on debris buildup. Biological media should only be rinsed when flow is restricted—typically every 6–8 weeks. Chemical media needs replacement every 3–4 weeks to remain effective.
Can I run my aquarium without a filter?
Only in very specific, low-waste setups like heavily planted nano tanks with minimal livestock. Even then, filtration significantly improves stability. Most standard aquariums require a filter to maintain safe water conditions.
Why is my filter making noise?
Gurgling or popping sounds usually indicate air trapped in the system or improper water level. Ensure intake tubes are fully submerged and canister lids are sealed. For HOB filters, adjust the water level to just below the overflow line.
Optimizing Long-Term Performance
Once your filter is set up, fine-tune its performance by observing your tank’s response. If you notice excessive surface agitation, reduce flow with a spray bar or valve. For planted tanks, consider adding specialized media like nitrate-absorbing resins or micron filters to support plant health.
Monitor your fish’s behavior. Lethargy or rapid gilling may signal poor water quality despite visual clarity—highlighting the need for regular testing. Remember, clear water isn’t always healthy water.
Conclusion
Mastering aquarium filter setup transforms aquarium keeping from a constant battle against cloudiness and disease into a rewarding experience of balance and natural beauty. By selecting the right filter, layering media wisely, maintaining consistency, and respecting the invisible work of beneficial bacteria, you create a self-sustaining environment where fish thrive and water stays pristine.


 浙公网安备
33010002000092号
浙公网安备
33010002000092号 浙B2-20120091-4
Comments
No comments yet. Why don't you start the discussion?