
Changing the background color in Photoshop is one of the most fundamental yet powerful skills in digital image editing. Whether you're preparing product photos for an e-commerce site, designing social media graphics, or retouching portraits, controlling the background enhances visual impact and professionalism. Done poorly, it can look artificial or distracting. Done well, it elevates the entire composition. This guide walks through proven methods, tools, and best practices to change background colors seamlessly—regardless of your experience level.
Selecting the Right Tool for Background Isolation
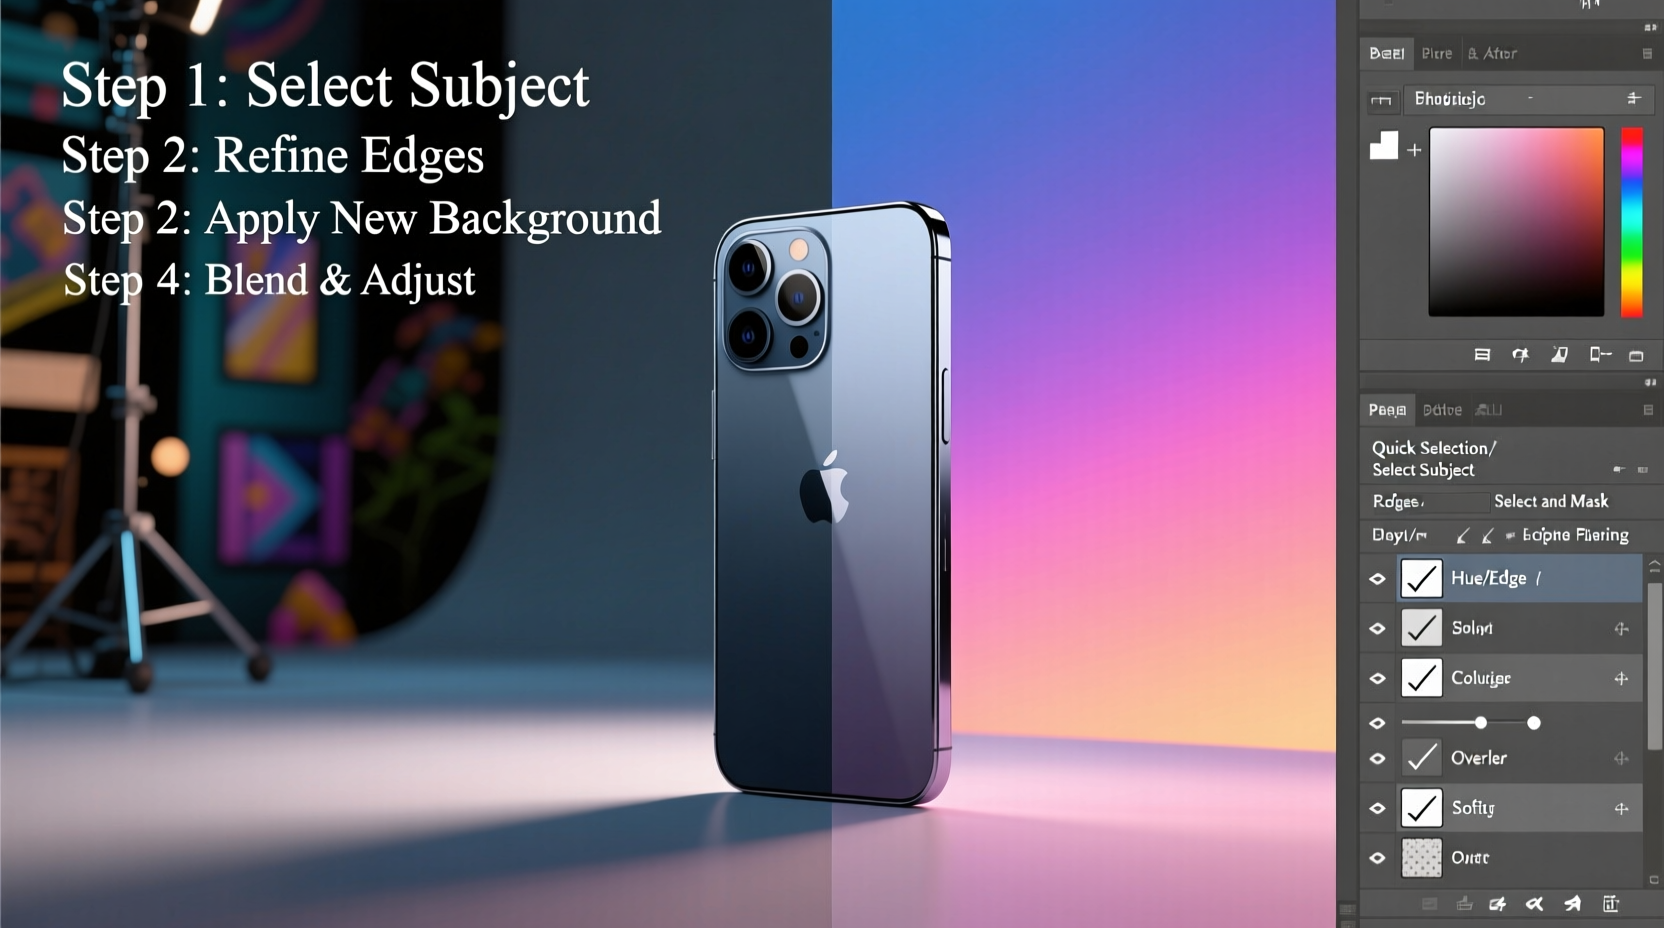
The first challenge in changing a background color is isolating the subject from its original backdrop. Photoshop offers several selection tools, each suited to different types of images.
- Quick Selection Tool: Ideal for subjects with high contrast against the background. Click and drag over the subject; Photoshop automatically detects edges.
- Magic Wand: Best for solid-colored or uniform backgrounds. Adjust tolerance settings to control how broadly it selects similar pixels.
- Object Selection Tool: Uses AI to detect and select people, animals, or objects with minimal input. Great for complex shapes like hair or fur.
- Pen Tool: Offers pixel-perfect precision for hard-edged objects. Requires more time but delivers the cleanest results for commercial work.
Step-by-Step Guide to Changing Background Color
- Open your image in Photoshop and duplicate the background layer (Ctrl+J / Cmd+J) to preserve the original.
- Select the subject using the Object Selection Tool or Quick Selection Tool. Hold Shift to add areas, Alt/Option to subtract.
- Enter Select and Mask (Select > Select and Mask). Use the Refine Edge Brush on tricky areas like hair or transparency.
- Output the selection to a new layer with a layer mask. This keeps the subject isolated non-destructively.
- Create a new solid color fill layer below the subject layer. Click the half-filled circle icon in the Layers panel and choose \"Solid Color.\"
- Pick your desired background color using the color picker. You can sample from other images or use HEX codes for brand consistency.
- Adjust blending if needed. For soft glows or shadows, lower the fill layer’s opacity or experiment with blend modes like Multiply or Overlay.
This process ensures complete control over both subject integrity and background appearance. The use of adjustment layers means you can change the color anytime without reprocessing the entire image.
Advanced Techniques for Realistic Results
A flat background color can sometimes appear unnatural, especially when lighting in the original photo suggests environmental influence. To create believable composites:
- Add subtle gradients instead of solid fills. Use the Gradient Tool (G) with low opacity to simulate depth or directional light.
- Match ambient tones. If the subject has warm highlights, tint the background slightly warm to avoid a “cut-out” look.
- Use drop shadows. Create a new layer beneath the subject, Ctrl-click the subject layer thumbnail to load its selection, then contract the selection by 5–10 pixels. Fill with black and apply Gaussian Blur for a natural shadow.
- Simulate reflections on glossy surfaces by duplicating the subject, flipping it vertically, masking the top portion, and applying a gradient fade with low opacity.
“Backgrounds aren’t just space—they’re context. A well-chosen color supports the mood, focus, and message of the image.” — Lena Torres, Professional Photo Editor & Adobe Certified Instructor
Common Mistakes and How to Avoid Them
Even experienced users make errors that undermine their edits. Awareness of these pitfalls leads to cleaner outcomes.
| Mistake | Why It’s Problematic | Solution |
|---|---|---|
| Using solid black or white without context | Creates harsh contrasts that draw attention away from the subject | Choose mid-tone grays or soft pastels; consider the subject’s color temperature |
| Ignoring edge halos | Leaves visible fringes, especially around dark subjects on light backgrounds | Use Decontaminate Colors in Select and Mask or manually paint over edges with a cleanup brush |
| Overlooking lighting direction | Results in mismatched shadows, breaking realism | Observe light source in original image and replicate angle in shadow placement |
| Flattening too early | Limits future adjustments and reduces flexibility | Keep layers separate and use Smart Objects when possible |
Real-World Example: E-Commerce Product Image Enhancement
A small online boutique specializing in handmade jewelry struggled with inconsistent product photography. Photos were taken under varying lighting conditions, resulting in cluttered or yellow-tinted backgrounds that distracted from the pieces. The goal was to standardize all product images with a clean, neutral gray background.
Using the Object Selection Tool, each item was carefully extracted. The team created a master template with a 5% noise texture overlay on a #f2f2f2 base to prevent a sterile, artificial look. Shadows were added uniformly to maintain consistency across listings. After implementation, customer feedback noted improved clarity and trust in product appearance, and conversion rates increased by 18% over six weeks.
Checklist: Perfect Background Color Change Workflow
- ✅ Duplicate the original layer before starting
- ✅ Use the most accurate selection tool for your subject type
- ✅ Refine edges using Select and Mask for clean transitions
- ✅ Output selection to a layer mask for non-destructive editing
- ✅ Add a Solid Color fill layer beneath the subject
- ✅ Choose a color that complements—not competes with—the subject
- ✅ Enhance realism with subtle gradients, shadows, or reflections
- ✅ Save in layered PSD format and export a flattened version for web use
Frequently Asked Questions
Can I change the background color after saving the file?
Yes, as long as you saved the layered .PSD file. Simply double-click the Solid Color fill layer thumbnail and choose a new color. If you only have a flattened JPEG or PNG, you’ll need to reselect the subject and start over.
Why does my subject look fake on the new background?
This usually happens due to mismatched lighting, color temperature, or lack of environmental interaction. Try adjusting the subject’s brightness/contrast to match the new background’s lighting. Adding a soft shadow often resolves the floating effect.
Is there a way to automate background color changes for multiple images?
Absolutely. Use Photoshop’s Actions panel to record your workflow, then batch-process files via File > Automate > Batch. This is ideal for product catalogs or portrait sessions requiring uniform styling.
Conclusion: Elevate Your Visual Quality with Confidence
Changing a background color in Photoshop isn’t just about technical skill—it’s about intention. Every hue choice influences perception, emotion, and engagement. By mastering selection tools, refining edges, and applying thoughtful enhancements, you transform ordinary edits into professional-grade visuals. The techniques outlined here are scalable, whether you're editing one image or hundreds.


 浙公网安备
33010002000092号
浙公网安备
33010002000092号 浙B2-20120091-4
Comments
No comments yet. Why don't you start the discussion?