
Carrying a poorly adjusted backpack can turn even the shortest hike or city walk into a test of endurance. Shoulder strain, lower back pain, and uneven weight distribution are common complaints among travelers, students, and outdoor enthusiasts—yet most of these issues stem from one overlooked factor: improper strap adjustment. The right fit doesn’t just enhance comfort; it improves posture, reduces fatigue, and protects your spine over time. This guide breaks down the science and practical steps behind perfect backpack strap alignment, helping you move freely and confidently on any journey.
The Anatomy of a Well-Fitted Backpack
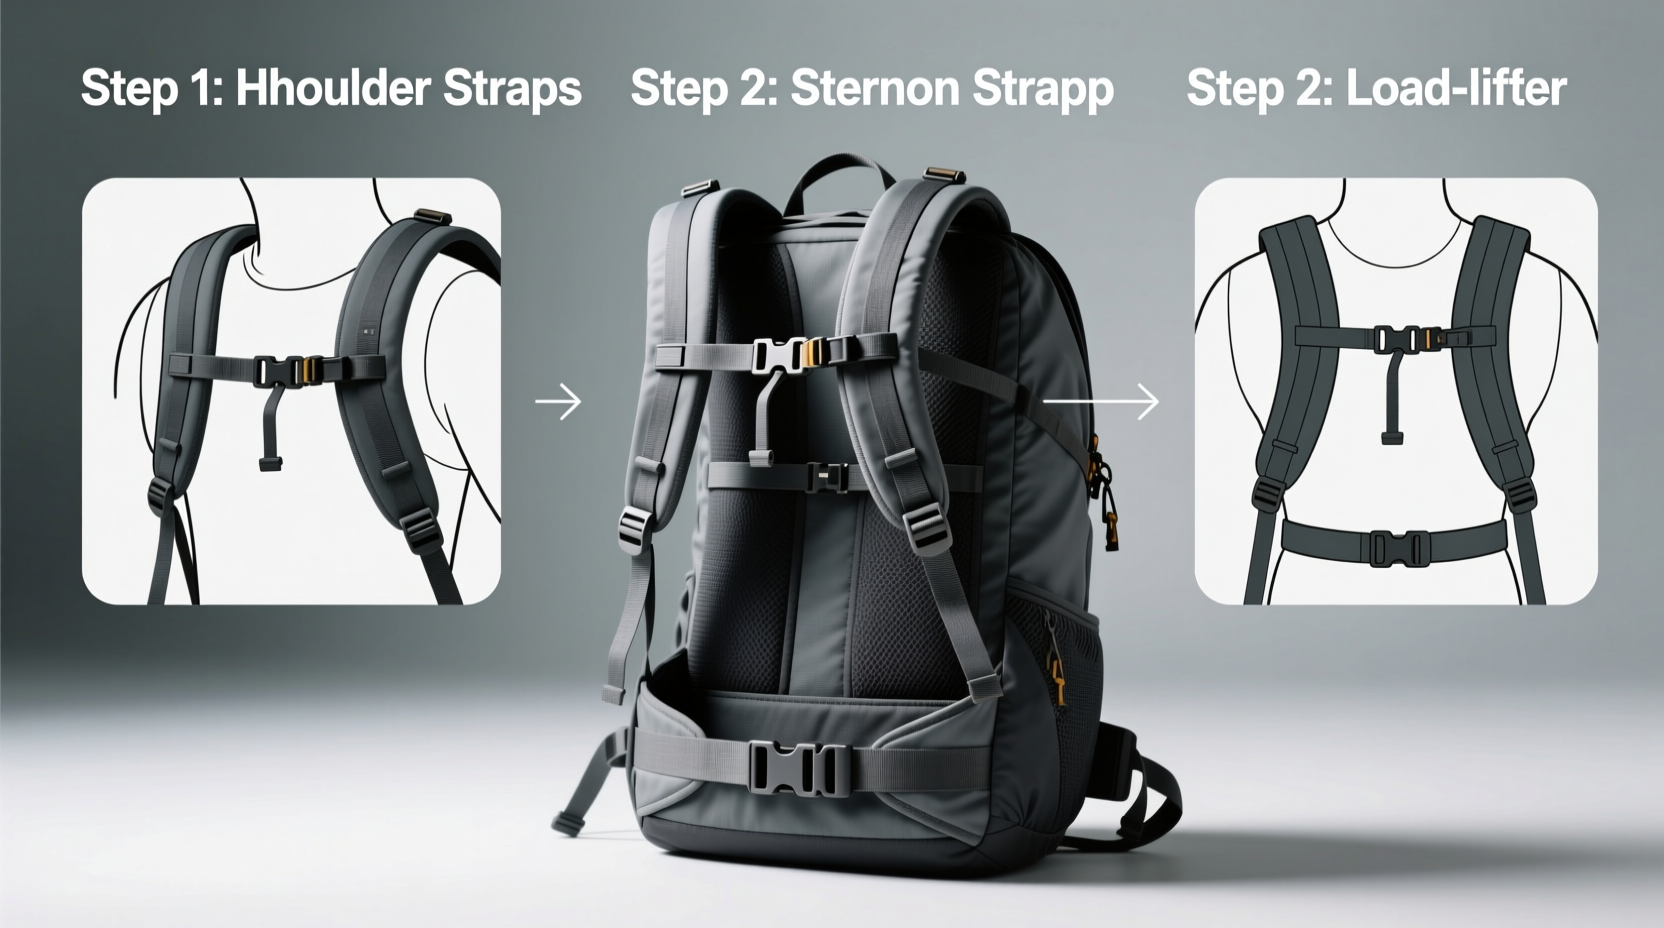
A backpack is more than a container for your belongings—it’s a wearable system designed to work with your body’s biomechanics. Modern packs include multiple adjustable components: shoulder straps, sternum strap, hip belt, load lifters, and sometimes a frame sheet or stabilizing fins. Each plays a specific role in weight transfer and balance.
When properly adjusted, up to 80% of the pack’s weight should rest on your hips via the hip belt, not your shoulders. The shoulders primarily stabilize the load, while the chest strap prevents lateral movement. Load-lifter straps (located at the top of the shoulder straps) pull the upper pack close to your back, preventing backward tilt.
Step-by-Step Guide to Perfect Strap Adjustment
- Put on the backpack with a moderate load. Use 15–20 lbs (7–9 kg) for testing—enough to simulate real use without straining.
- Loosen all straps completely. Start fresh to avoid compensating for prior incorrect settings.
- Position the hip belt correctly. Fasten it so the padded section sits directly over your iliac crest (the top of your hip bones), not on your waist or lower back.
- Tighten the hip belt firmly. It should be snug but not restrictive—able to hold the pack’s weight without shifting.
- Adjust shoulder straps for contact and tension. Pull them until the pack lies flat against your back. There should be no gap between the panel and your spine.
- Engage the load-lifter straps. These diagonal straps connect the top of the shoulder harness to the pack frame. Pull them at a 45-degree angle upward until the top of the pack pulls slightly toward your shoulders.
- Fasten the sternum strap. Position it across your chest, level with your armpits. It should provide stability without restricting breathing.
- Test mobility. Walk, bend, and twist. If the pack moves independently of your body or digs into your shoulders, revisit the adjustments.
Real-World Example: A Hiker’s Transformation
Samantha, an avid weekend hiker, regularly experienced numbness in her left shoulder after three-mile treks. She assumed the issue was her pack’s size. After consulting a gear specialist, she discovered her hip belt was riding too low, forcing her shoulders to bear 70% of the load. Once she repositioned the belt over her hips and tightened the load-lifters, her shoulder pain vanished. Her next 8-mile hike felt lighter despite carrying more gear.
Common Adjustment Mistakes and How to Avoid Them
- Hip belt placed too high or low: Causes instability and forces shoulders to compensate.
- Over-tightening shoulder straps: Compresses nerves and restricts blood flow, leading to tingling or numbness.
- Neglecting the sternum strap: Allows excessive side-to-side sway, especially on uneven terrain.
- Ignoring load-lifter straps: Creates a “lean-back” effect, pulling the pack away from your center of gravity.
- Wearing bulky clothing during adjustment: Leads to loose straps when worn with thinner layers later.
“Proper fit isn’t about squeezing the pack tight—it’s about aligning its center of gravity with yours.” — Dr. Lena Torres, Physical Therapist & Outdoor Ergonomics Consultant
Do’s and Don’ts of Backpack Adjustment
| Do’s | Don’ts |
|---|---|
| Adjust straps while standing upright with a loaded pack | Set straps while sitting or leaning against a wall |
| Distribute 80% of weight to the hips | Rely on shoulder straps to carry the bulk of the load |
| Check fit every few hours during long trips | Assume one adjustment lasts the entire day |
| Use load-lifter straps to reduce upper back pressure | Leave load-lifters dangling or unattached |
| Ensure sternum strap allows full lung expansion | Fasten chest strap so tightly it restricts breathing |
Special Considerations for Different Travel Styles
Backpack needs vary significantly depending on activity. Urban travelers prioritize quick access and sleek profiles, while hikers need durability and load control. Here’s how to adapt strap settings accordingly:
City Commuters & Daypack Users
Even light loads benefit from proper hip support. Use the hip belt lightly cinched for short-term wear. Keep the sternum strap open if moving through crowded areas where quick removal may be needed.
Long-Distance Hikers & Trekking Enthusiasts
Every mile counts. Fine-tune load-lifter angles to match terrain—tighter on ascents for forward balance, slightly looser on descents. Re-adjust after repacking or changes in weather gear.
Students & Daily Carriers
Single-strap slinging causes spinal misalignment. Always use both shoulder straps. Adjust the hip belt if available, or consider switching to an ergonomic dual-strap model with lumbar support.
Frequently Asked Questions
How do I know if my backpack fits my torso length?
Torso length (measured from the base of your neck to the top of your hips) determines ideal pack height. Most brands offer small, medium, or large torso options. If the top of the pack extends above your shoulders or sags below your waist, it’s likely the wrong size.
Can a well-adjusted backpack prevent back pain?
Yes. Proper weight distribution reduces spinal compression and muscle fatigue. Studies show that correct hip belt usage decreases lumbar strain by up to 40% compared to shoulder-only carrying.
Should children adjust their backpacks differently?
Children should never carry more than 10–15% of their body weight. Straps must be tightened so the pack rests high on the back, just below the shoulders. Avoid letting packs hang below waist level, which encourages slouching.
Essential Adjustment Checklist
- ✅ Hip belt centered over hip bones
- ✅ Shoulder straps snug with no vertical sliding
- ✅ Load-lifter straps creating a 45° angle from top of pack to shoulders
- ✅ Sternum strap positioned at mid-chest, allowing deep breaths
- ✅ No gaps between back panel and spine
- ✅ Pack remains stable during walking, bending, and turning
- ✅ Weight feels anchored to hips, not hanging from shoulders
Final Thoughts: Comfort Is a Skill, Not Luck
Perfect backpack comfort isn’t achieved by buying the most expensive model—it’s earned through attention to detail and consistent adjustment. Your body changes position, your load shifts, and environmental conditions affect balance. Treat your backpack like a dynamic extension of your posture, not a static accessory. By mastering strap adjustment, you’re not just avoiding discomfort; you’re investing in long-term musculoskeletal health and travel enjoyment.


 浙公网安备
33010002000092号
浙公网安备
33010002000092号 浙B2-20120091-4
Comments
No comments yet. Why don't you start the discussion?