
Canva has transformed the way individuals and teams create visual content, offering an intuitive platform for designing social media graphics, presentations, posters, and more. One of the most common challenges users face—especially when repurposing designs—is adjusting the canvas size without compromising layout, resolution, or alignment. Whether you're switching from Instagram post to story, adapting a flyer for print, or converting a presentation into a PDF handout, knowing how to change design sizes efficiently is essential. This guide walks through every aspect of resizing in Canva, offering practical steps, expert tips, and real-world insights to help you maintain professional quality across formats.
Understanding Canva’s Design Dimensions
Before resizing, it's important to understand that every Canva design starts with a preset dimension. These dimensions are optimized for specific platforms and use cases—Instagram posts (1080x1080 px), stories (1080x1920 px), A4 documents (2480x3508 px at 300 dpi), and so on. When you attempt to change the size of a design, especially from square to vertical or vice versa, elements may become misaligned or distorted if not handled properly.
Canva supports both preset templates and custom dimensions. You can choose from hundreds of built-in size options or input your own measurements in pixels, inches, or centimeters. The key is to match the new size to your intended output while preserving visual balance.
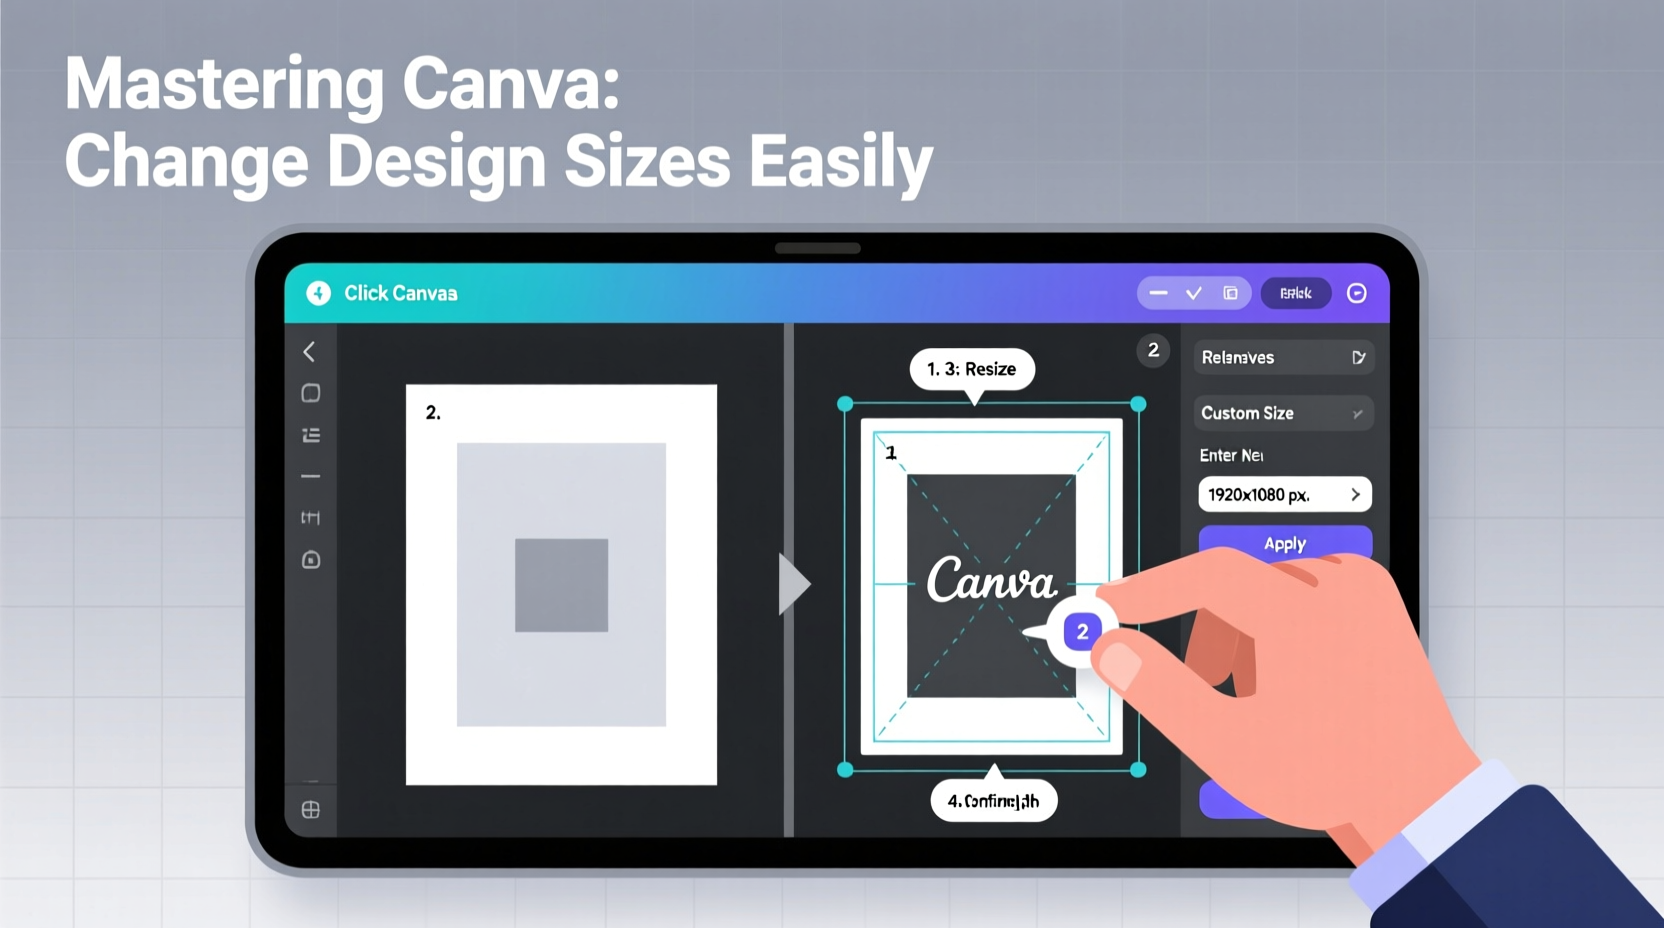
Step-by-Step Guide to Changing Design Sizes
Resizing a design in Canva doesn’t have to be disruptive. Follow this structured process to ensure a smooth transition between formats.
- Open Your Existing Design: Navigate to your Canva dashboard and open the project you want to resize.
- Click “Resize” in the Top Toolbar: Located just above the canvas, next to the share button, this tool allows you to adjust dimensions quickly.
- Select a Preset Size or Enter Custom Dimensions: Choose from popular formats like “Instagram Story,” “Pinterest Pin,” or “A4 Portrait.” Alternatively, click “Custom Size” to enter exact measurements.
- Review Element Placement: After applying the new size, inspect your design. Text boxes, images, and shapes may shift or get cropped depending on the change.
- Use Position Guides and Snap Grid: Enable these under “View” settings to align elements precisely within the new canvas boundaries.
- Adjust Content as Needed: Re-center text, resize images proportionally, and reposition layered elements to restore visual harmony.
- Download or Share: Once satisfied, export your updated design in PNG, JPG, PDF, or other supported formats.
This method works seamlessly for minor adjustments, such as switching between similar aspect ratios. However, drastic changes—like turning a horizontal banner into a vertical mobile ad—require additional considerations.
Handling Major Aspect Ratio Changes
When transitioning between vastly different formats—say, from a LinkedIn cover (1584x396 px) to a YouTube thumbnail (1280x720 px)—the original layout often breaks. Elements cluster on one side, whitespace dominates another, or critical content gets cut off.
To manage these shifts effectively:
- Use the “Magic Switch” feature (available in Canva Pro) to automatically adapt layouts across formats. It intelligently resizes and repositions elements based on the new canvas.
- Group related elements together (e.g., headline + subtext + CTA button) so they move as a single unit during resizing.
- Avoid placing key visuals near the edges unless they’re designed to bleed. These areas are prone to cropping when switching devices or platforms.
- Leverage background layers wisely. Use full-bleed backgrounds only when necessary; otherwise, opt for centered focal points that remain visible across sizes.
| Original Format | New Format | Recommended Action |
|---|---|---|
| Instagram Post (1:1) | Instagram Story (9:16) | Add vertical padding, reposition text upward, extend background subtly |
| A4 Flyer (Portrait) | Letter Flyer (Slight size difference) | Maintain margins, verify print-safe zones, confirm DPI |
| Presentation Slide (16:9) | Social Media Image (1:1) | Crop central content, simplify text, enhance contrast for readability |
Mini Case Study: Repurposing a Workshop Poster into Digital Ads
Sophie, a community wellness coordinator, created a vibrant A5 poster in Canva to promote an upcoming yoga workshop. After seeing strong local engagement, she wanted to convert the same design into Facebook and Instagram ads. Initially, she manually resized the canvas but found the text too small and the image cramped.
She revisited the design using the “Resize” tool and selected the Facebook Ad template (1200x628 px). Using grouping and alignment tools, she isolated the event title, date, and instructor photo, then restructured them vertically to fit the wider format. She replaced the detailed background with a blurred version to reduce clutter and increased font size for mobile readability. The revised ad performed 40% better in click-through rates than her previous campaigns.
Expert Insight on Design Consistency
“Maintaining brand consistency across formats isn’t about copying the same layout—it’s about translating the core message effectively. Smart resizing preserves intent, not just pixels.” — Lena Patel, Digital Design Strategist
According to industry experts, successful cross-format design hinges on flexibility and intentionality. Instead of treating each size change as a mechanical task, view it as an opportunity to refine messaging for different audiences and contexts.
Pro Tips for Flawless Resizing
Checklist: Preparing to Resize a Canva Design
- ✅ Back up the original design by duplicating it
- ✅ Identify the target platform and its required dimensions
- ✅ Group related design elements for easier manipulation
- ✅ Check image resolution and scalability
- ✅ Confirm brand colors, fonts, and logo placement will remain consistent
- ✅ Test visibility on mobile and desktop previews
- ✅ Export and review final output before publishing
Frequently Asked Questions
Can I resize a free Canva design without upgrading?
Yes, all users can access the basic “Resize” tool. However, features like Magic Switch, custom brand kits, and advanced aspect ratio presets require a Canva Pro subscription.
Why does my text look blurry after resizing?
Text may appear pixelated if the canvas was scaled up significantly beyond its original resolution. To prevent this, avoid extreme enlargements and use vector-based text instead of embedded images of text.
Will changing the size affect my downloaded file quality?
Only if you alter the download settings. Always select “High Quality” (PDF Print or PNG) for professional results, especially for print. Ensure the DPI matches your output needs—300 dpi for print, 72 dpi for digital.
Conclusion
Changing design sizes in Canva is more than a technical adjustment—it's a strategic skill that enhances efficiency, consistency, and reach. By mastering the resize tool, understanding aspect ratios, and applying smart layout principles, you can effortlessly adapt one creative concept across multiple platforms and purposes. Whether you're a marketer, educator, entrepreneur, or hobbyist, the ability to scale designs without sacrificing quality gives you a powerful edge in today’s fast-moving digital landscape.


 浙公网安备
33010002000092号
浙公网安备
33010002000092号 浙B2-20120091-4
Comments
No comments yet. Why don't you start the discussion?