
Chafer dishes are the backbone of professional buffet service, keeping food warm, presentable, and safe for guests over extended periods. Whether you're a caterer, event planner, or hosting a large gathering, mastering the setup and use of chafing dishes ensures your hot foods stay at optimal temperature without drying out or compromising safety. Despite their simplicity, improper use can lead to cold spots, uneven heating, or even fire hazards. This guide breaks down best practices, equipment selection, and real-world techniques to elevate your buffet game.
Understanding Chafer Dishes: Components and Functionality
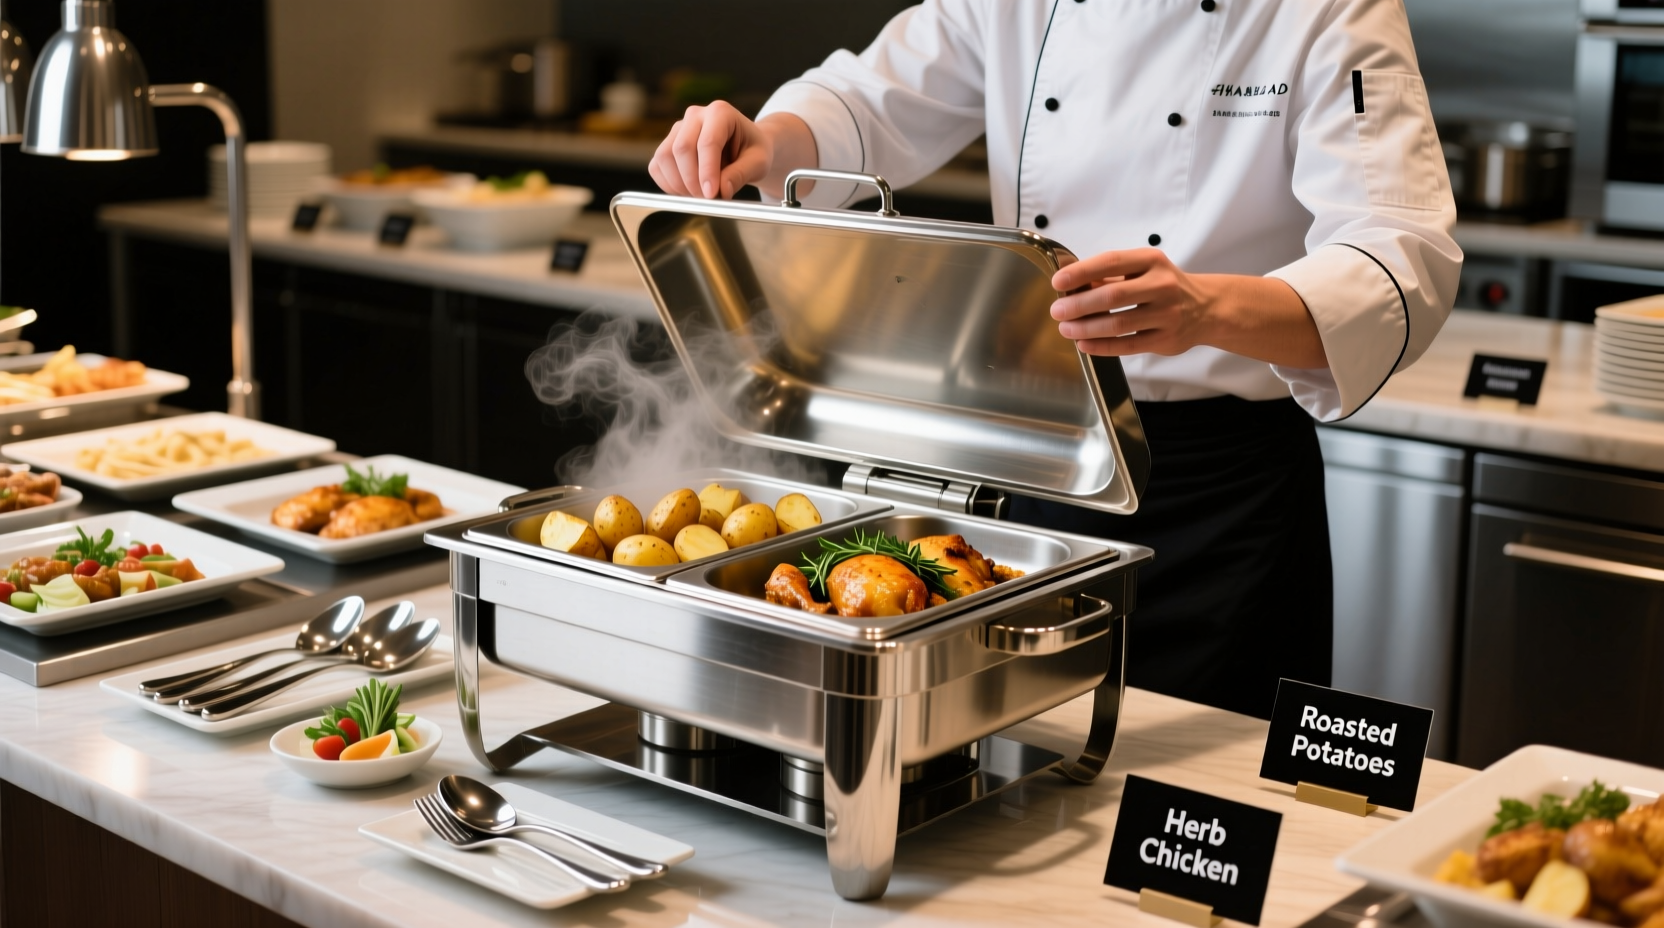
A chafing dish—often referred to as a steam table in catering contexts—is a portable warming unit that uses water and heat sources to maintain food temperature. It consists of several key components:
- Metal frame: Provides structural support and often includes adjustable height settings.
- Water pan: Placed beneath food pans, it holds hot water to create steam-based indirect heating.
- Food pans (GN pans): Stainless steel containers that fit into the top of the chafer, usually sized in standard gastronorm (GN) dimensions like 1/1, 1/2, or 1/3.
- Lid (dome cover): Retains heat and moisture while protecting food from contamination.
- Heat source: Typically chafing fuel cans (gel or liquid) placed beneath the water pan.
The system works by heating water in the pan, which generates consistent, gentle steam that warms the food above without scorching. This method is ideal for delicate items like scrambled eggs, mashed potatoes, or braised meats.
Step-by-Step Guide to Proper Chafer Setup
Correct assembly ensures maximum efficiency and food safety. Follow this sequence for reliable results every time:
- Choose a stable, level surface. Uneven tables can cause water to pool on one side, leading to inconsistent heating.
- Assemble the frame and insert the water pan. Ensure it sits securely and is free of debris.
- Add hot water to the water pan—about 1–1.5 inches deep. Use near-boiling water to jumpstart the heating process.
- Place the food pan(s) into the chafer. Fill no more than 2/3 full to allow for even heat distribution.
- Cover with the lid and let the unit pre-warm for 10–15 minutes.
- Ignite the fuel canister and place it in the holder beneath the water pan. Use only the recommended number of cans (usually one per pan).
- Monitor temperature after 20 minutes using a calibrated thermometer. Food should reach and maintain 135°F (57°C) or higher.
Once operational, avoid lifting the lid frequently. Each opening releases heat and moisture, increasing the risk of temperature drops below safe holding levels.
Do’s and Don’ts of Chafer Operation
| Do’s | Don’ts |
|---|---|
| Use fresh, high-quality chafing fuel for consistent burn times. | Overfill food pans—this restricts heat circulation. |
| Stir food occasionally to distribute heat evenly. | Use water pans with cracks or warping—replace them immediately. |
| Label each dish with name and allergens for guest clarity. | Leave fuel unattended once lit—always supervise during operation. |
| Replace fuel cans every 2 hours for continuous service. | Place chafers near flammable materials like curtains or napkins. |
| Pre-chill cold foods in serving pans before adding ice for cold displays. | Use household ovens or microwaves to reheat food directly in chafing pans—thermal shock can warp metal. |
Expert Insight: Safety and Efficiency in High-Volume Service
“Temperature control isn’t just about quality—it’s a legal requirement. A single lapse in hot-holding can lead to bacterial growth and foodborne illness. I always recommend digital probe thermometers and backup fuel on hand.” — Carlos Mendez, Certified Catering Manager & ServSafe Instructor
Professional caterers emphasize the importance of HACCP (Hazard Analysis Critical Control Point) principles when managing buffet lines. Time and temperature are critical control points. Foods must not remain in the “danger zone” (40°F–140°F) for more than two hours. For outdoor events or air-conditioned venues with fluctuating temperatures, additional precautions are essential.
Real-World Example: Wedding Buffet Recovery
A catering team arrived at an outdoor garden wedding to find that two of their chafers had been assembled without water pans due to a miscommunication. The fuel was lit, and dry pans were heating rapidly. Recognizing the hazard, the lead chef shut down the units immediately, refilled the water pans with hot water, and replaced the food with backup portions held in warming ovens. Though stressful, the incident highlighted the need for standardized checklists and team briefings before service.
The event ultimately succeeded, but the lesson was clear: even experienced teams benefit from structured protocols. Since then, the company implemented a pre-service inspection sheet used across all events.
Essential Checklist for Flawless Chafer Service
- ☑ Inspect chafing dishes for damage or warping
- ☑ Confirm availability of correct-sized GN pans
- ☑ Prepare enough chafing fuel (minimum 2 cans per station)
- ☑ Preheat water using a kettle or urn
- ☑ Calibrate thermometers and test flame height
- ☑ Assign staff roles for monitoring and refilling
- ☑ Position chafers away from foot traffic and drafts
Frequently Asked Questions
How long does a chafing fuel can last?
Standard 2-hour gel or liquid fuel cans typically provide 2 hours of consistent heat. High-output cans may last up to 3 hours but require compatible holders. Never rely on a single can for services longer than 2 hours—rotate them proactively.
Can I use electric chafers instead of fuel-based ones?
Yes. Electric chafers plug into power sources and offer precise temperature control with no open flame. They’re ideal for indoor venues with accessible outlets and eliminate concerns about ventilation or fuel storage. However, they lack portability for remote locations.
Why is my food drying out even with the lid on?
This often happens when the water pan runs dry or when food is held too long. Replenish water every 90 minutes and avoid holding food beyond 4 hours. For moisture-sensitive dishes like rice or casseroles, add a splash of broth or butter before service.
Optimizing Layout and Guest Flow
Beyond technical setup, consider how chafers fit into the overall buffet design. Place high-demand items like proteins and starches at opposite ends to prevent crowding—a technique known as the “buffet loop.” Keep serving utensils clean and aligned, with spares nearby. Label dishes clearly, including vegan, gluten-free, or nut-containing options.
Spacing matters: allow at least 18 inches between chafers for airflow and safety. Overcrowded setups trap heat, increase fire risk, and make replenishment difficult.
Conclusion
Mastering chafer dish setup and use transforms buffet service from a logistical challenge into a seamless, professional experience. With attention to detail—from preheating water pans to rotating fuel cans—you ensure food remains safe, flavorful, and visually appealing throughout the event. Whether you're managing a corporate luncheon or a backyard celebration, these practices build trust with guests and reflect culinary professionalism.


 浙公网安备
33010002000092号
浙公网安备
33010002000092号 浙B2-20120091-4
Comments
No comments yet. Why don't you start the discussion?