
Finding the center of a circle may seem like a simple task, but without the right approach, it can lead to inaccuracies—especially in practical applications like carpentry, engineering, or design. Whether you're working on a blueprint, crafting a wooden table, or solving a geometry problem, knowing how to locate the center of a circle with precision is a foundational skill. The good news? You don’t need advanced tools or complex math. With basic instruments and an understanding of geometric principles, anyone can master this technique.
Why Locating the Center Matters
The center of a circle is more than just a point—it's the anchor from which all other measurements derive. Radius, diameter, circumference, and symmetry all depend on knowing this central point. In real-world applications, such as aligning gears, designing circular furniture, or creating symmetrical artwork, even a slight offset can cause misalignment, imbalance, or structural flaws.
Despite its importance, many people rely on estimation, which introduces error. Instead, applying time-tested geometric methods ensures accuracy and consistency. These techniques are rooted in Euclidean geometry but are accessible to anyone willing to follow a few logical steps.
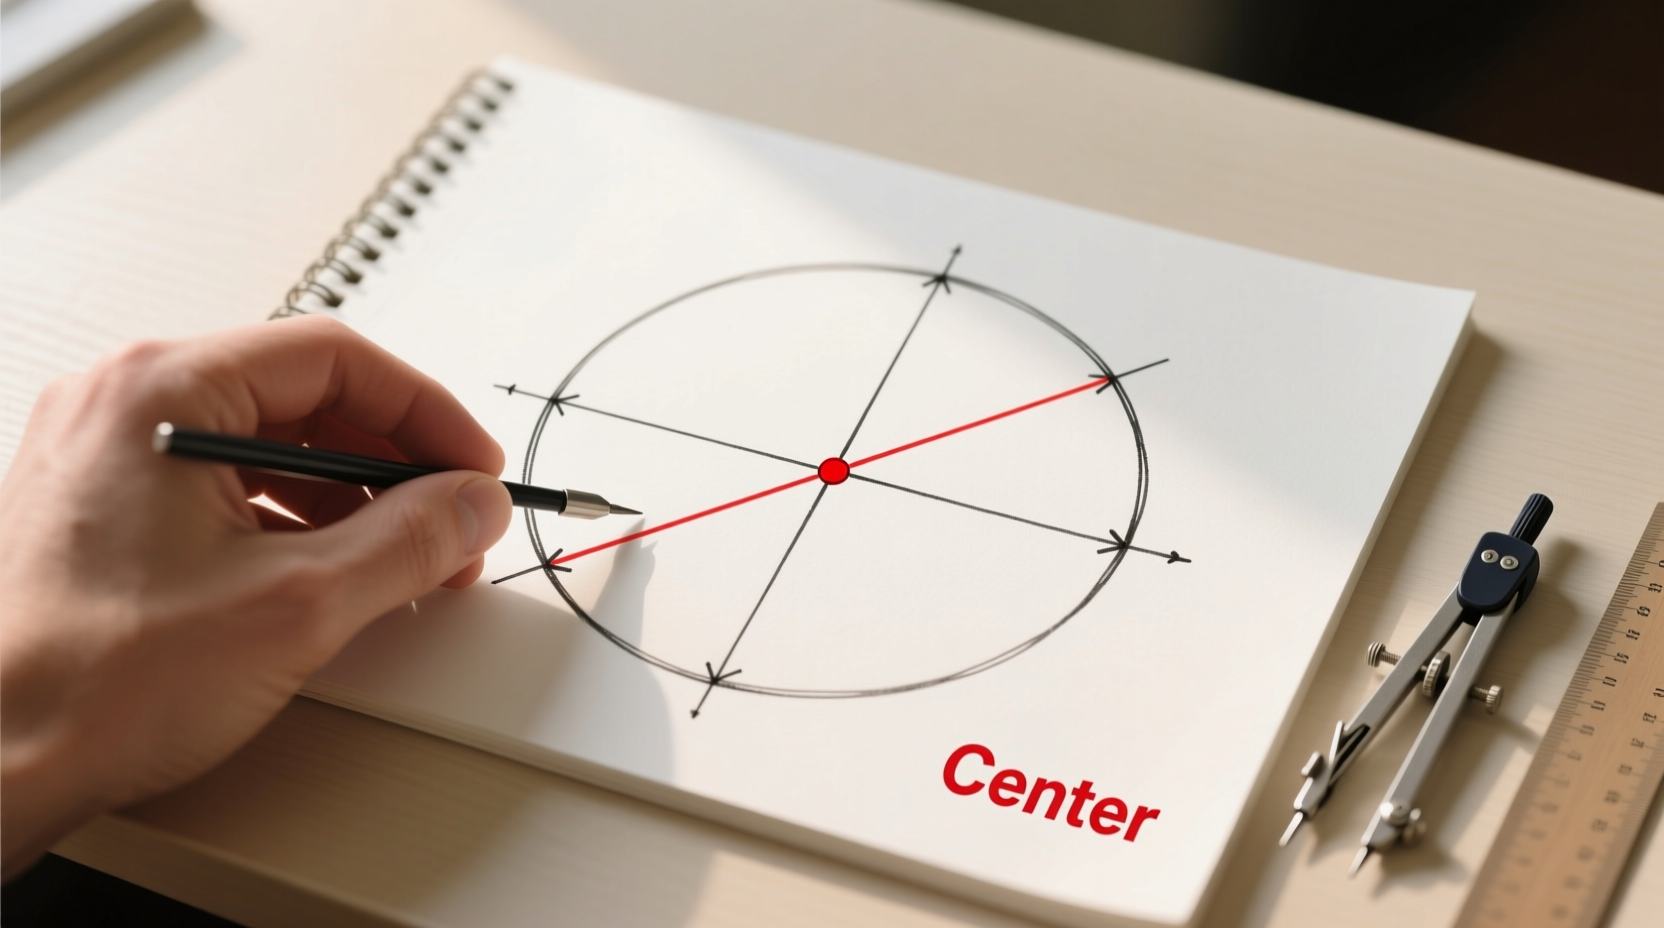
Method 1: Using Perpendicular Bisectors of Chords
This is one of the most reliable and widely taught methods in geometry. It relies on a fundamental property: the perpendicular bisector of any chord in a circle passes through the center.
To apply this method:
- Draw any chord across the circle using a straightedge. Label the endpoints A and B.
- Using a compass, set a width greater than half the length of AB. Place the compass at A and draw arcs above and below the chord.
- Without changing the compass width, repeat from point B, creating two intersecting arcs.
- Draw a straight line connecting the two intersection points. This is the perpendicular bisector of chord AB.
- Repeat the process with a second chord (not parallel to the first) to get a second perpendicular bisector.
- The point where the two bisectors intersect is the exact center of the circle.
Why This Works
In a circle, every point is equidistant from the center. Therefore, the set of points equidistant from A and B lies along the perpendicular bisector of AB. Since the center must be equidistant from both ends of any chord, it must lie on this bisector. Two such bisectors uniquely determine the center.
Method 2: Using a Right Angle (Thales’ Theorem)
An elegant alternative uses Thales’ Theorem: if a triangle is inscribed in a circle with one side as the diameter, then the angle opposite that side is a right angle. We can reverse this principle to find the center.
- Place a right-angled object (like a carpenter’s square or protractor) on the circumference so that the two legs touch the circle at two points, P and Q.
- Mark these points and draw the line segment PQ—it forms the hypotenuse of a right triangle inscribed in the circle.
- According to Thales’ Theorem, PQ must be a diameter. <4>Find the midpoint of PQ using a ruler or compass. That midpoint is the center. <5>For verification, repeat with another right angle placement and confirm both diameters intersect at the same point.
“Geometry is not about memorizing formulas—it’s about recognizing patterns in space. The right angle method turns a theorem into a practical tool.” — Dr. Alan Reyes, Mathematics Educator
Practical Application Example
Imagine you’re restoring an old wooden tabletop with no visible center mark. You need to attach a pedestal base precisely in the middle. By placing a framing square along the edge and marking where the arms intersect the perimeter, you define a diameter. Measuring halfway gives you the center. Repeat once more at a different angle to confirm. Within minutes, you’ve located the exact center without guesswork.
Method 3: Folding Technique for Physical Circles
If you’re working with a physical circular object—like a paper disk, fabric piece, or thin metal sheet—you can use symmetry through folding.
- Fold the circle in half so that the edges align perfectly. Crease the fold sharply.
- Unfold and fold again in a different direction, ensuring the edges match.
- The intersection of the two creases is the center.
This method is fast, requires no tools, and is ideal for lightweight materials. However, precision depends on how cleanly the folds are made. For thicker materials, this method becomes impractical.
Comparison of Methods: When to Use Which
| Method | Best For | Tools Needed | Accuracy | Limits |
|---|---|---|---|---|
| Perpendicular Bisectors | Precision drawing, technical plans | Compass, straightedge | Very High | Requires flat surface and steady hand |
| Right Angle (Thales) | Carpentry, metalwork, large circles | Carpenter’s square, ruler | High | Needs a true right angle tool |
| Folding | Paper, fabric, lightweight materials | Hands only | Moderate | Not suitable for rigid or thick objects |
| Diameter Intersection (Estimation) | Quick approximations | Ruler | Low | Prone to human error |
Common Mistakes and How to Avoid Them
- Using short or poorly placed chords: Short chords amplify small measurement errors. Always use longer chords spaced apart.
- Incorrect compass pressure: Uneven arcs due to slipping compasses distort bisectors. Ensure the compass needle is secure.
- Assuming symmetry without verification: Never assume a manufactured circle is perfect. Always verify the center with a second method if precision is critical.
- Ignoring material thickness: On thick objects like pipes, measure from the outer edge but account for curvature when projecting inward.
Step-by-Step Checklist for Accuracy
Follow this checklist to ensure consistent results regardless of method:
- ✅ Clean the surface or drawing area to avoid obstructions.
- ✅ Use sharp tools—dull pencils or bent rulers reduce precision.
- ✅ Choose two non-parallel reference lines (chords or edges).
- ✅ Construct perpendiculars or diameters carefully with proper alignment.
- ✅ Verify the result by repeating one step or using a secondary method.
- ✅ Mark the center with a fine dot and circle it lightly for visibility.
Frequently Asked Questions
Can I find the center of a circle with only a ruler?
Yes, but with limitations. Draw two chords, find their midpoints with the ruler, and estimate perpendiculars. However, without a compass or right angle tool, accuracy drops significantly. For best results, combine the ruler with a protractor or square.
What if the circle is incomplete or damaged?
You can still reconstruct the center. Select three distinct points on the remaining arc. Construct perpendicular bisectors of the chords between them. The intersection of the bisectors will be the center, provided the points lie on the same original circle.
Is digital software more accurate than manual methods?
Digital tools like CAD programs offer high precision, especially for complex designs. However, manual methods build spatial intuition and are invaluable when technology isn't available. Combining both—sketching manually and verifying digitally—is often ideal.
Mastery Through Practice
Becoming proficient in locating the center of a circle isn’t about memorizing steps—it’s about understanding relationships. Each method reveals a deeper truth about symmetry and balance in circular forms. Architects use these principles to design domes, machinists apply them to calibrate parts, and artists rely on them for composition.
The key to mastery is repetition. Try each method on different surfaces: sketch on paper, work on a whiteboard, or practice on a wooden disk. Over time, you’ll develop an intuitive sense of alignment and proportion that goes beyond measurement.
“Precision begins with patience. The center isn’t found by rushing—it’s revealed through careful construction.” — Maria Lin, Industrial Designer
Take Action Today
Grab a compass, a ruler, and a blank sheet of paper. Draw a circle freehand or trace a plate. Then, apply the perpendicular bisector method. Once you’ve found the center, verify it with the right angle technique. Notice how each approach converges on the same point. This simple exercise builds confidence and skill.


 浙公网安备
33010002000092号
浙公网安备
33010002000092号 浙B2-20120091-4
Comments
No comments yet. Why don't you start the discussion?