
Crimping is more than just squeezing metal—it’s the foundation of reliable electrical and mechanical joints. Whether you're wiring a circuit board, assembling a custom harness, or crafting jewelry, the quality of your crimp determines performance, safety, and longevity. Crimping pliers, when used correctly, deliver consistent, gas-tight connections that outperform soldered joints in many applications. Yet too often, improper technique leads to intermittent failures, voltage drops, or mechanical weakness. This guide walks through the essentials of mastering crimping pliers, from tool selection to execution, ensuring every connection is both precise and secure.
Understanding Crimping and Why It Matters
A crimp is a mechanical connection formed by deforming a terminal or connector around a stripped wire. Unlike soldering, which relies on molten metal to bond conductors, crimping creates a cold weld—compressing the terminal and wire so tightly that air and moisture are excluded, preventing corrosion and ensuring conductivity. Properly executed, a crimp can be stronger and more vibration-resistant than the original wire.
The key to success lies in using the right crimping pliers and applying consistent pressure at the correct location. Poor crimps—either under-compressed or over-compressed—can lead to high resistance, overheating, or disconnection under stress. In automotive, aerospace, and industrial settings, a single faulty crimp can trigger system-wide failures. Even in DIY electronics or hobbyist projects, reliability starts with a solid mechanical bond.
“Crimping isn’t about force—it’s about precision. A perfect crimp should look seamless, feel solid, and last decades.” — James Rolen, Senior Electrical Technician, Industrial Controls Division
Selecting the Right Crimping Pliers and Terminals
Not all crimping pliers are created equal. The type you choose depends on the application, wire gauge, and terminal style. Using the wrong tool results in inconsistent deformation and weak joints.
Types of Crimping Pliers:
- Basic Hand Crimpers: Affordable and suitable for small-gauge wires (e.g., 22–16 AWG). Ideal for home electronics or low-volume work.
- Ratchet Crimpers: Deliver uniform pressure and prevent release until the cycle completes. Best for critical applications where consistency is non-negotiable.
- Adjustable Dies: Allow customization for different terminal sizes. Used in professional settings with varied crimp requirements.
- Insulated vs. Non-Insulated: Insulated crimpers have plastic-coated handles for safety; non-insulated models are lighter and often more durable.
Terminals also vary widely: butt splices, ring terminals, spade connectors, and quick-disconnects each require specific die profiles. Always match the terminal size (e.g., 16–14 AWG) to the wire gauge and crimp tool slot.
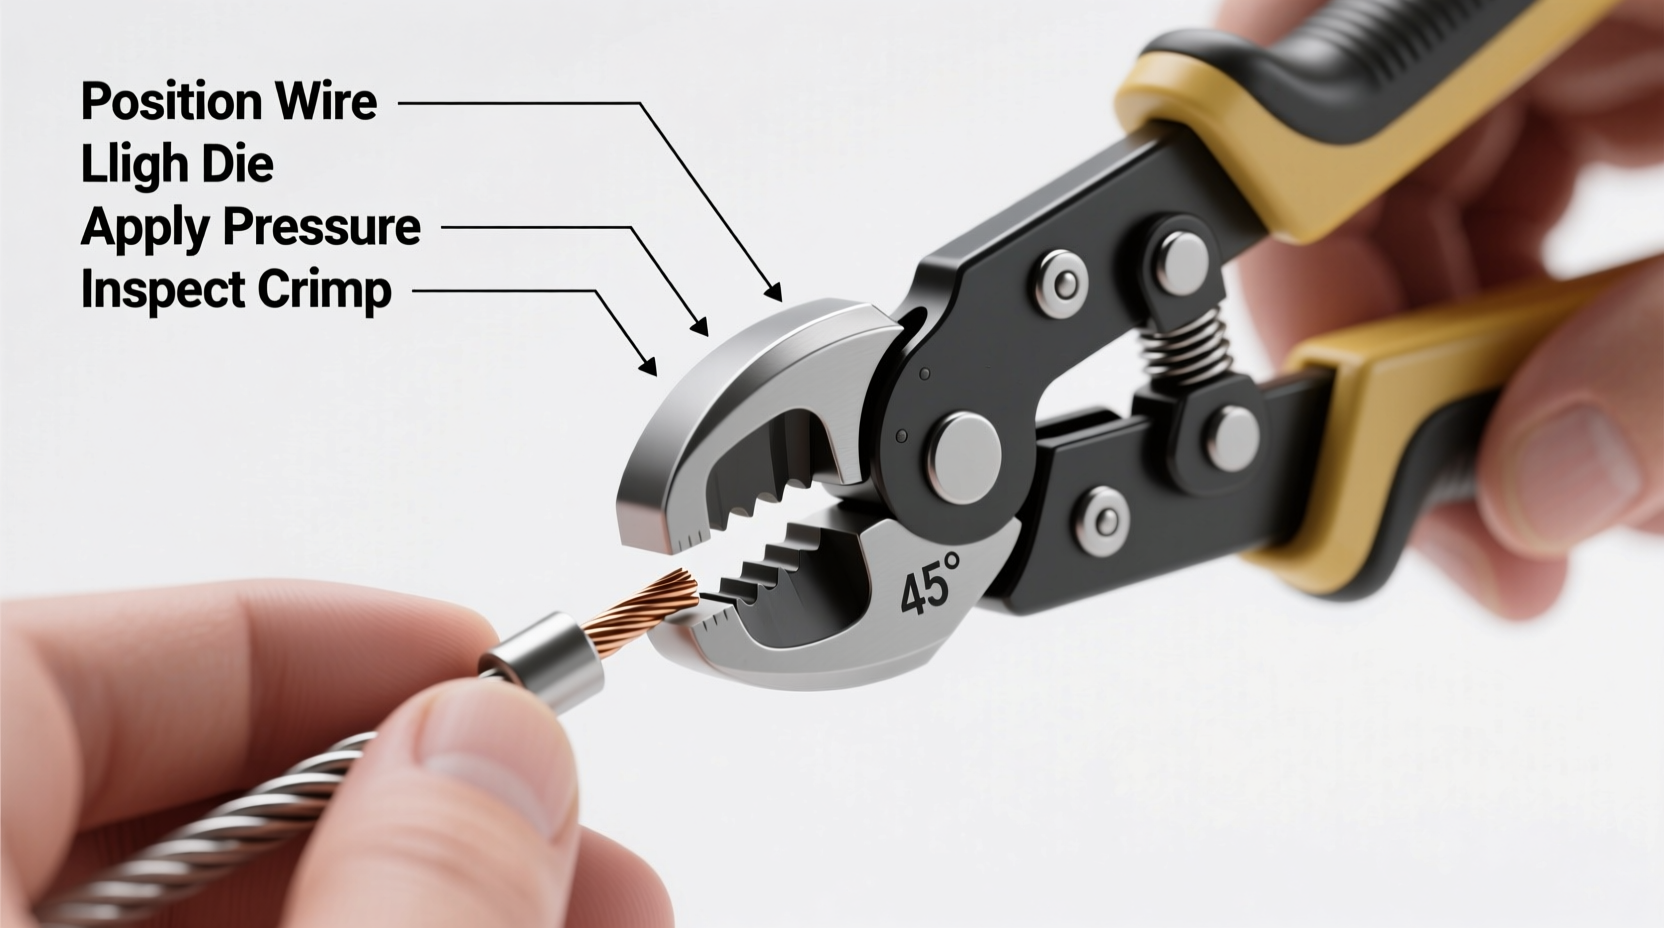
Step-by-Step Guide to a Perfect Crimp
Follow this sequence to create a secure, long-lasting crimp every time:
- Strip the Wire: Use a precision wire stripper to remove insulation without nicking the conductor. For 18 AWG wire, strip approximately ¼ inch (6 mm).
- Inspect the Conductor: Check for frayed strands or damage. Trim any stray wires flush with the end.
- Select the Correct Terminal: Match the terminal size to the wire gauge. A terminal labeled “16–14 AWG” works best with those gauges.
- Insert the Wire: Slide the bare wire fully into the terminal barrel until no copper is exposed beyond the metal sleeve.
- Position in Crimper: Place the terminal in the matching die section of the pliers. Most tools have color-coded or labeled sections (red for 22–18 AWG, blue for 16–14 AWG, etc.).
- Apply Pressure: Squeeze the handles firmly. With ratchet pliers, continue until the tool releases automatically. Do not re-crimp.
- Test the Connection: Gently tug the wire to ensure it doesn’t pull out. The terminal should remain securely attached.
- Inspect Visually: Look for even compression, no cracks in the metal, and proper alignment between wire and terminal.
This process may take less than a minute, but skipping steps compromises integrity. Consistency is achieved through repetition and attention to detail.
Do’s and Don’ts of Crimping: A Quick Reference Table
| Do’s | Don’ts |
|---|---|
| Use the correct die size for the terminal | Use needle-nose pliers as a substitute for crimping tools |
| Strip wire cleanly without damaging strands | Leave copper exposed outside the terminal barrel |
| Ensure full insertion of wire into terminal | Over-crimp or crush the terminal |
| Perform a pull test after crimping | Re-crimp a failed joint—replace the terminal instead |
| Store crimpers in a dry place to prevent corrosion | Use damaged or worn-out crimping tools |
Real-World Example: Fixing an Intermittent Car Headlight
A mechanic troubleshooting a flickering headlight discovered the issue wasn’t the bulb or fuse—it was a poorly crimped connector in the headlight harness. The original repair used a basic hand crimper, and the terminal had loosened due to engine vibration. Replacing the connector with a new one and using a ratcheting crimping tool eliminated the problem. The new crimp held firm, maintained conductivity, and survived months of road testing without failure.
This case illustrates how a seemingly minor crimp can impact system reliability. In vehicles, marine systems, or industrial machinery, vibrations and temperature swings demand mechanically sound connections. A properly crimped terminal resists fatigue far better than a soldered joint, which can crack under thermal cycling.
Advanced Tips for Professional Results
Even experienced users can improve their crimping outcomes with these refinements:
- Pre-Tin Wires Only If Necessary: While soldering inside a crimp is generally discouraged (it can cause cracking), pre-tinning stranded wire before crimping may help in high-vibration environments—provided the solder doesn’t extend beyond the barrel.
- Use a Magnifier: Small terminals (e.g., 24–26 AWG) benefit from visual inspection under magnification to confirm proper seating and compression.
- Label Your Tools: If you own multiple crimpers, label them by gauge range to avoid confusion during fast-paced work.
- Maintain Your Tools: Clean the dies regularly with a soft brush and apply light machine oil to hinges. Replace worn jaws immediately.
“In mission-critical wiring, we don’t trust eyeballs—we trust calibrated tools and documented procedures.” — Lt. Col. Maria Tran, Avionics Maintenance Unit, USAF Reserve
Frequently Asked Questions
Can I crimp insulated and non-insulated terminals with the same tool?
Yes, most modern crimping pliers support both types, provided the gauge and terminal size match the correct die. However, some specialized tools are designed only for non-insulated terminals. Always verify compatibility before use.
How do I know if my crimp is good?
A successful crimp has three qualities: mechanical strength (the wire won’t pull out under moderate force), electrical continuity (low resistance measured with a multimeter), and visual correctness (even deformation, no gaps, no exposed copper).
Is crimping better than soldering?
In most cases involving stranded wire, yes. Crimping provides superior mechanical strength, especially under vibration, and avoids heat-related damage to insulation. Solder can wick up the wire and create a rigid point prone to fatigue cracking. For permanent, high-reliability connections, crimping is preferred by professionals.
Final Checklist: Achieving Mastery with Crimping Pliers
- Choose the right crimping tool for your wire gauge and terminal type.
- Use precision wire strippers to prepare conductors cleanly.
- Match terminal size exactly to wire gauge.
- Insert wire fully into the terminal barrel before crimping.
- Use the correct die position on the pliers.
- Apply full, even pressure—let ratchet tools complete the cycle.
- Inspect and test each crimp for security and conductivity.
- Replace damaged terminals or wires—never compromise on quality.
Conclusion: Precision Starts with Practice
Mastering crimping pliers isn’t about owning the most expensive tool—it’s about developing disciplined habits. Each crimp is a promise of reliability, whether you’re building a prototype, repairing a car, or installing solar panels. By selecting the right equipment, following proven techniques, and inspecting your work, you ensure every connection meets professional standards. The difference between a temporary fix and a lasting solution lies in the details. Pick up your crimping pliers today, follow this guide, and start making connections you can trust.


 浙公网安备
33010002000092号
浙公网安备
33010002000092号 浙B2-20120091-4
Comments
No comments yet. Why don't you start the discussion?