
Cream puffs are a classic dessert that combine elegance with simplicity. Their golden, hollow shells hold rich pastry cream or whipped cream, delivering a satisfying contrast of textures. Despite their sophisticated appearance, cream puffs are surprisingly accessible—even for beginner bakers. The key lies in mastering the choux pastry, a versatile dough that puffs dramatically in the oven. With precise technique and attention to detail, anyone can produce light, crisp, and perfectly shaped puffs at home.
The magic of choux pastry is its ability to rise without yeast or baking powder. Instead, it relies on steam generated from water and eggs during baking. This creates large air pockets inside, ideal for filling. When executed correctly, cream puffs boast a delicate crunch on the outside and an airy interior. Yet small missteps—like underbaking or incorrect egg incorporation—can lead to deflated or soggy results. This guide breaks down each stage, offering practical advice, proven methods, and professional insights to ensure consistent success.
The Science Behind Choux Pastry
Understanding how choux pastry works is essential to mastering it. Unlike most doughs, choux is cooked twice: first on the stovetop, then in the oven. The initial cooking gelatinizes the starch in the flour, allowing it to absorb more liquid. When baked, the high moisture content turns to steam, causing the dough to expand rapidly. As the structure sets, the puffs retain their shape while drying out internally.
Eggs play a critical role. They add moisture for steam, protein for structure, and fat for tenderness. The number of eggs required can vary based on humidity and flour absorption, so adding them gradually ensures the correct consistency. Overmixing after adding eggs can deflate the batter slightly, but proper mixing is necessary for emulsification.
“Choux pastry is one of the few batters where precision meets intuition. You need exact measurements, but also the ability to read the texture.” — Chef Antoine Morel, Pastry Instructor at Le Cordon Bleu
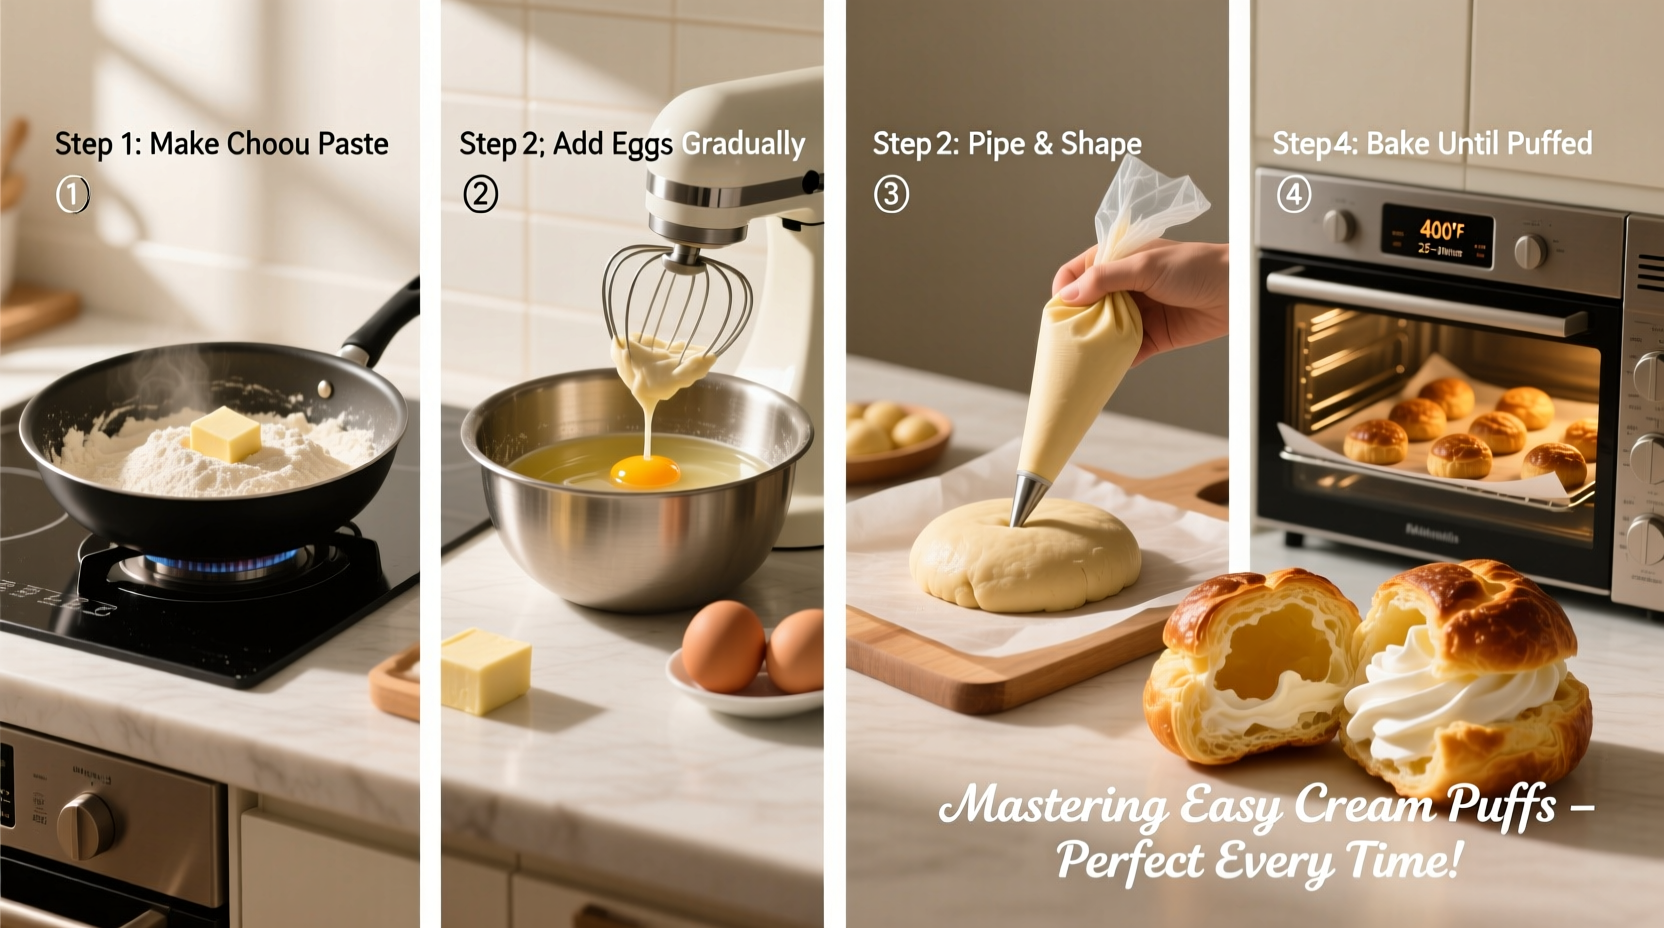
Step-by-Step Guide to Perfect Cream Puffs
Follow this detailed timeline to create flawless cream puffs from start to finish. Each phase builds on the last, ensuring optimal rise, texture, and stability.
- Preheat oven to 425°F (220°C). A hot oven is crucial for immediate lift when the puffs go in.
- Prepare baking sheets. Line two trays with parchment paper or silicone mats. Mark 1.5-inch circles lightly with a pencil if you want uniform size.
- Cook the base. In a medium saucepan, combine 1/2 cup water, 1/2 cup whole milk, 8 tablespoons unsalted butter, and a pinch of salt. Bring to a rolling boil.
- Add flour all at once. Stir vigorously with a wooden spoon until the mixture forms a smooth ball and pulls away from the pan. Cook for 1–2 minutes to dry the dough slightly.
- Cool slightly. Transfer to a bowl and let cool for 3 minutes. Adding eggs too soon can cook them prematurely.
- Incorporate eggs. Beat in eggs one at a time, fully incorporating each before adding the next. Stop when the batter falls from the spoon in a thick ribbon that slowly dissolves into itself.
- Pipe the puffs. Use a piping bag fitted with a round tip (about 1/2 inch) to form mounds spaced 2 inches apart. Smooth peaks with a damp finger to prevent burning.
- Bake at 425°F for 15 minutes. This high heat triggers rapid expansion.
- Reduce heat to 350°F (175°C) and bake 20–25 minutes more. Do not open the oven door during baking—steam escape causes collapse.
- Test for doneness. Puffs should be deep golden and sound hollow when tapped. Pierce each with a skewer to release steam and prevent sogginess.
- Cool completely. Allow puffs to cool on a wire rack before filling to maintain crispness.
Filling and Finishing Techniques
Once cooled, cream puffs can be filled using several methods. For clean presentation, insert a small knife into the side and pipe in filling using a narrow tip. Alternatively, slice off the top third like a lid, fill generously, and replace the cap.
Classic options include vanilla pastry cream, chocolate ganache, or lightly sweetened whipped cream. For longer storage, fill just before serving to preserve texture. Dust with powdered sugar or drizzle with melted chocolate for an elegant finish.
| Filling Type | Best For | Storage Limit |
|---|---|---|
| Pastry Cream | Dinner parties, formal events | 24 hours refrigerated |
| Whipped Cream | Same-day serving, light texture | 6 hours |
| Chantilly Cream | Sweet, aromatic flavor | 12 hours |
| Chocolate Ganache | Richer desserts, colder months | 48 hours |
Troubleshooting Common Issues
Even experienced bakers encounter challenges with choux. Here’s how to diagnose and fix frequent problems:
- Puffs didn’t rise: Oven wasn’t hot enough, or door was opened too early. Always preheat thoroughly and avoid peeking.
- Shells collapsed after removal: Underbaked. Extend baking time by 5–10 minutes and always vent with a skewer.
- Dough too runny: Too many eggs added. Measure eggs beforehand and add gradually until the right consistency is reached.
- Cracked surfaces: Normal and often beneficial—it allows steam to escape evenly. However, excessive cracking may indicate overmixing or too much flour.
- Soggy interiors: Cooling in a humid environment or improper venting. Cool completely on a wire rack with space between puffs.
Real-World Example: Baking for a Summer Wedding
Sophie, a home baker from Portland, was asked to provide dessert for her sister’s outdoor wedding. She chose mini cream puffs filled with lemon pastry cream and topped with edible flowers. Concerned about heat and humidity, she tested her recipe three times in varying conditions.
Her first batch collapsed in the afternoon sun. After researching, she realized she hadn’t baked the shells long enough. On her second attempt, she extended baking by 10 minutes and vented each puff. The shells held up better but absorbed moisture overnight. Her final solution: bake shells two days ahead, store in an airtight container with rice packets to absorb humidity, and fill the morning of the event. The result? Over 200 perfectly crisp, flavorful puffs that guests raved about.
Sophie’s experience highlights the importance of environmental factors and planning—especially when serving cream puffs in warm climates.
Essential Checklist for Success
Use this checklist before starting to ensure you’re set up for flawless results:
- ✅ Preheat oven fully and use an oven thermometer for accuracy
- ✅ Line baking sheets properly to prevent sticking
- ✅ Weigh or measure ingredients precisely—especially flour and liquid
- ✅ Cool cooked dough slightly before adding eggs
- ✅ Add eggs one at a time, checking consistency after each
- ✅ Pipe uniform sizes for even baking
- ✅ Do not open oven during the first 20 minutes
- ✅ Vent puffs after baking to release internal moisture
- ✅ Cool completely before filling
- ✅ Store unfilled shells in airtight containers for up to 2 days
Frequently Asked Questions
Can I make cream puff shells ahead of time?
Yes. Bake and cool the shells completely, then store in an airtight container at room temperature for up to 48 hours. For longer storage, freeze them for up to 3 months. Re-crisp in a 300°F oven for 5–10 minutes before filling.
Why did my choux paste turn out too stiff?
This usually happens when too much flour is used or eggs aren’t fully incorporated. Ensure you measure flour correctly (spoon and level, don’t scoop), and beat the mixture well after each egg addition until smooth and glossy.
Can I use gluten-free flour for cream puffs?
Traditional choux relies on wheat gluten for structure. While some gluten-free blends work, they often require xanthan gum and careful hydration control. For best results, use a blend formulated for pastry or bread applications, and expect slight variations in rise and texture.
Mastery Starts with Practice
Cream puffs are deceptively simple, yet achieving perfection requires attention to timing, temperature, and texture. The beauty of choux pastry lies in its adaptability—it can be shaped into éclairs, gougères, or even savory profiteroles. Once you master the fundamentals, the possibilities expand far beyond dessert.
Don’t be discouraged by early attempts that don’t rise or crack unevenly. Even professional bakers adjust their method based on weather, equipment, and ingredient batches. Keep notes, refine your technique, and celebrate small improvements. With each batch, you’ll develop a feel for the batter and confidence in your results.


 浙公网安备
33010002000092号
浙公网安备
33010002000092号 浙B2-20120091-4
Comments
No comments yet. Why don't you start the discussion?