
Finding the origin of an image, identifying unknown objects, or locating higher-resolution versions can be challenging—especially in an age where visuals dominate communication. Google Reverse Image Search is one of the most powerful tools available for answering these questions. Yet, many users only scratch the surface of its capabilities. This guide dives deep into advanced techniques, practical workflows, and real-world applications to help you master reverse image searching with precision and confidence.
Why Reverse Image Search Matters Today
In a world flooded with digital content, verifying authenticity has never been more important. From spotting fake social media profiles to tracing stolen artwork or identifying plant species from a photo, reverse image search bridges the gap between curiosity and knowledge. It’s used by journalists, researchers, marketers, and everyday users who want to confirm what they’re seeing online.
Google’s tool doesn’t just match pixels—it analyzes context, color patterns, text within images, and metadata (when available) to deliver relevant results. The technology behind it combines computer vision with vast indexing, making it possible to find variations of an image across forums, e-commerce sites, news articles, and social networks.
“Reverse image search is not just about finding pictures—it’s about understanding their journey across the web.” — Dr. Lena Torres, Digital Forensics Researcher at MIT Media Lab
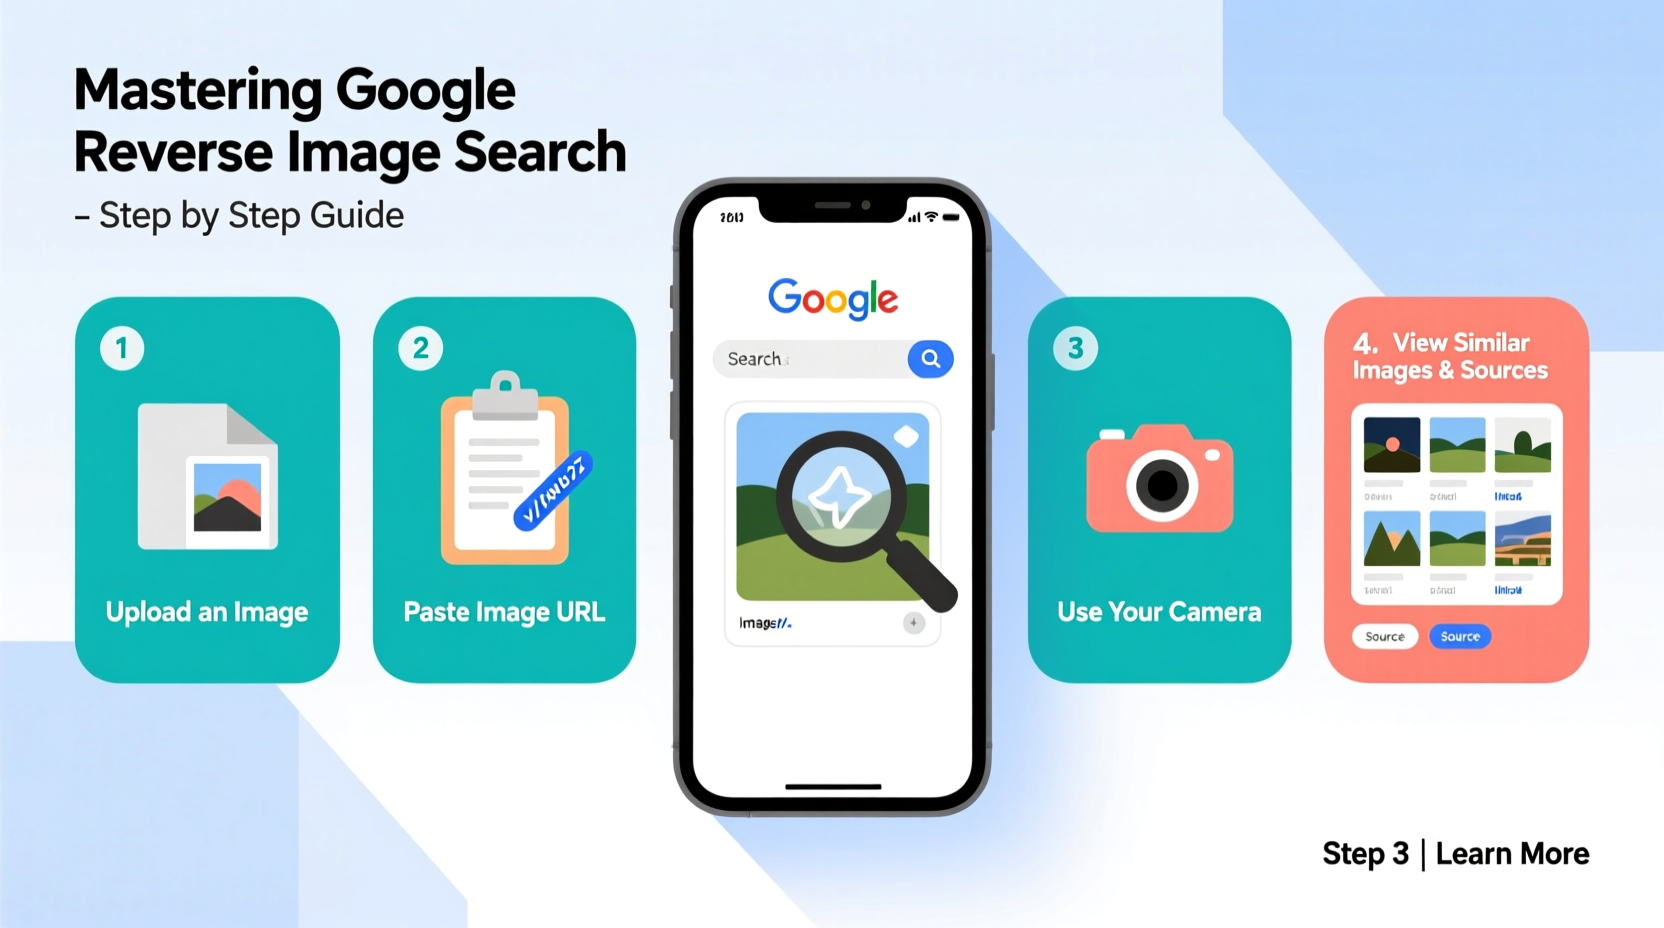
Step-by-Step Guide: How to Perform a Reverse Image Search
Whether you're on desktop or mobile, the process is straightforward—but knowing how to optimize each step makes all the difference.
- Open Google Images: Go to images.google.com. Ensure you're logged into your Google account if you want personalized results or history tracking.
- Click the Camera Icon: Located inside the search bar, this opens the upload options.
- Choose Your Method:
- Upload an image: Select a file from your device.
- Paste image URL: If the image is already online, copy its direct link.
- Drag and drop: On desktop, drag an image directly into the browser window.
- Analyze Results: Wait for Google to return matches. Look for:
- Pages where the image appears
- Sizes and resolutions
- Related searches and visually similar images
- Refine with Filters: Use tools like “Size,” “Color,” “Type,” and “Time” to narrow results based on your goal (e.g., recent uses, specific image types).
Advanced Techniques for Better Accuracy
Basic searches yield results, but mastery comes from refinement. These strategies improve success rates significantly.
Crop Before Uploading
If the image contains multiple elements, crop to focus on the subject of interest. A tight crop reduces noise and increases relevance. For example, isolating a logo from a cluttered screenshot helps identify brands faster.
Use Incognito Mode for Neutral Results
Your browsing history influences Google's output. To get unbiased matches, run searches in incognito mode or clear your cache before starting.
Leverage Metadata When Possible
While Google doesn't always extract EXIF data, other tools like TinEye or specialized forensic software may detect timestamps, GPS coordinates, or camera models. Pair Google’s visual analysis with metadata readers for deeper insights.
Combine Text and Visual Search
After running a reverse image search, scan the top results for keywords. Then perform a regular Google search using those terms alongside descriptors like “origin,” “copyright,” or “high resolution.” This hybrid approach often uncovers hidden context.
| Scenario | Best Practice | Avoid |
|---|---|---|
| Identifying a person | Crop face tightly; add known names to keyword search | Using low-quality thumbnails |
| Tracking image theft | Search exact filename + site:.com filters | Assuming first result is original |
| Finding product source | Include size, color, and brand clues in follow-up queries | Relying solely on visual match without verification |
Real-World Example: Tracing a Viral Meme
In early 2023, a meme featuring a confused-looking cat in a spacesuit circulated widely on Reddit and Twitter. Users joked it was “NASA’s secret feline astronaut.” A journalist investigating misinformation used reverse image search to trace its roots.
By uploading the image, she discovered the earliest appearance dated back to 2017 on a Ukrainian art blog. The artist confirmed it was a digital illustration titled *Cosmic Kitty*, created as part of a surrealism series. Further searches revealed commercial use on merchandise sites without permission.
This case illustrates how reverse image search supports fact-checking and intellectual property protection. Without it, false narratives persist, and creators lose control over their work.
Checklist: Mastering Reverse Image Search
- ✅ Start with a high-quality version of the image
- ✅ Crop irrelevant background elements
- ✅ Try both upload and URL paste methods
- ✅ Review \"visually similar\" results for leads
- ✅ Filter by date to track recent usage
- ✅ Cross-reference findings with keyword searches
- ✅ Verify claims through multiple sources
- ✅ Document your search path for future reference
Common Pitfalls and How to Avoid Them
Even experienced users make mistakes that compromise accuracy.
Mistake 1: Assuming the First Result Is Original
Google ranks relevance, not chronology. The top hit might be a popular blog post—not the source. Scroll down and look for older domains or niche platforms.
Mistake 2: Ignoring Image Modifications
Edited versions (cropped, filtered, resized) may not appear in initial results. Use the “Tools” dropdown to explore different sizes and formats.
Mistake 3: Overlooking Context Clues
Sometimes the surrounding text on a webpage gives away the true story. Read captions, article intros, and comments carefully.
“Many people stop at the first page of results. But the truth often hides on page three or four—especially with obscure or manipulated images.” — Mark Chen, Open Source Intelligence Analyst
FAQ: Frequently Asked Questions
Can I reverse search images on my phone?
Yes. On Android or iOS, open the Google app or Chrome browser, go to Google Images, tap the camera icon, and either upload a photo or paste a URL. Some devices also allow long-pressing an image in certain apps and selecting “Search Image with Google.”
Does Google store my uploaded images?
Uploaded images are temporarily stored to process the query. According to Google’s privacy policy, they do not retain files permanently unless required for legal reasons. However, avoid uploading sensitive personal photos.
What if no results appear?
No matches don’t mean the image isn’t online. It could be too new, heavily edited, or hosted behind login walls. Try alternative engines like TinEye or Yandex Images, which sometimes index different corners of the web.
Beyond Google: Alternative Tools Worth Knowing
While Google leads in usability and reach, complementary tools offer unique advantages:
- TinEye: Excellent for tracking long-term usage and detecting minor alterations.
- Yandex.Images: Strong performance with faces and Russian/Eastern European content.
- Bing Visual Search: Integrates well with Microsoft products and offers shopping-focused results.
For critical investigations, run the same image across multiple platforms. Each uses different algorithms and crawlers, increasing your chances of discovery.
Conclusion: Take Control of Visual Information
Mastering Google Reverse Image Search isn’t just a technical skill—it’s a form of digital literacy. In an era where visuals shape opinions, influence decisions, and spread rapidly, being able to trace, verify, and understand images empowers you to navigate the internet with greater awareness and integrity.
From protecting creative work to debunking falsehoods, the ability to ask, “Where did this come from?” and actually get answers is invaluable. Apply these techniques consistently, stay curious, and refine your approach with every search.


 浙公网安备
33010002000092号
浙公网安备
33010002000092号 浙B2-20120091-4
Comments
No comments yet. Why don't you start the discussion?