
Hand embroidery transforms ordinary garments into wearable art. Whether you're personalizing a denim jacket, adding delicate details to a linen shirt, or reviving a faded dress, hand embroidery offers endless creative potential. Unlike machine stitching, handwork carries a human touch—each stitch tells a story. With patience and practice, anyone can learn to embroider beautifully on clothing. The key lies in understanding fabric behavior, choosing the right tools, and mastering foundational stitches.
Selecting the Right Fabric and Garment
Not all fabrics respond the same way to embroidery. The garment’s material affects how stitches hold, how the design lays, and whether puckering occurs. Natural fibers like cotton, linen, and silk generally accept embroidery well due to their stable weave and ability to handle tension. Lightweight knits or stretchy synthetics, however, can distort under needle pressure unless properly stabilized.
When choosing a garment, consider both fiber content and structure. A crisp cotton poplin shirt holds intricate patterns better than a loose-knit sweater. Vintage pieces often have excellent fabric quality but may be fragile—test a small area first. Avoid overly stiff or heavily treated materials, as they resist needle penetration and increase thread breakage.
Essential Tools and Materials
Success begins with proper supplies. Invest in quality tools—they make a visible difference in precision and comfort.
- Embroidery needles: Use sharp crewel (or “cheneille”) needles for woven fabrics; betweens for tighter weaves. Blunt tapestry needles work best on knits to avoid splitting fibers.
- Embroidery floss: Six-strand cotton floss (like DMC) is standard. Separate strands based on desired thickness—two or three strands are ideal for clothing.
- Hoop or frame: A wooden or plastic embroidery hoop keeps fabric taut. For larger projects, consider a Q-snaps frame to reduce hand fatigue.
- Scissors: Small, sharp embroidery scissors ensure clean cuts without damaging fabric.
- Water-soluble pen or transfer paper: For marking designs accurately without permanent residue.
- Fusible stabilizer: Especially useful for lightweight or stretchy fabrics to prevent distortion during stitching.
| Fabric Type | Recommended Stabilizer | Best Stitch Types |
|---|---|---|
| Cotton/Linen | Lightweight tear-away | Backstitch, satin stitch, French knots |
| Knit/Jersey | Fusible cut-away | Running stitch, chain stitch, lazy daisy |
| Silk/Chiffon | Water-soluble film | Stem stitch, seed stitch, detached chain |
| Denim | None or light tear-away | Satin stitch, couching, feather stitch |
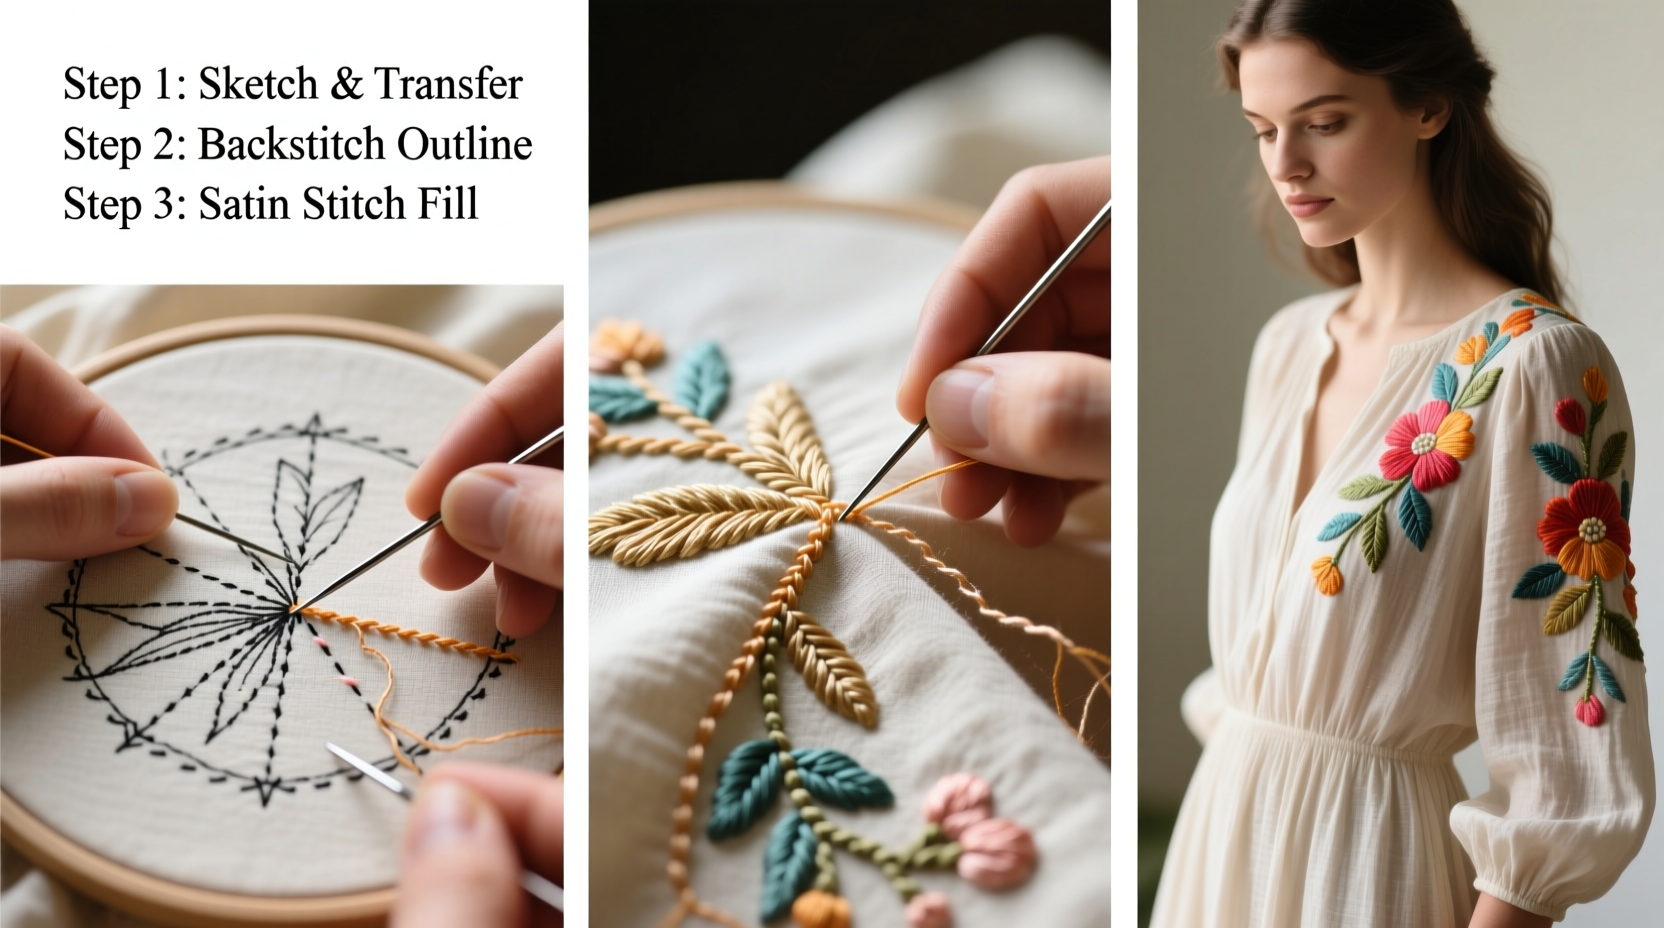
Step-by-Step Embroidery Process
- Choose or create a design: Start simple—a floral motif, monogram, or geometric shape. Print or draw it at actual size.
- Transfer the design: Use a lightbox, window, or transfer paper to trace the outline onto the garment. For complex patterns, try a water-soluble pen that disappears after washing.
- Secure the fabric: Place the garment section in the hoop. If needed, apply stabilizer to the back using a warm iron.
- Thread the needle: Cut about 18 inches of floss. Use fewer strands (2–3) for fine detail, more for bold areas. Knot the end securely.
- Begin stitching: Start with outlining stitches like backstitch or stem stitch. Then fill shapes with satin stitch or French knots. Keep tension even—tight enough to lie flat, not so tight it distorts the fabric.
- Finish and secure: After completing a section, run the thread under existing stitches on the back to lock it. Trim excess.
- Remove markings: Gently dab any remaining pencil or pen marks with a damp cloth. Let dry completely.
- Wash carefully: Hand wash the garment in cool water with mild detergent. Air dry flat to preserve the embroidery.
Common Stitches and Their Uses
Mastering a few core stitches opens up vast design possibilities. Practice each on scrap fabric before applying to clothing.
- Backstitch: Ideal for clean outlines and text. Creates a continuous line by overlapping stitches.
- Stem stitch: Slightly twisted, great for curved lines like stems or vines.
- Satin stitch: Fills shapes with smooth, dense color. Best used in small areas to avoid bulk.
- French knots: Add texture and dimension—perfect for flower centers or polka dots.
- Chain stitch: Bold and decorative, works well for borders or freeform lines.
- Lazy daisy: A looped petal stitch used in floral clusters.
“Embroidery isn’t about perfection—it’s about expression. The slight variations in hand stitching give each piece soul.” — Lila Chen, Textile Artist & Educator
Mini Case Study: Reviving a Worn Denim Jacket
Sophie, a graphic designer in Portland, inherited her grandfather’s old denim jacket. Though structurally sound, it had faded patches and missing buttons. Instead of discarding it, she decided to personalize it with embroidery. She sketched a mountain range along the back yoke and added pine trees on one sleeve. Using navy and forest green floss, she applied backstitch for outlines and French knots for textured evergreens. She fused a lightweight stabilizer to the back to prevent puckering. After four weekend sessions, the jacket transformed into a conversation piece. Friends began requesting customizations of their own, and Sophie later launched a small Etsy shop focused on embroidered upcycling.
This example illustrates how embroidery combines emotional storytelling with practical skill. It doesn’t require years of training—just intention and attention to detail.
Checklist: Preparing for Your First Clothing Embroidery Project
- ☐ Choose a garment made of stable, natural fabric
- ☐ Pre-wash and dry the item to prevent future shrinkage
- ☐ Sketch or select a simple design (under 4” x 4”)
- ☐ Gather tools: hoop, floss, needle, scissors, transfer method
- ☐ Test stitches on a hidden seam or scrap swatch
- ☐ Apply stabilizer if working on stretchy or thin fabric
- ☐ Transfer the design gently using a water-soluble pen
- ☐ Work in a well-lit space with comfortable seating
- ☐ Take breaks to avoid hand strain
- ☐ Finish with a gentle hand wash and air dry
Frequently Asked Questions
Can I embroider on dark-colored clothing?
Absolutely. Use light-colored floss for contrast, or choose metallic threads for subtle shimmer. When transferring designs, use a silver gel pen or carbon transfer paper instead of blue water-soluble markers, which may not show clearly.
How do I prevent the fabric from puckering?
Puckering usually results from excessive tension or lack of stabilization. Use a hoop consistently, don’t pull stitches too tightly, and apply a suitable backing—especially on lightweight or stretchy materials.
Is hand embroidery durable enough for everyday wear?
Yes, when done correctly. Secure all thread ends with locking stitches, and avoid placing heavy embroidery in high-friction zones like underarms or waistbands. Most hand-stitched designs withstand regular gentle washing.
Conclusion
Hand embroidery on clothing is more than a craft—it’s a form of personal storytelling. Each stitch reflects care, creativity, and individuality. By following structured techniques, selecting appropriate materials, and practicing foundational skills, you can transform everyday garments into unique masterpieces. Whether you’re mending with meaning or designing from scratch, the process invites mindfulness and joy. The beauty of embroidery lies not in flawlessness, but in authenticity.


 浙公网安备
33010002000092号
浙公网安备
33010002000092号 浙B2-20120091-4
Comments
No comments yet. Why don't you start the discussion?