
Weaving a hanging rope keychain is more than just a craft—it’s a tactile meditation, a way to create something functional with your hands. The practice blends tradition with modern minimalism, offering both utility and personal expression. Whether you're new to macramé or looking to refine your knotting technique, creating a keychain from cord or hemp rope is an accessible entry point. This guide walks through materials, foundational knots, step-by-step construction, and finishing touches that elevate a simple project into a keepsake.
Why Start With a Rope Keychain?
A handwoven keychain serves as both a practical tool and a meaningful gift. Unlike mass-produced accessories, each piece carries subtle variations—the tension of a knot, the rhythm of your fingers—that make it uniquely yours. Beyond aesthetics, rope weaving strengthens fine motor skills and promotes mindfulness. The repetitive motion of knotting can be calming, similar to knitting or embroidery.
For beginners, the keychain format is ideal: small enough to complete in under two hours, yet complex enough to teach core techniques like the lark’s head, square knot, and spiral stitch. Once mastered, these skills scale up to larger projects—wall hangings, plant hangers, even jewelry.
Materials and Tools You’ll Need
Before starting, gather a few essential supplies. Quality materials ensure longevity and ease of handling. Choose natural fibers for a rustic look or synthetic cords for strength and color variety.
| Item | Purpose | Recommended Type |
|---|---|---|
| Rope or Cord | Main material for weaving | 3mm–4mm diameter; cotton, hemp, or paracord |
| Key Ring or Split Ring | Holds keys and anchors the weave | Stainless steel, 25–30mm size |
| Scissors | Cutting cord cleanly | Sharp fabric scissors |
| Lighter or Heat Source | Sealing synthetic ends | Butane lighter (for paracord) |
| Clamp or Tape | Secures work while tying | Mini clamp or masking tape |
For a standard keychain, cut four strands of cord, each about 60 cm (24 inches) long. Fold them in half and attach to the key ring using a lark’s head knot—this doubles the number of working strands to eight, giving you enough thickness for a full-bodied weave.
Step-by-Step Guide to Weaving Your Keychain
The following sequence builds a compact, textured keychain using basic macramé knots. Follow each stage carefully, ensuring consistent tension across all strands.
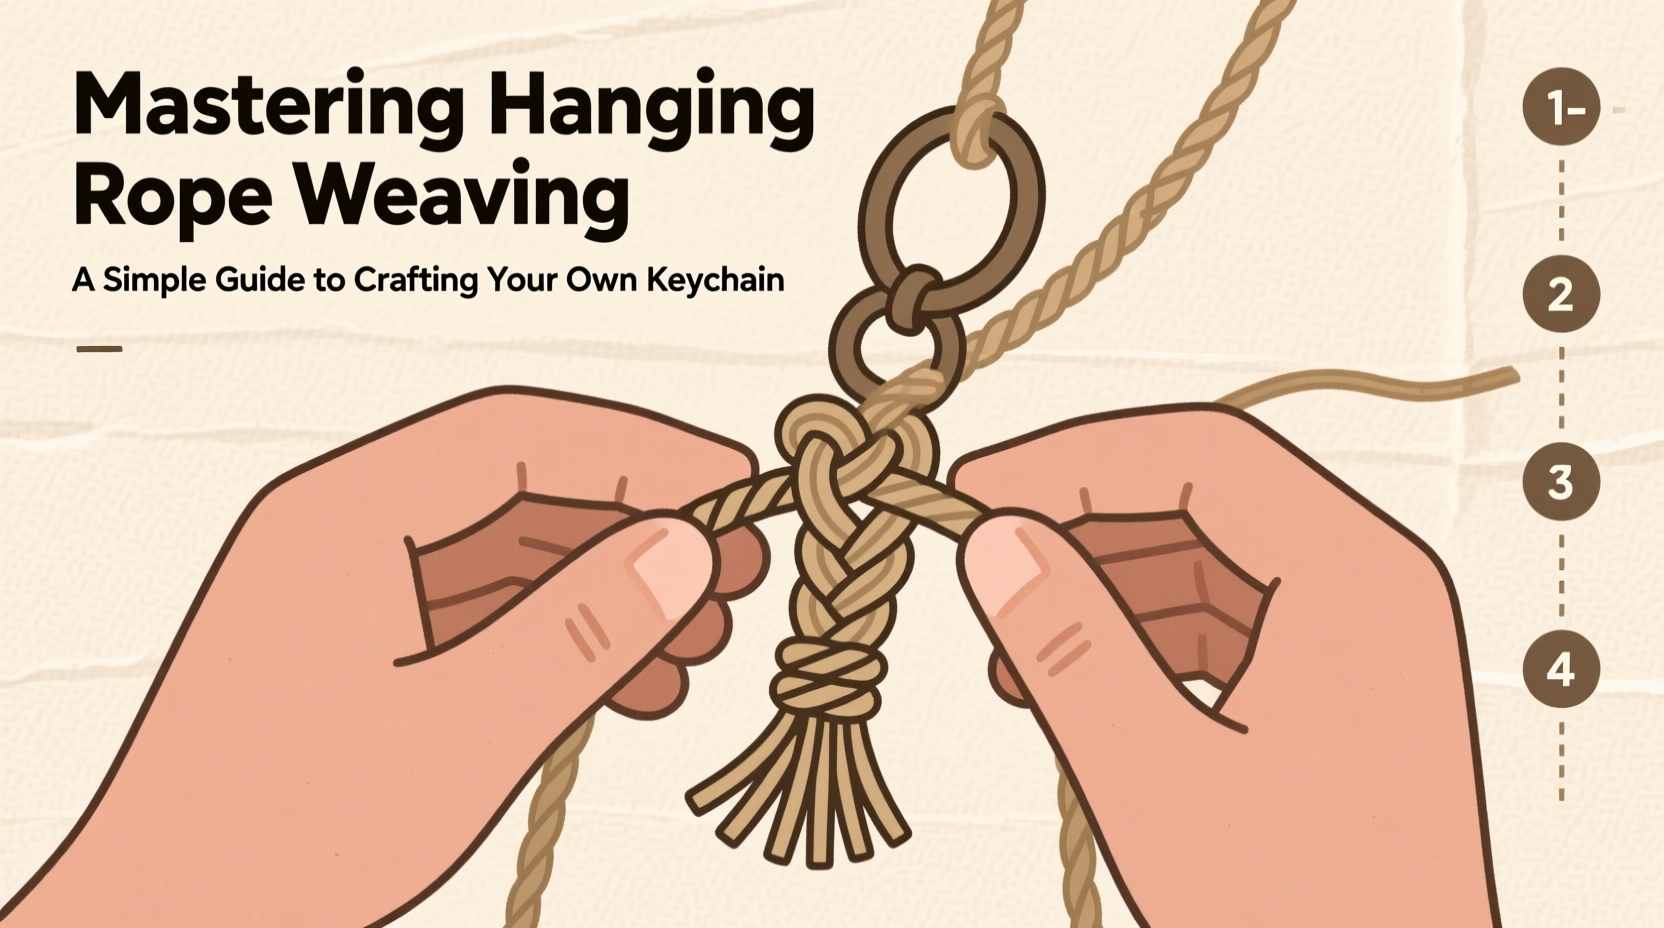
- Attach the cords to the ring: Fold each of the four 60 cm strands in half. Loop the folded end through the key ring and pull the loose ends through the loop. Tighten gently to form a lark’s head knot. Repeat for all four strands. You now have eight hanging cords.
- Secure your work: Clip the key ring to the edge of a table using a small clamp, or tape it firmly in place. This prevents slipping while you weave.
- Begin with a series of square knots: Divide the cords into four groups of two. For each group, take two cords—one designated as the “filler” (held taut), and one as the “working” cord. Form a square knot by crossing the working cord over the filler, looping behind and through. Repeat the opposite direction to complete the knot. Do this for all four pairs across the top row.
- Add length with spiral knots: After two rows of square knots, shift to a spiral (half-square) knot pattern. Use adjacent cords to form new pairs, slightly offset from the previous row. Tie several consecutive half-knots on each pair—this creates a twisting column effect. Continue for 8–10 cm (3–4 inches).
- Finish with a diamond or taper: To close the weave neatly, gradually reduce the number of active cords. Combine neighboring strands into larger square knot groups—first four, then two—until only one central knot remains. Trim excess, leaving about 2 cm of tail.
- Seal and finalize: For synthetic cords, briefly pass the cut ends through a flame to melt and prevent fraying. Gently press the melted tip flat with tweezers or pliers. For natural fibers, apply a tiny drop of clear glue or fray check.
“Knotting isn’t just about structure—it’s about rhythm. Let your hands find their pace, and the pattern will follow.” — Lena Reyes, Textile Artist & Macramé Instructor
Tips for Clean, Professional Results
Even simple weaves benefit from attention to detail. These tips help avoid common pitfalls and improve the final appearance.
- Keep consistent tension: Pull each knot with the same firmness. Too loose looks sloppy; too tight distorts the shape.
- Use a comb or needle to align strands between knots, especially when switching patterns.
- Work in good lighting to see individual fibers clearly and catch mistakes early.
- Wash and dry your hands before starting—oils can stain natural cord.
- If a strand breaks, splice in a new piece by overlapping 3–4 cm and wrapping tightly with invisible thread before continuing.
Real Example: A First-Time Weaver’s Experience
Sophie, a graphic designer in Portland, picked up rope weaving during a weekend workshop. “I wanted something offline, something I could finish,” she said. Her first attempt used bright blue cotton cord and a brass split ring. She struggled initially with uneven square knots but found success after marking her center point with a pin.
“Once I got the spiral section down, it felt like it was making itself,” she recalled. The entire process took her 90 minutes, including retying one messy row. She now keeps the keychain on her work bag and has made three more as gifts. “It’s satisfying to see people notice it and ask where they can get one.”
Do’s and Don’ts at a Glance
| Action | Do | Don't |
|---|---|---|
| Knot Tension | Maintain even pressure across all knots | Pull some tight and leave others loose |
| Cord Selection | Choose pre-cut kits or uniform spools | Mix different thicknesses without testing |
| Finishing | Seal synthetic ends with heat | Leave cut ends exposed to friction |
| Pattern Changes | Mark transition points lightly with thread | Switch knots mid-row without planning |
Frequently Asked Questions
Can I use embroidery floss instead of rope?
Yes, but with limitations. Embroidery floss works well for decorative keychains not meant for heavy use. It lacks the tensile strength of proper cord and may fray faster. If using floss, braid multiple strands together or coat the finished piece with clear nail polish for reinforcement.
How do I clean a rope keychain?
Spot clean with a damp cloth and mild soap. Avoid soaking, especially with natural fibers, as this can weaken fibers and cause shrinkage. Air dry completely before reuse. For odor removal, sprinkle with baking soda, wait 15 minutes, then brush off.
What’s the easiest knot for beginners?
The lark’s head knot is the simplest and most versatile. It requires no prior experience and forms the foundation for attaching cords to rings or dowels. The square knot is the next logical step and appears frequently in macramé patterns.
Start Weaving Today
Creating a hanging rope keychain doesn’t require years of training or expensive tools. With a few meters of cord and a spare hour, you can produce a durable, personalized accessory that reflects your effort and care. The techniques learned here lay the groundwork for more ambitious projects—bracelets, coasters, even furniture accents. Each knot reinforces muscle memory, patience, and creativity.


 浙公网安备
33010002000092号
浙公网安备
33010002000092号 浙B2-20120091-4
Comments
No comments yet. Why don't you start the discussion?