
Burritos are more than just a meal—they’re a canvas for creativity, nutrition, and comfort. Found in taquerias and home kitchens alike, a well-made burrito balances textures, temperatures, and flavors in a single, portable package. While store-bought or fast-food versions offer convenience, they often lack freshness, customization, and quality ingredients. Making burritos at home gives you full control over what goes inside, allowing you to tailor each wrap to your dietary preferences, taste profile, and nutritional goals.
The secret to mastering homemade burritos isn’t complexity—it’s preparation, layering technique, and ingredient harmony. With the right approach, you can create restaurant-quality burritos that are flavorful, structurally sound, and satisfying every time.
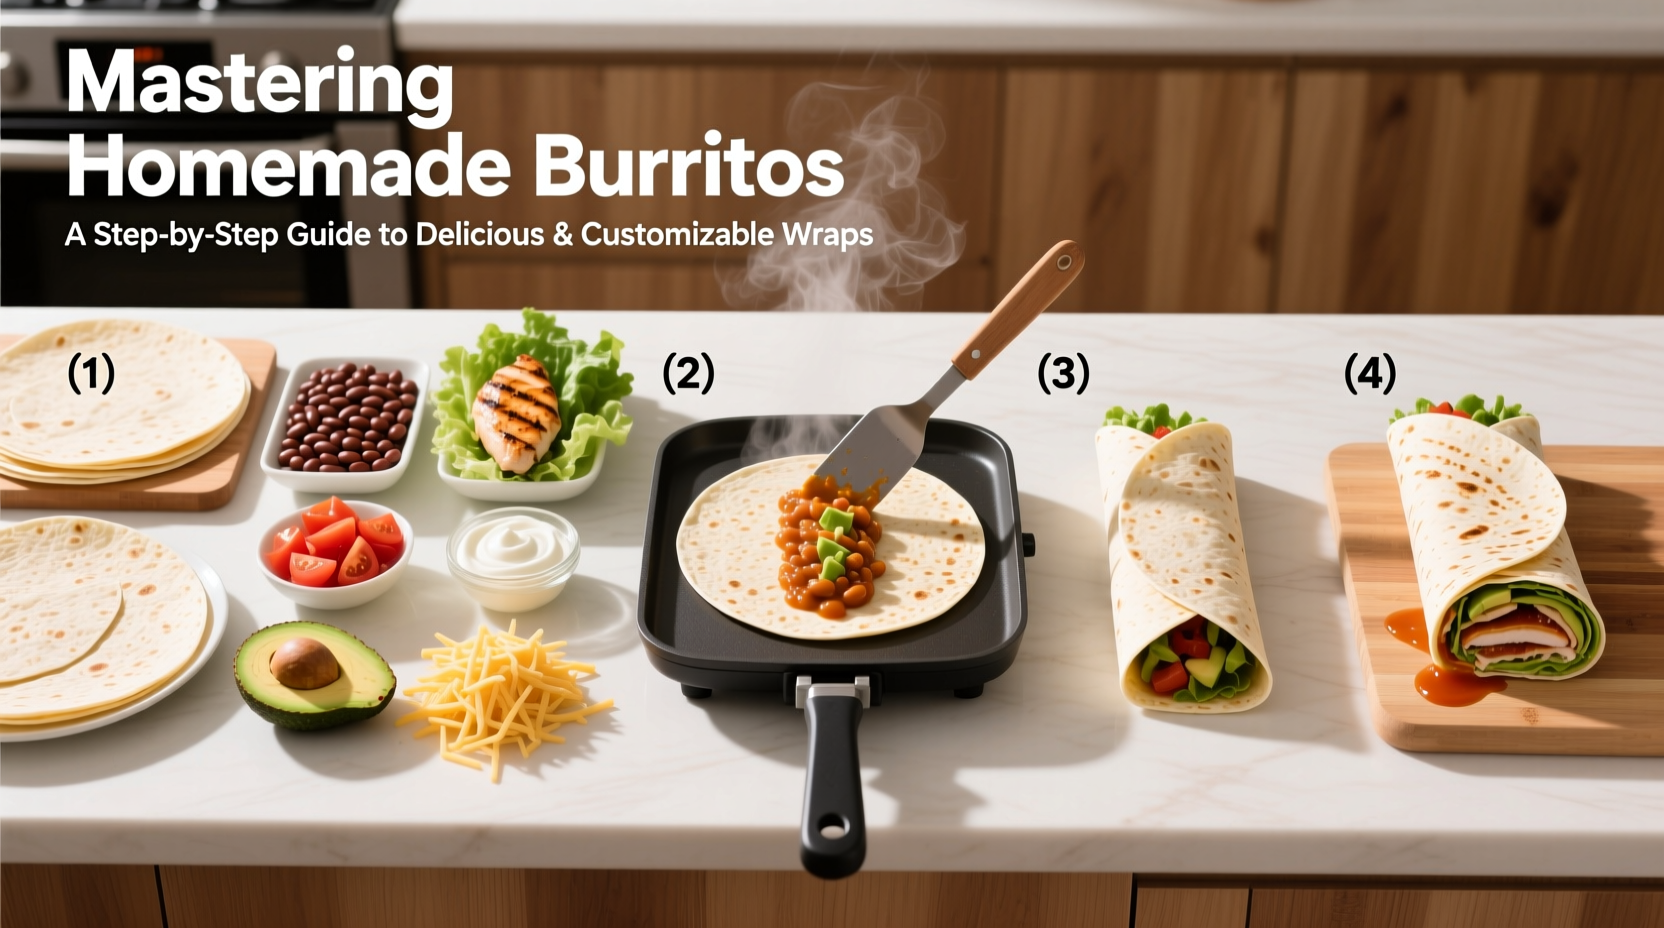
1. Build Your Burrito Foundation: The Tortilla
The tortilla is the backbone of any burrito. While flour tortillas are standard due to their flexibility and size, not all are created equal. Look for large (10–12 inch), high-quality flour tortillas made with minimal ingredients—ideally just flour, water, oil, and salt. Avoid those with preservatives or hydrogenated oils, which can make the texture gummy or brittle when heated.
To maximize pliability, gently warm the tortilla before assembling. Place it on a dry skillet over medium heat for 20–30 seconds per side until soft and slightly puffed. This warming step prevents cracking when rolling and enhances flavor through light toasting.
2. Layering Logic: Order Matters
How you layer ingredients determines whether your burrito holds together or explodes upon first bite. A successful burrito follows a strategic sequence designed to protect the tortilla from moisture and maintain structural integrity.
- Warm tortilla – Start with a warmed base.
- Cheese or spread barrier – A thin layer of cheese, refried beans, or guacamole acts as a moisture shield between wet fillings and the tortilla.
- Rice or grains – Adds bulk and absorbs excess liquid.
- Protein – Whether grilled chicken, carnitas, tofu, or black beans, place it next.
- Vegetables and salsas – Add fresh or cooked veggies like peppers, onions, corn, or pico de gallo last to prevent sogginess.
- Extra toppings – Finish with sour cream, hot sauce, or more cheese if desired.
Leave at least two inches of space around the edges to allow for folding. Overfilling is the most common mistake—stick to about 1.5 cups of total filling per burrito.
3. Step-by-Step Assembly Technique
Rolling a burrito properly ensures it stays intact during transport and eating. Follow this timeline for consistent results:
- Position the tortilla: Lay it flat on a clean surface or parchment paper.
- Add the cheese layer: Sprinkle shredded cheese across the lower third to create a moisture-resistant base.
- Spread rice evenly: Distribute a thin layer of rice or quinoa over the cheese.
- Add protein: Place meat, beans, or plant-based alternatives down the center.
- Incorporate vegetables: Add sautéed peppers, onions, corn, or raw lettuce and tomatoes.
- Fold the sides: Bring the left and right edges toward the center.
- Roll from the bottom: Lift the edge closest to you and tuck it over the filling, then continue rolling upward tightly.
- Serve or wrap: If taking to go, wrap in foil or parchment to hold shape and retain warmth.
4. Customization Matrix: Build-Your-Own Options
One of the greatest advantages of homemade burritos is adaptability. Whether feeding a family with diverse diets or meal-prepping for the week, a modular system saves time and increases satisfaction.
| Component | Options | Dietary Notes |
|---|---|---|
| Base | White rice, brown rice, cilantro-lime rice, quinoa, cauliflower rice | Gluten-free, vegan options available |
| Protein | Grilled chicken, carnitas, carne asada, barbacoa, black beans, lentils, tofu, scrambled eggs | Vegan, paleo, keto-friendly variations possible |
| Vegetables | Roasted peppers, sautéed onions, corn, spinach, avocado, pico de gallo | Raw or cooked; adjust for texture preference |
| Toppings | Shredded cheese, sour cream, guacamole, salsa verde, hot sauce, pickled jalapeños | Dairy-free swaps: cashew crema, vegan cheese |
This flexibility makes burritos ideal for households with mixed dietary needs. Prepare components in bulk, then assemble individually based on preference.
5. Real-World Example: The Sunday Meal Prep Routine
Jessica, a working parent in Austin, used to rely on frozen burritos during busy weeks. After noticing how bloated and sluggish they made her feel, she decided to try making her own. On Sundays, she dedicates one hour to batch-cooking ingredients: cilantro-lime brown rice, seasoned black beans, grilled chicken, and roasted vegetables. She stores each in separate glass containers and keeps whole wheat tortillas in the freezer.
Each weekday morning, she assembles a burrito in under five minutes, customizing fillings for herself (low-carb, extra greens) and her kids (mild salsa, more cheese). She wraps them in foil and freezes them. By lunchtime, they’re thawed and ready to eat or quickly reheated in a toaster oven. Her family now eats fresher food, reduces waste, and saves money—about $75 per month compared to buying pre-made versions.
“Homemade burritos changed our weekly rhythm. They’re fast, nutritious, and something everyone actually looks forward to.” — Jessica M., Home Cook & Nutrition Advocate
Common Pitfalls and How to Avoid Them
- Soggy tortillas: Caused by wet ingredients like un-drained beans or overly juicy salsas. Solution: Pat dry ingredients, use thicker salsas like salsa roja, and always include a moisture barrier.
- Burrito falling apart: Often due to poor folding or overfilling. Stick to the fold-and-tuck method and limit fillings to 1.5 cups.
- Cool fillings: Cold ingredients make the experience unappetizing. Warm rice, beans, and proteins before assembling.
- Lack of flavor balance: A burrito should have salty, creamy, tangy, and spicy elements. Taste components separately before assembly to ensure harmony.
Storage and Reheating Tips
Homemade burritos excel in meal prep scenarios. To store:
- Refrigerate: Wrap tightly in foil or parchment and keep for up to 4 days.
- Freeze: Double-wrap in plastic and foil; freeze for up to 3 months. Thaw overnight in the fridge or reheat from frozen.
For best reheating results:
- Oven or toaster oven: 375°F for 20–25 minutes (from frozen) or 12–15 minutes (refrigerated). Produces a crispy exterior and even heat.
- Skillet: Heat on medium with lid for 4–5 minutes per side. Great for restoring texture.
- Microwave: Use only if necessary—wrap in a damp paper towel and heat 2–3 minutes. Can make tortillas rubbery.
FAQ
Can I make low-carb or keto burritos at home?
Absolutely. Replace rice with riced cauliflower or shredded cheese, use high-protein fillings like steak or eggs, and opt for low-carb tortillas (typically 4–6g net carbs). Focus on healthy fats like avocado and olive oil.
How do I prevent my burrito from leaking salsa?
Use thicker salsas like roasted tomato or tomatillo, and add them just before eating or pack on the side. Alternatively, place a layer of beans or cheese directly on the tortilla to act as a seal.
Are homemade burritos healthier than restaurant ones?
Generally, yes. You control sodium levels, avoid processed fillers, and choose fresh, whole ingredients. Restaurant burritos often exceed 1,000 calories and 1,500mg of sodium—homemade versions can be tailored to stay within balanced nutritional ranges.
Conclusion: Roll With Confidence
Mastering homemade burritos isn’t about perfection—it’s about consistency, smart planning, and personalization. Once you understand the foundational steps—selecting the right tortilla, layering strategically, and rolling securely—you unlock endless possibilities for flavor, nutrition, and convenience. Whether you're feeding a family, prepping lunches, or hosting a casual dinner, a well-crafted burrito delivers satisfaction in every bite.


 浙公网安备
33010002000092号
浙公网安备
33010002000092号 浙B2-20120091-4
Comments
No comments yet. Why don't you start the discussion?