
Drawing the human form demands more than just copying what you see—it requires understanding structure, volume, and movement. Among the most misunderstood yet essential parts of the lower body is the gluteal region. Often reduced to caricature or avoided altogether, the buttocks play a crucial role in posture, balance, and anatomical realism. Whether you're sketching athletes in motion, figures at rest, or character designs, mastering how to draw a butt with accuracy and dynamism elevates your entire figure work.
The key lies not in memorizing shapes but in learning how muscles and bones interact beneath the skin. This guide breaks down the process into actionable steps, offering insight into proportion, form, shading, and integration within full-body composition.
Anatomy Fundamentals: What Lies Beneath the Surface
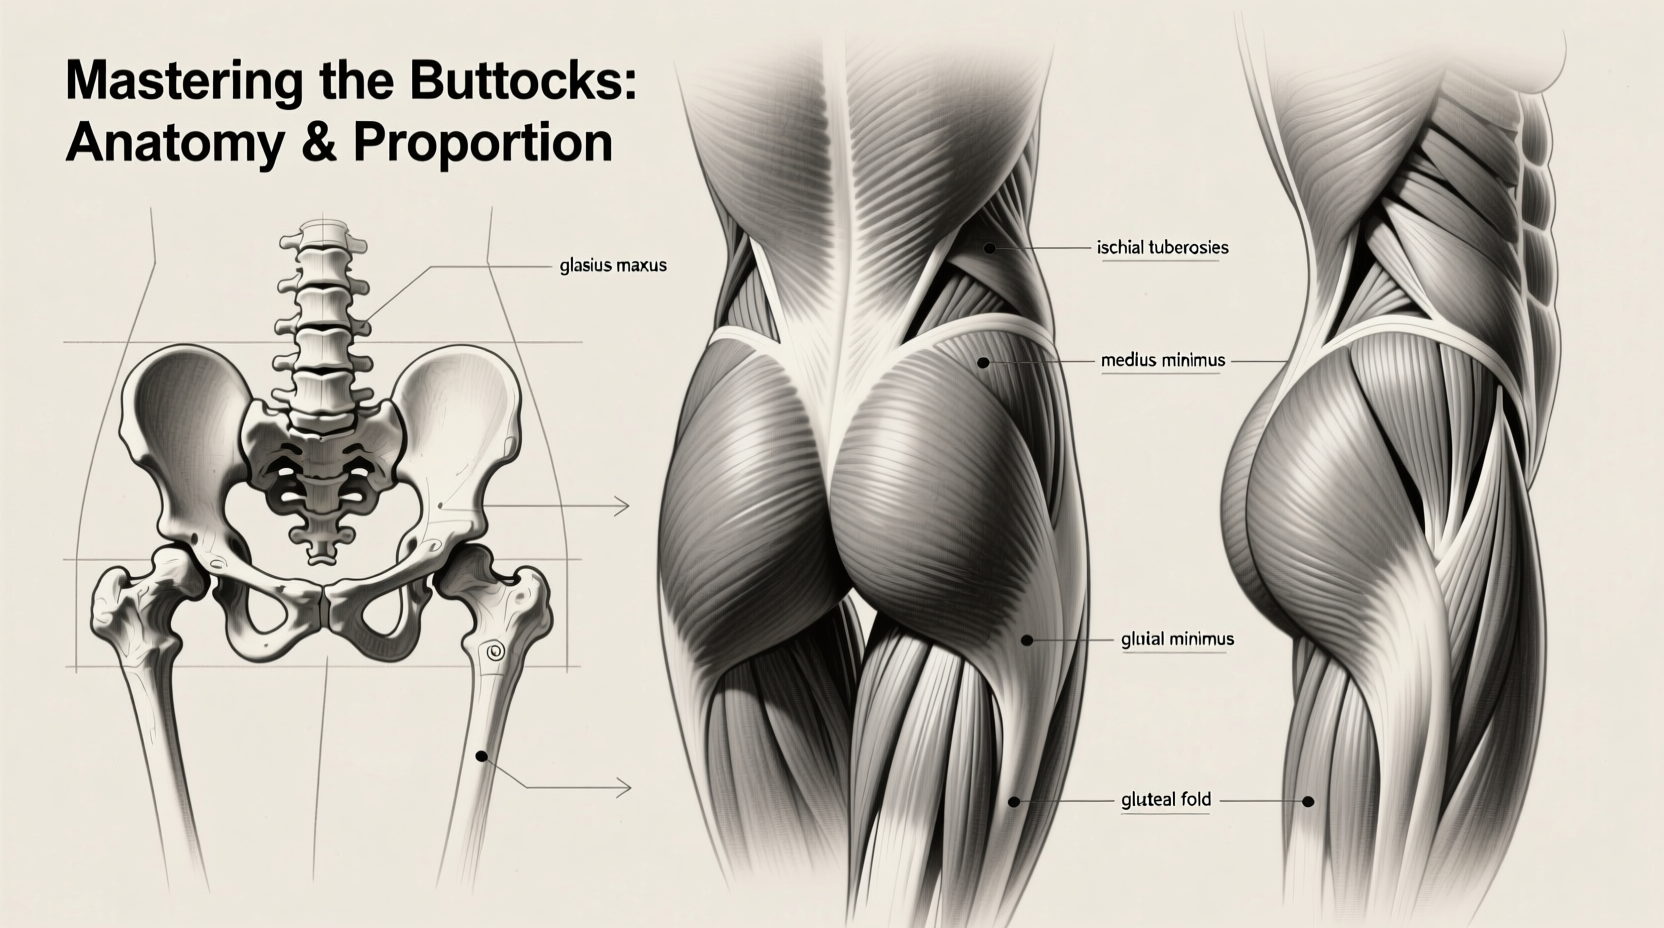
To draw realistically, begin with the skeleton. The pelvis forms the foundation of the lower torso. From an anterior view, it’s a wide, bowl-like structure; from behind, it flares outward and supports the sacrum. The iliac crests define the top edges, while the greater trochanters of the femurs mark lateral reference points for muscle attachment.
Three primary muscles shape the buttocks: the gluteus maximus, gluteus medius, and gluteus minimus. The gluteus maximus is the largest and most visible—responsible for hip extension and external rotation. It originates along the ilium and sacrum and inserts into the femur and iliotibial band. Its fibers run diagonally downward and outward, creating the rounded contour most associated with the rear view.
The gluteus medius lies beneath and above the maximus, contributing to the upper outer curve. When viewed from behind, its influence becomes clear during leg abduction or weight shifts. Understanding these layers prevents flat, featureless rendering and allows for dimensional accuracy even in stylized work.
“Anatomy isn’t about labeling every muscle—it’s about seeing how forces translate into form.” — Dr. Sarah Lin, Figure Drawing Instructor at the New York Academy of Art
Step-by-Step Guide: Constructing the Buttocks in Proportion
Start with gesture and alignment. A common mistake is isolating the buttocks from the rest of the body. Instead, treat them as part of a continuous kinetic chain extending from the spine through the legs.
- Establish the pelvic plane: Draw a simple oval or trapezoid tilted slightly forward or backward depending on pose. In standing poses, the front (ASIS) sits slightly lower than the back (PSIS), creating a subtle posterior tilt.
- Define the spine and sacrum: Mark the centerline descending from the lower back. The sacrum should follow the tilt of the pelvis, ending near the cleft.
- Add hip landmarks: Place dots at the iliac crests and greater trochanters. These help determine width and muscle pull.
- Block in mass with overlapping ovals: Use two soft, overlapping forms—one for each gluteus maximus. They should mirror the curvature of the pelvis but extend outward based on musculature and fat distribution.
- Refine the silhouette: Soften transitions between the lower back, sides, and upper thighs. Avoid sharp angles unless depicting extreme tension or anatomy under strain.
- Incorporate crease lines: The intergluteal cleft runs vertically from the sacrum to the perineum. It’s deeper centrally and fades toward the top and bottom. Do not make it symmetrical or overly straight.
Dynamic Poses and Weight Distribution
The appearance of the buttocks changes dramatically with movement. In a neutral stance, the glutes appear relaxed and evenly rounded. Shift the weight to one leg, however, and the dynamics shift.
- In contrapposto (weight on one leg), the supporting side contracts slightly, lifting and firming the glute. The opposite side elongates and softens.
- During forward bends, the hamstrings stretch while the glutes compress horizontally, forming horizontal folds.
- In squats or lunges, the gluteus maximus engages fully, bulging outward and separating clearly from the hamstring origin.
Observe real-life references or use poseable mannequins to study how fabric drapes over moving hips. Clothing rarely lies flat—it pulls across tension points and sags in relaxed areas. Accurate depiction of denim seams, waistbands, or athletic wear enhances believability.
| Pose Type | Glute Shape | Key Visual Cues |
|---|---|---|
| Standing (neutral) | Symmetrical, soft curves | Subtle dimples above, smooth transition to thighs |
| Walking / Contrapposto | One side lifted and tighter | Hip tilt, asymmetry in fold lines |
| Squatting | Widened, compressed vertically | Horizontal skin folds, stretched lower back |
| Running | Taut, defined separation | Muscle bulge, dynamic stretch in hamstring attachment |
Avoiding Common Mistakes: Do’s and Don’ts
Even experienced artists fall into traps when rendering this area. Awareness of pitfalls leads to cleaner, more confident drawings.
| Do | Don’t |
|---|---|
| Study diverse body types to avoid idealized stereotypes | Rely solely on exaggerated cartoon or anime proportions |
| Use cross-contour lines to test roundness and volume | Draw flat, pancake-like shapes without depth |
| Connect the glutes to the lower back and thighs fluidly | Isolate the butt as a floating shape disconnected from anatomy |
| Practice gesture sketches focusing on weight and balance | Focus only on detail before establishing correct gesture |
Shading and Volume: Bringing the Form to Life
No amount of line work substitutes for proper value structure. The buttocks are inherently three-dimensional—think of them as two connected spheres with complex surface flow.
Light typically hits the upper outer quadrants when the figure stands facing away. Shadows pool along the intergluteal cleft, under the lower curve, and where the glutes meet the thigh (ischial tuberosity). Reflected light may lift the shadow edge near the legs, especially on smoother surfaces like skin.
Use soft gradients rather than hard lines. Build tone gradually with hatching or blending stumps. Cross-hatching works well for textured skin or clothing, while smooth gradation suits polished realism.
“In charcoal, I often smudge first, then re-establish edges. It mimics how light wraps around organic forms.” — Marcus Tran, Portrait and Figure Artist
Checklist: Mastering Butt Drawing in Practice
- ✅ Begin with skeletal landmarks: pelvis, sacrum, femur heads
- ✅ Block major masses before detailing
- ✅ Check symmetry and tilt in relation to the whole figure
- ✅ Study reference photos from multiple angles
- ✅ Sketch quickly in gesture mode to capture motion
- ✅ Apply consistent lighting logic across the form
- ✅ Review work using mirror or grayscale conversion
Real Example: From Sketch to Final Rendering
Lena, an intermediate art student, struggled with stiff, lifeless rear views. She consistently drew the buttocks as two identical mounds lacking connection to the spine or legs. After analyzing anatomical diagrams and practicing weekly gesture sessions using Croquis Café video loops, she began incorporating pelvic tilt into her thumbnails.
Her breakthrough came during a timed 5-minute pose featuring a model leaning forward on a stool. By focusing on the stretch across the sacrum and compression of the upper glutes, she captured a natural fold pattern that flowed into the hamstring. Her instructor noted improved spatial awareness and recommended continuing short-pose drills with emphasis on weight-bearing joints.
Within six weeks, Lena’s figure compositions showed stronger anatomical coherence and expressive confidence—even in challenging foreshortened views.
Frequently Asked Questions
How do I draw different body types realistically?
Vary the ratio of muscle definition to subcutaneous fat. Athletic builds show pronounced gluteal divisions and tight transitions. Softer physiques have smoother gradients and less distinct separations. Always maintain structural integrity—fat doesn’t erase bone landmarks.
Should I include cellulite or skin texture?
Only if it serves the narrative or style. In hyper-realistic work, subtle stippling can suggest texture without distraction. In most cases, prioritize form over surface imperfections until the base rendering is solid.
Can I use this method for stylized or cartoon characters?
Absolutely. Even exaggerated designs benefit from anatomical grounding. Exaggerate proportions after establishing correct relationships. Think of Pixar or Looney Tunes—believable motion stems from real biomechanics.
Final Thoughts and Call to Action
Drawing the human buttocks well means embracing complexity without fear. It’s not merely about aesthetics but understanding how the body bears weight, moves through space, and expresses physical truth. With deliberate practice, anatomical study, and observational honesty, you’ll develop the ability to render this region with confidence and nuance.


 浙公网安备
33010002000092号
浙公网安备
33010002000092号 浙B2-20120091-4
Comments
No comments yet. Why don't you start the discussion?