
Drawing animals from real life or imagination requires a balance of observation, structure, and creativity. Among farmyard subjects, the hen stands out as both accessible and rich in character. Its rounded form, textured feathers, and distinctive features make it an ideal subject for artists at any level. Whether you're just starting with pencil and paper or refining your sketching technique, learning how to draw a hen can improve your understanding of animal anatomy, proportion, and texture. This guide walks through foundational and advanced methods, offering structured steps, expert insights, and practical tools to elevate your drawing practice.
Understanding the Hen’s Anatomy and Proportions
Before putting pencil to paper, study the basic structure of a hen. Unlike birds built for flight, hens have compact bodies, short wings, and strong legs suited for scratching the ground. Their head features a prominent comb, small eyes, and a curved beak. Recognizing these elements helps avoid common mistakes like over-elongating the neck or misplacing facial features.
The body can be broken into three main shapes: a large oval for the torso, a smaller circle for the head, and a tapered cone for the tail. The legs are thin but sturdy, with three forward-facing toes and one backward. Observing reference photos—especially side profiles—helps internalize these proportions.
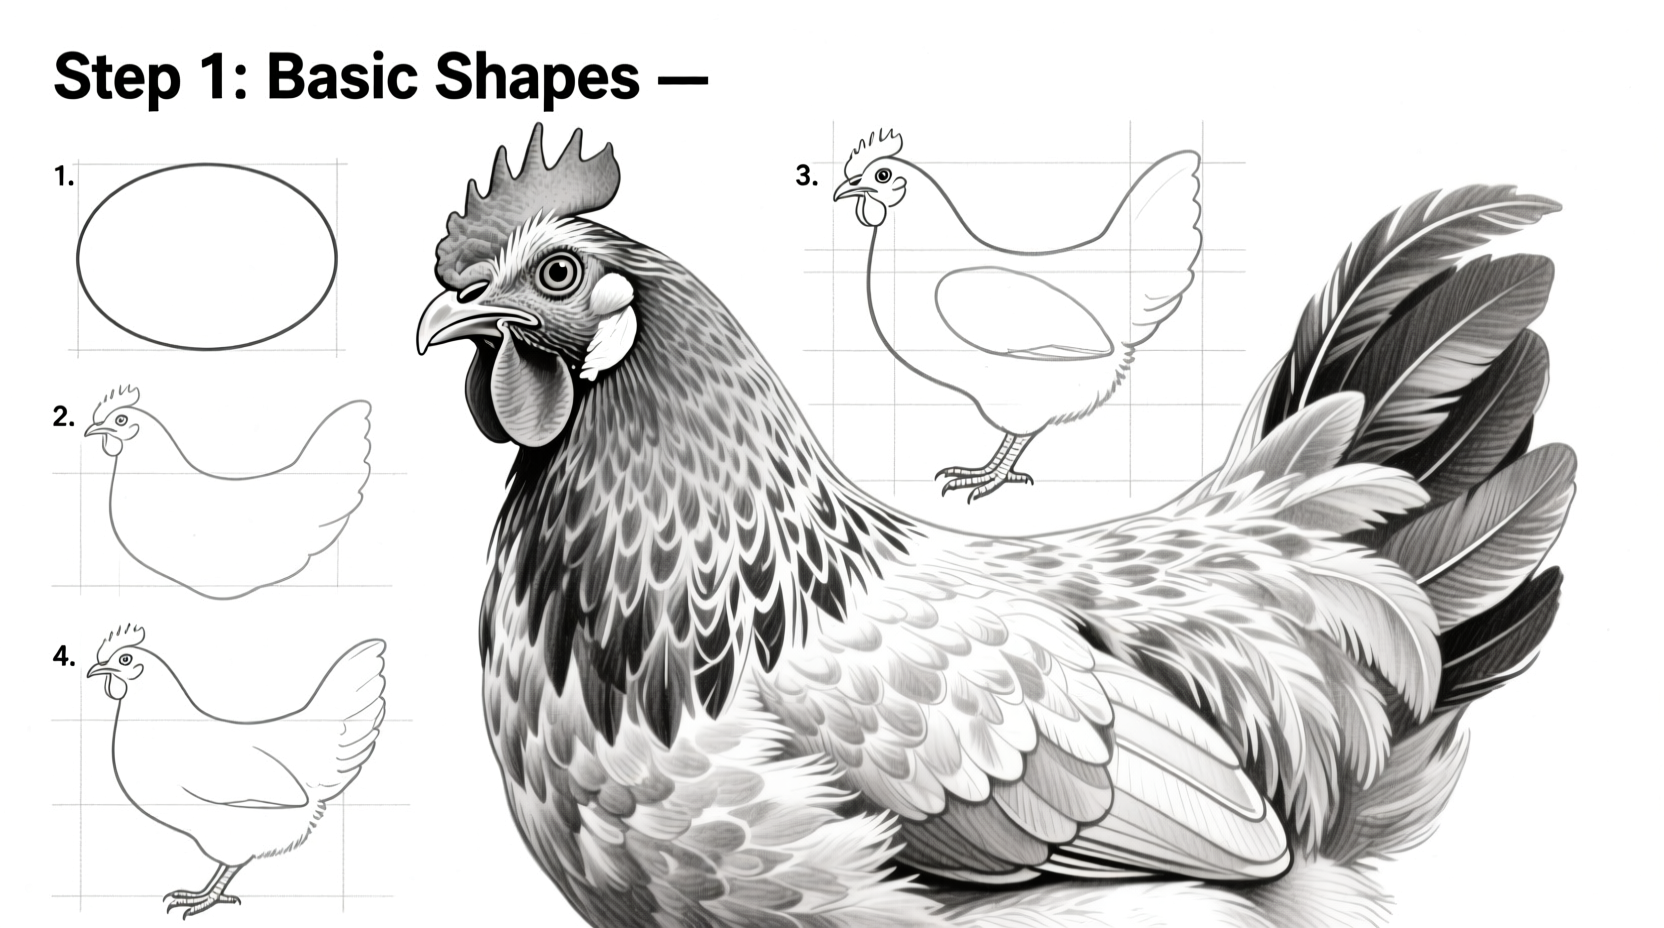
Step-by-Step Guide to Drawing a Hen
- Sketch the basic shapes: Lightly draw an oval for the body, a smaller circle overlapping its top for the head, and a teardrop shape at the back for the tail.
- Add the neck and beak: Connect the head to the body with a slightly curved cylinder. Extend a short triangle from the face for the beak.
- Outline the comb and wattle: On top of the head, draw a jagged crown-like shape for the comb. Beneath the beak, add a small, wrinkled lobe for the wattle.
- Define the wing and feathers: Sketch a curved line along the side of the body for the wing. Use layered, crescent-shaped strokes to suggest feather groups.
- Draw the legs and feet: Use two vertical lines for each leg. At the base, draw three curved claws pointing forward and one behind.
- Refine the outline: Go over your sketch with a darker line, cleaning up unnecessary construction marks and emphasizing key contours.
- Add texture and shading: Use short, directional strokes to mimic feathers on the breast and back. Shade under the wings, neck, and legs to create depth.
This sequence builds confidence through incremental progress. Beginners should repeat the process several times, focusing on one step at a time. Speed is less important than accuracy and consistency.
Essential Tools and Materials for Success
The right materials enhance control and expression. While any pencil and paper will work, selecting tools tailored to drawing animals improves results. Graphite pencils offer a range of hardness (from 2H for light sketching to 6B for deep shading). A kneaded eraser lifts graphite without damaging paper, ideal for creating highlights in feathers. Smooth, medium-weight paper (like Bristol board) holds detail well without smudging excessively.
| Tool | Recommended Type | Purpose |
|---|---|---|
| Pencil | HB, 2B, 4B | General sketching and shading |
| Eraser | Kneaded eraser | Lifting graphite for highlights |
| Paper | Bristol or sketchbook (90–120 lb) | Smooth surface for fine detail |
| Blending stump | Medium size | Smoothing gradients in shadows |
Advanced Techniques: Adding Realism and Expression
Once the basic form is mastered, focus shifts to realism. Feathers aren’t uniform—they vary in length, direction, and density. Observe how feathers flow from the spine outward, overlapping like shingles. Use short, flicking strokes for soft down on the chest and longer, curved lines for wing coverts.
Shading creates volume. Identify a single light source (e.g., upper left) and consistently shade opposite areas. The underside of the body, beneath the wing, and behind the legs receive the least light. Use a blending stump to soften transitions between light and shadow, avoiding harsh lines.
Expression matters. A hen’s posture communicates mood. A relaxed hen stands with weight evenly distributed; a vigilant one stretches its neck upward. Capturing subtle cues—like a tilted head or parted beak—adds narrative depth.
“Animals communicate through posture and micro-gestures. A drawing gains soul when the artist captures not just form, but feeling.” — Lena Torres, Wildlife Illustrator and Educator
Common Mistakes and How to Avoid Them
- Over-detailing too early: Focus on structure first. Add feathers only after the body shape is accurate.
- Ignoring perspective: Even simple side views benefit from slight angles. Try drawing a hen from a three-quarter view to build spatial awareness.
- Flat shading: Use gradients, not solid blocks of gray. Build darkness gradually with layered strokes.
- Rigid lines: Loosen your wrist. Natural forms rarely have mechanical edges.
Practice Checklist for Skill Development
To move from beginner to confident artist, follow this weekly routine:
- ✅ Sketch the hen’s basic shapes 5 times using light guidelines
- ✅ Complete 2 full-line drawings with clean outlines
- ✅ Practice feather textures on a separate sheet using varied stroke lengths
- ✅ Apply shading to one drawing using a defined light source
- ✅ Draw the hen from memory once per week to reinforce anatomy recall
Real Example: From First Attempt to Confident Rendering
Jamie, a self-taught hobbyist, struggled with animal proportions. Her first hen sketch had a disproportionately large head and stiff legs. After studying anatomical references and practicing the seven-step method for two weeks, she redrew the same subject. The second version showed improved balance—the body oval was correctly sized, the comb was accurately jagged, and feather strokes followed natural growth patterns. By week four, her drawings included subtle shading under the wings and dynamic poses, such as a hen pecking at the ground. Jamie credits consistent practice and structural breakdowns for her progress.
Frequently Asked Questions
How long does it take to learn how to draw a hen realistically?
With regular practice (3–4 sessions per week), most beginners produce a recognizable, well-proportioned hen within 2–3 weeks. Achieving realistic texture and shading may take 6–8 weeks of focused effort.
Can I use colored pencils instead of graphite?
Absolutely. Colored pencils allow for rich feather tones—russet browns, golden buffs, and iridescent blacks. Start with a light base layer and build color gradually to avoid wax bloom or uneven coverage.
What if my hen doesn’t look like a hen?
Early sketches often feel awkward. Compare your drawing to reference images, focusing on one mismatched area at a time (e.g., “Is the beak too long?”). Redraw that section separately until it aligns with reality.
Moving Beyond the Basics
Once comfortable with individual hens, challenge yourself with more complex scenes: a hen with chicks, a flock in motion, or a rooster nearby. These compositions develop skills in spacing, scale, and interaction. Try different mediums—ink for bold linework, watercolor washes for soft backgrounds, or digital layers for experimentation without waste.
Join online art communities or local sketch groups to share progress and receive feedback. Constructive critique accelerates growth far more than solitary practice.
Conclusion: Start Drawing Today
Drawing a hen is more than copying a shape—it's an exercise in observation, patience, and creative problem-solving. Each stroke teaches something new about form, texture, and expression. Whether you're picking up a pencil for the first time or refining years of practice, the step-by-step techniques outlined here provide a clear path forward. Mastery isn't achieved in a single sketch, but in the repetition, reflection, and refinement that follow.


 浙公网安备
33010002000092号
浙公网安备
33010002000092号 浙B2-20120091-4
Comments
No comments yet. Why don't you start the discussion?