
Drawing clothing convincingly is one of the most challenging aspects of figure illustration. Among garments, sweaters present a unique opportunity to explore texture, volume, and dynamic folds due to their knitted structure and elasticity. Whether you're sketching a cozy winter scene or refining your fashion illustration skills, mastering how to draw a sweater step by step can elevate your artwork significantly. This guide breaks down the process into actionable stages, focusing on structural accuracy, fabric behavior, and textural realism.
Understanding Sweater Anatomy and Fabric Behavior
A successful drawing begins with understanding what you’re depicting. Sweaters are typically made from knitted yarns—wool, cotton, acrylic, or blends—that stretch, drape, and compress in response to body movement and gravity. Unlike stiff fabrics like denim, knitwear conforms closely to the body while maintaining soft, organic folds.
The key areas where a sweater interacts with the body include the shoulders, elbows, waist, and underarms. These zones generate characteristic creases and bulges. For example, when an arm bends, the sleeve bunches at the elbow, creating concentric folds. Around the neck, horizontal compression lines appear due to stretching over the collarbone.
“Clothing isn’t just draped over the body—it responds to it. Study how tension and compression shape the fabric.” — Daniel Rivera, Figure Drawing Instructor at the New York Art Academy
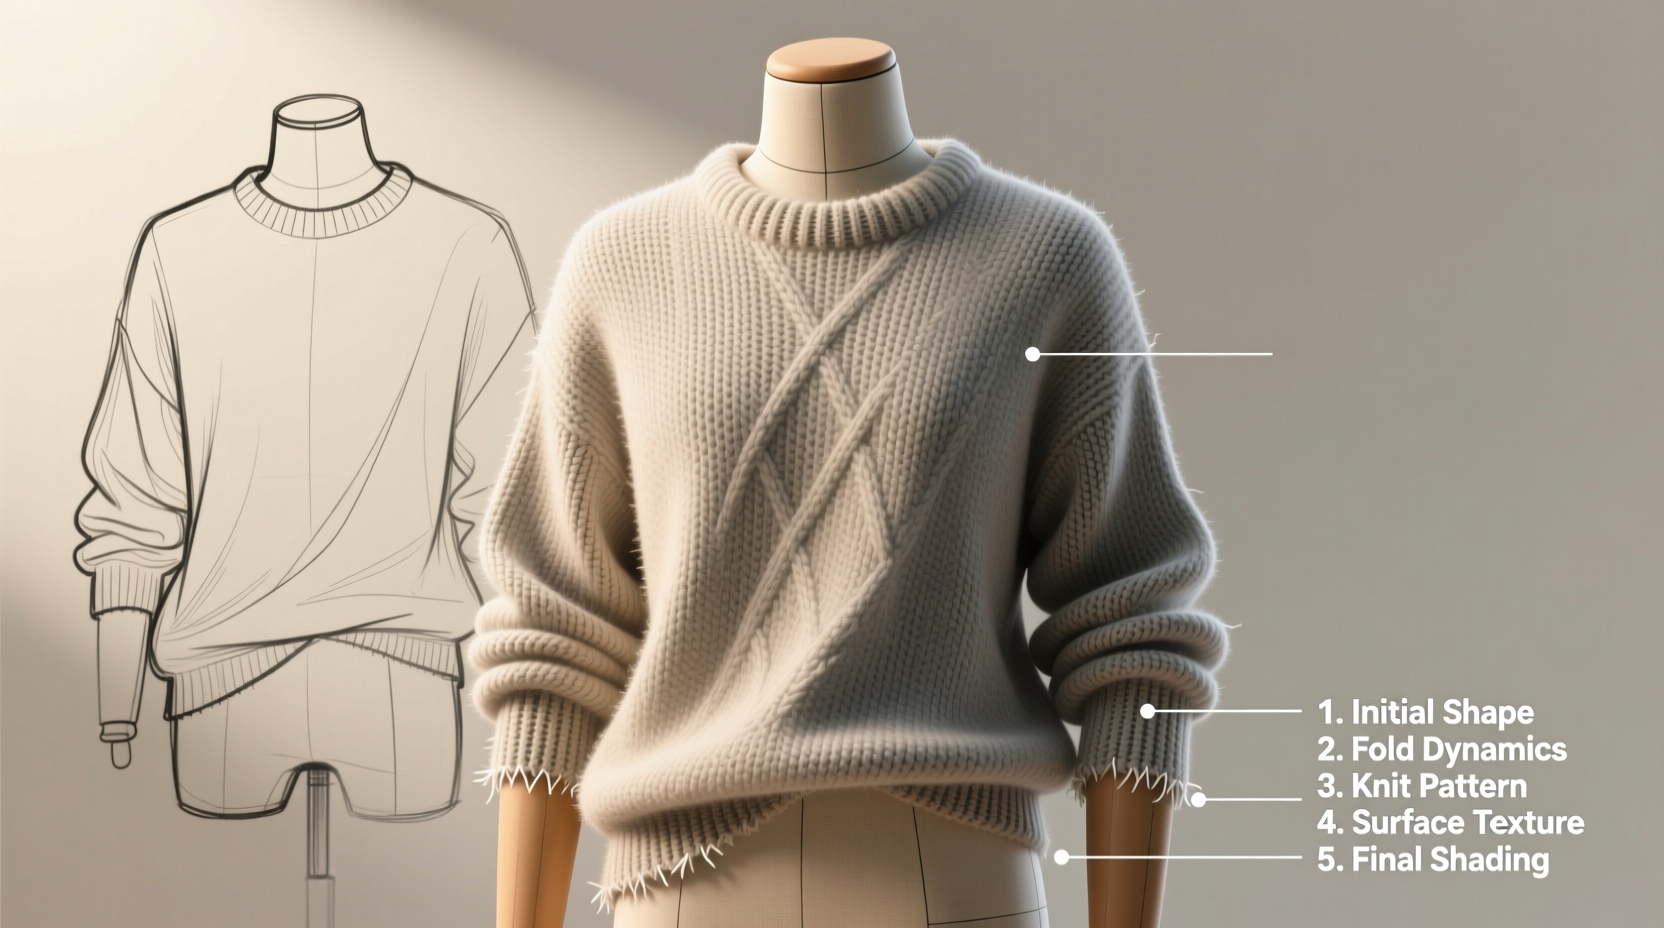
Step-by-Step Guide to Drawing a Realistic Sweater
Follow this structured approach to build a believable sweater drawing from foundation to finish.
- Sketch the Underlying Form: Begin with a simplified mannequin or figure outline. Mark shoulder joints, elbows, and torso contours. This base ensures proportions remain accurate beneath the fabric.
- Map Major Folds: Identify high-tension areas (under arms, across back) and low-stress zones (chest, upper arms). Use flowing, directional lines to indicate fold paths. Avoid straight lines—knit folds are soft and irregular.
- Define Silhouette: Lightly outline the outer edge of the sweater. Include natural sagging at the hem and cuffs. Remember: knits stretch downward due to gravity.
- Add Knit Texture: Choose a stitch pattern (e.g., ribbed, cable, stockinette). Start lightly in mid-tone areas, avoiding highlights and deep shadows. Use small repeating shapes or parallel lines to simulate rows of stitches.
- Apply Shading and Volume: Build form using gradual tonal gradients. Emphasize core shadows in deep crevices (armpits, elbow folds). Use soft blending for wool’s matte surface, preserving subtle texture.
- Refine Details: Add stitching lines at seams, slight pilling on worn areas, and fuzziness along edges. Highlight raised cable knots or ribbing with fine white pencil or eraser lifts.
Common Mistakes to Avoid
| Mistake | Why It’s Problematic | Solution |
|---|---|---|
| Uniform texture across entire garment | Ignores how light and movement affect visibility of knit pattern | Render texture more densely in mid-tones; fade in highlights and shadows |
| Overly geometric folds | Knit fabric doesn’t crease sharply like cotton | Use wavy, overlapping curves instead of angular lines |
| Ignoring body influence | Sweater appears flat or floating | Anchor folds to anatomical landmarks like shoulder blades or biceps |
Capturing Different Knit Textures
Not all sweaters look alike. The type of knit dramatically affects how light reflects and how folds behave. Here’s how to approach common styles:
- Ribbed Knit: Features vertical ridges. Draw parallel, slightly wavy lines running lengthwise. Compress lines closer together in stretched areas (wrists, neck).
- Cable Knit: Intricate twisted patterns. Sketch the overall bulge first, then overlay braided lines. Keep details subtle in shadowed regions.
- Stockinette Stitch: Smooth front, bumpy back. On the front, use faint horizontal lines; on the back, add tiny dots or short dashes for texture.
- Loose Weave (Fisherman Style): Show gaps between stitches with small diamond-shaped voids. Focus on silhouette variation rather than micro-details.
Mini Case Study: Drawing a Seated Figure in a Chunky Cable Sweater
Artist Lena Tran spent three hours illustrating a character lounging on a couch wearing a thick cream-colored cable knit sweater. Her initial sketch showed accurate anatomy but lacked fabric authenticity. After reviewing reference images, she realized the forearm folds were too linear and the cable pattern was inconsistently scaled.
She revised her approach: first blocking in major shadow masses, then redrawing folds with undulating curves that followed muscle contours. She rendered the cables only on the upper arms and chest—areas catching direct light—while letting texture dissolve into mid-tones on the forearms. The final piece gained depth and realism, earning praise in an online art critique group.
This case illustrates that even experienced artists benefit from revisiting fabric logic. Realism emerges not from detail overload, but from selective emphasis and structural fidelity.
Essential Tools and Materials Checklist
To achieve professional results, ensure you have the right tools at hand. Use this checklist before starting:
- ✅ Pencil set (ranging from 2H for light lines to 4B for deep shadows)
- ✅ Kneaded eraser (for lifting highlights and correcting texture)
- ✅ Blending stump or tissue (for smooth gradients on wool surfaces)
- ✅ High-resolution reference photo or live model
- ✅ Tracing paper (optional, for testing fold variations)
- ✅ Ruler or straightedge (for consistent stitch alignment in ribbed areas)
Frequently Asked Questions
How do I make knitted texture look three-dimensional?
Create dimension by aligning your stroke direction with the curvature of the garment. For instance, on a rounded shoulder, curve your stitch lines outward. Combine this with strategic shading—light hits the tops of ridges, while valleys stay darker. A slight highlight on raised stitches enhances roundness.
Should I draw every stitch?
No. Over-detailing flattens the image. Render full texture only in focal areas (e.g., foreground sleeve). Elsewhere, suggest pattern through tone and rhythm. Your brain fills in what isn’t explicitly drawn—trust that principle.
How can I practice sweater drawing effectively?
Start with isolated studies: draw just a cuff, collar, or elbow. Use time-lapse sessions (10-minute sketches) to train quick observation. Rotate between different knit types weekly to expand your visual vocabulary.
Final Thoughts and Call to Action
Drawing a sweater realistically demands patience and keen observation, but the payoff is artwork that breathes with life and tactile presence. By grounding your work in anatomical truth, respecting fabric logic, and applying texture strategically, you transform simple lines into convincing wearable art.
Don’t wait for inspiration—grab your sketchbook today and study the sweater you’re wearing right now. Notice how it pulls at the elbows, how the neckline stretches, and where the light glances off textured ridges. These everyday moments are your best teachers.


 浙公网安备
33010002000092号
浙公网安备
33010002000092号 浙B2-20120091-4
Comments
No comments yet. Why don't you start the discussion?