
Drawing a wall clock may seem simple at first glance, but capturing its symmetry, precision, and subtle details requires more than just sketching a circle and adding numbers. A well-executed clock drawing demonstrates control over proportion, perspective, and line quality—skills that form the foundation of strong observational art. Whether you're a beginner building confidence or an intermediate artist refining your technique, mastering this subject offers valuable lessons in geometry, measurement, and visual accuracy. This guide breaks down the process into clear, repeatable steps while offering expert insights and practical tips to elevate your sketches from rough drafts to polished illustrations.
Understanding the Structure of a Wall Clock
A wall clock is not merely a circular object; it’s a structured composition of concentric elements. Before picking up your pencil, take a moment to analyze its components: the outer rim, face, numerals or markers, hands, and often a central pivot point. Most traditional clocks follow a radial design, meaning all parts radiate from a central axis. Recognizing this underlying symmetry is crucial to avoiding lopsided or distorted results.
The key challenge lies in maintaining consistent spacing and alignment. Even slight deviations in the placement of hour markers or hand angles can make a clock look “off” to the viewer. To overcome this, rely on light construction lines early in the process. These invisible scaffolds help position elements accurately before committing to final lines.
Step-by-Step Guide to Drawing a Realistic Wall Clock
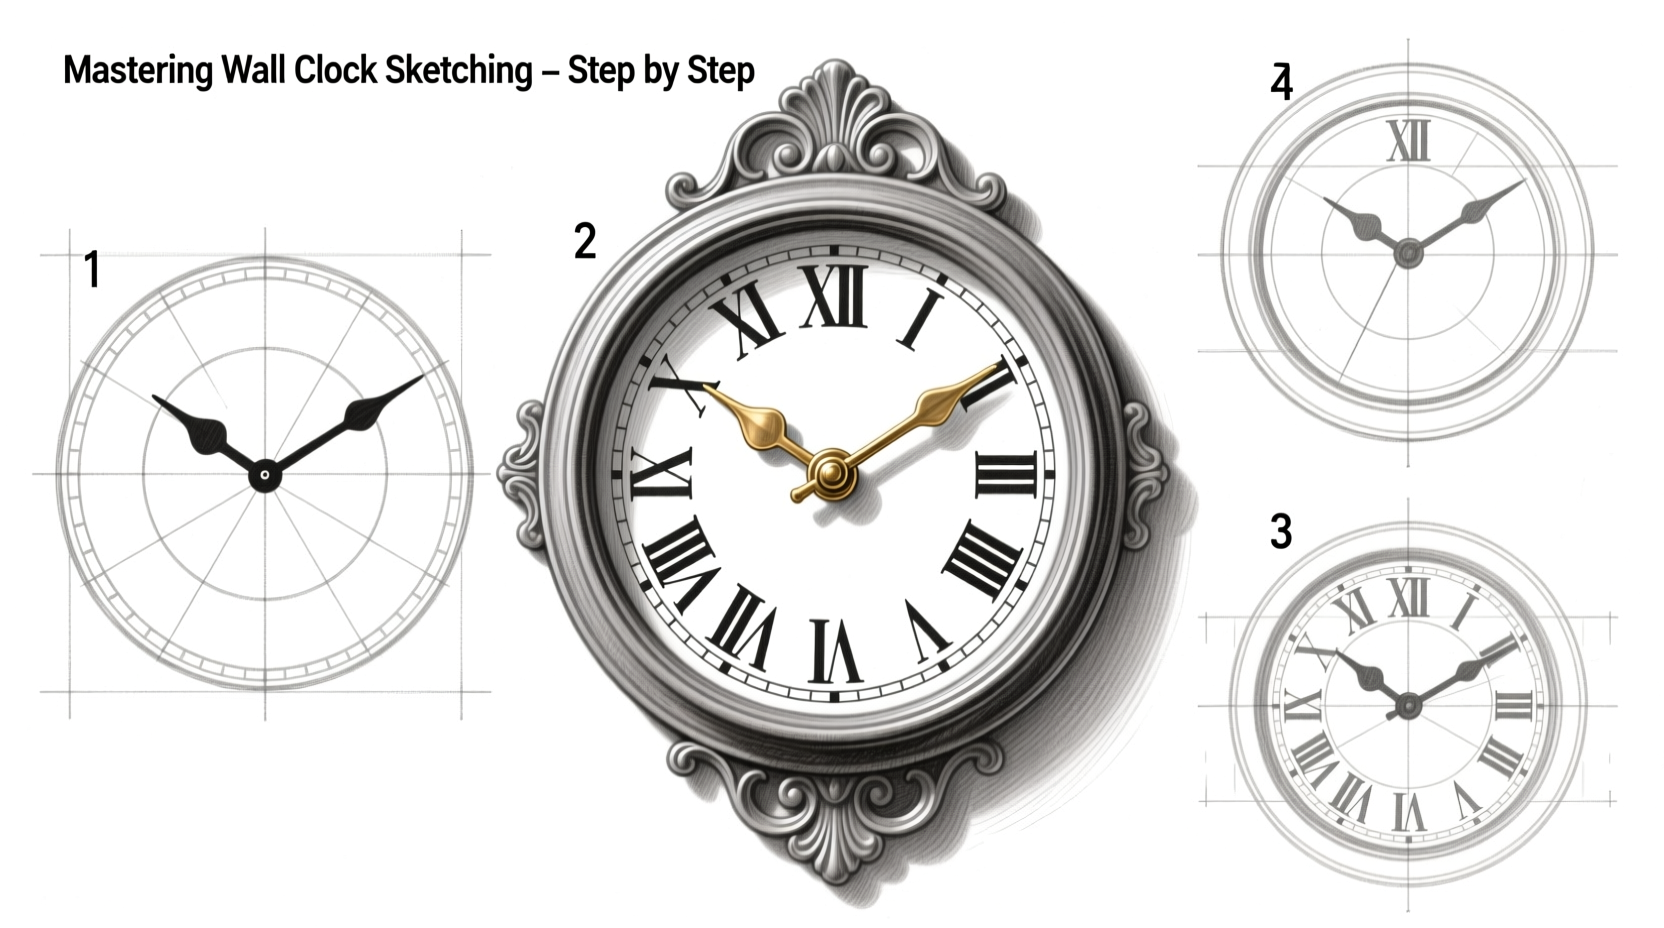
Follow this structured sequence to create a precise and visually balanced wall clock sketch. Each stage builds upon the last, minimizing errors and maximizing clarity.
- Mark the Center Point: Lightly dot the exact center of your intended clock face using a sharp pencil (e.g., H or 2H). This will serve as the anchor for all subsequent measurements.
- Draw the Outer Circle: Using a compass or freehand with careful rotation, draw the main circumference. If drawing freehand, rotate the paper instead of your wrist for smoother curves.
- Add Inner Guidelines: Sketch two perpendicular lines (vertical and horizontal) crossing through the center. These divide the clock into quadrants and assist in placing numbers and hands evenly.
- Position Hour Markers: Begin with 12, 3, 6, and 9 o’clock positions. Then subdivide each quarter to place the remaining numerals. For Roman numerals, note common stylizations like \"IV\" vs. \"IIII.\"
- Sketch the Clock Hands: Draw the hour, minute, and second hands as elongated shapes tapering toward the ends. Ensure they originate from the center and are proportionally balanced—one typically shorter and wider (hour), one longer (minute), and a thin second hand if included.
- Ink Final Lines: Once satisfied with layout, trace over essential outlines with a finer pen or darker pencil. Erase all construction lines gently to avoid smudging.
- Add Shading and Depth: Apply gradients to suggest curvature. Darken the outer edge slightly to simulate a recessed bezel. Cast a soft shadow beneath the clock to ground it on the surface.
“Precision in drawing begins with patience in planning. The best sketches are built on invisible discipline.” — Julian Reed, Fine Art Instructor at the Royal Academy of Drawing
Common Pitfalls and How to Avoid Them
Even experienced artists can fall into traps when rendering symmetrical objects. Below is a comparison of frequent mistakes and their solutions:
| Common Mistake | Why It Happens | How to Fix It |
|---|---|---|
| Uneven numeral spacing | Relying on eye estimation without guidelines | Use radial division lines every 30 degrees for hours |
| Tilted or skewed hands | Not aligning hands with the center point | Double-check angles using protractor or reference image |
| Flat, lifeless appearance | Lack of tonal variation or depth cues | Add subtle gradients and drop shadows |
| Distorted circle | Freehand wobble or incorrect pressure | Use a compass or draw in segments with smooth transitions |
Pro Techniques for Advanced Realism
To move beyond basic representation, incorporate advanced observational strategies that mimic real-world lighting and material properties. Consider the following approaches:
- Cast Shadows: Determine the light source direction. Draw a soft shadow extending diagonally downward from the bottom edge of the clock. Soften the shadow’s edges with blending tools for realism.
- Surface Texture: If depicting a metallic finish, use fine parallel lines or cross-hatching near the rim to suggest reflectivity. Matte surfaces require even, low-contrast shading.
- Perspective Variation: Try drawing the clock at a slight angle (3/4 view). This introduces elliptical distortion, challenging your understanding of foreshortening and spatial depth.
- Background Integration: Place the clock on a wall with a nail or hook above. Add subtle wallpaper patterns or wood grain behind it to enhance context without overwhelming the subject.
Mini Case Study: From Sketch to Gallery Submission
Sophie Tran, a self-taught artist from Portland, struggled with symmetry in her early drawings. Her initial attempts at a vintage-style wall clock resulted in uneven numerals and misaligned hands. After studying technical drafting principles, she began using a grid method: dividing her paper into eighths and plotting key points before drawing. She also started practicing daily circle drills to improve freehand control. Within six weeks, her precision improved dramatically. Her final piece—a detailed brass-finished clock with Roman numerals and a mahogany frame—was accepted into a local art exhibition. “I realized that patience with structure leads to freedom in expression,” she said.
Essential Tools and Materials Checklist
Having the right tools streamlines the drawing process and improves accuracy. Here’s what you should have on hand:
- Sharp pencils (HB, 2H for light lines; 2B–4B for dark outlines and shading)
- Eraser (kneaded for lifting graphite, plastic for clean removal)
- Compass or circular template
- Ruler or straightedge
- Protractor (optional, for exact degree markings)
- Blending stump or tissue (for smooth gradients)
- High-quality sketch paper (minimum 90 gsm)
Frequently Asked Questions
Can I draw a wall clock without a compass?
Yes, though it requires practice. Rotate the paper slowly while keeping your wrist steady to draw smoother circles. Alternatively, trace around a round object like a cup or lid for a perfect outline.
How do I space the numbers evenly around the clock face?
Divide the circle into 12 equal sections using 30-degree increments (360° ÷ 12 = 30°). Lightly mark these positions with radial lines from the center, then place numerals at the intersections of these lines and the inner circle boundary.
What if my hands don’t look proportional?
Establish a ratio beforehand. A standard approach is: hour hand = 40% of radius, minute hand = 70%, second hand = 65% with a thinner stroke. Sketch them lightly first and adjust before finalizing.
Mastery Through Practice and Observation
Drawing a wall clock is more than a technical exercise—it’s a meditation on order, time, and craftsmanship. Each line you refine strengthens your ability to see and render the world with greater accuracy. While digital tools offer shortcuts, there’s unmatched value in learning to draw such objects by hand. The discipline carries over into portraiture, architecture, and mechanical illustration.
Start simple. Focus on clean circles and centered elements. Gradually introduce complexity: different fonts for numerals, ornate frames, reflective surfaces. Over time, you’ll develop an intuitive sense of balance and proportion that transcends any single subject.


 浙公网安备
33010002000092号
浙公网安备
33010002000092号 浙B2-20120091-4
Comments
No comments yet. Why don't you start the discussion?