
Drawing the letter \"y\" might seem simple at first glance, but it serves as a powerful gateway to understanding fundamental drawing principles such as line precision, symmetry, and muscle control. Whether you're just starting out or refining your artistic technique, mastering how to draw \"y\" can improve your overall hand-eye coordination and set a strong foundation for more complex forms. This guide breaks down the process into actionable steps, offering insights that apply far beyond a single letter—into sketching, calligraphy, and even character design.
The Importance of Simple Forms in Artistic Development
Artists often overlook basic shapes and characters, rushing toward complex subjects like portraits or landscapes. However, simplicity is where mastery begins. The letter \"y\" contains both straight and curved lines, angles, and branching elements—making it an ideal training ground for developing fine motor skills. By focusing on clean execution, consistent pressure, and spatial awareness, beginners build habits that translate directly to realistic drawing and expressive illustration.
“Even the most intricate drawings begin with simple strokes. Mastering fundamentals like letters trains the hand to obey the mind.” — Julian Park, Drawing Instructor at the Northern Arts Academy
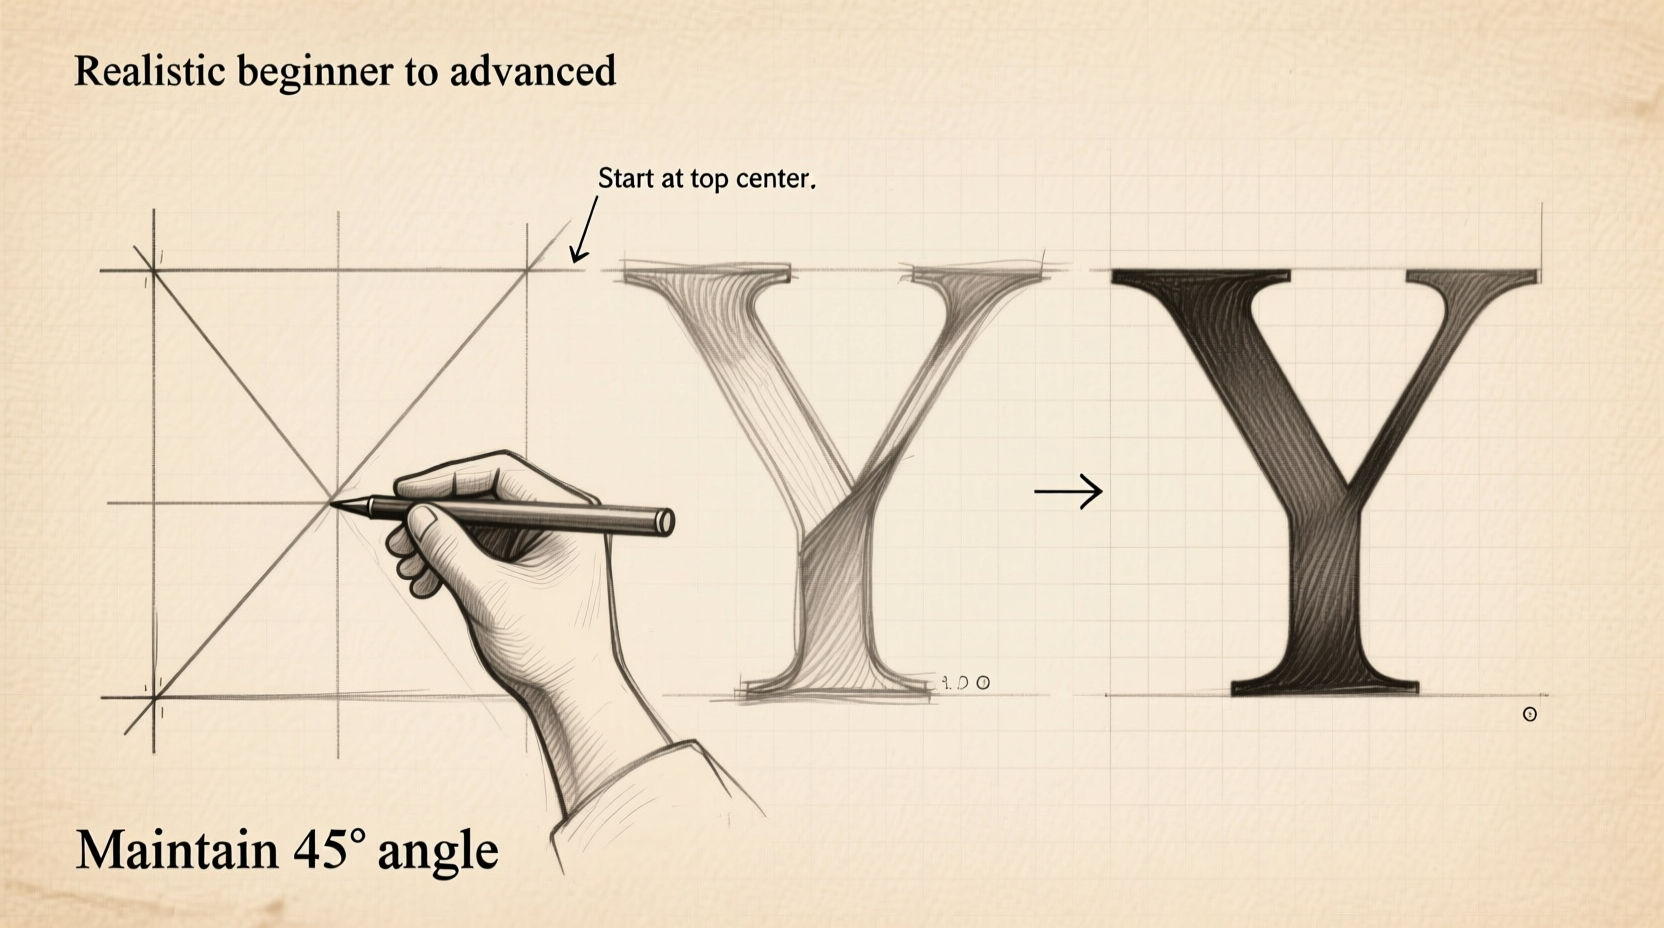
Step-by-Step Guide: How to Draw 'Y' with Precision
Follow this structured approach to draw \"y\" correctly, whether in print or cursive form. Each stage builds upon the last, emphasizing control and consistency.
- Choose Your Style: Decide between block (print) or cursive \"y\". Block letters help with geometry; cursive improves fluidity.
- Gather Tools: Use a pencil with medium hardness (HB or 2B), eraser, and lined or grid paper for alignment.
- Lightly Sketch Guidelines: Draw horizontal lines to define top, middle, and baseline levels. Add a vertical centerline if needed for symmetry.
- Start with the Stem: For block \"y\", draw a vertical line from top to bottom baseline. Keep it straight using light guide marks. <5> Add Angled Arms: From the top third of the stem, draw two diagonal lines outward—one slightly steeper than the other—meeting at a point below the baseline.
- Refine Cursive Form (Optional): Begin above the line with a loop, descend into a slanted stem, then extend a tail diagonally downward to the right.
- Darken Final Lines: Once proportions are correct, go over the sketch with firmer pressure for clarity.
- Erase Guides: Remove all construction lines gently to avoid smudging.
Common Mistakes and How to Avoid Them
Even experienced learners make recurring errors when drawing letters. Recognizing these pitfalls early prevents bad habits from forming.
| Mistake | Why It Happens | Solution |
|---|---|---|
| Uneven arms | Lack of measurement or freehand inconsistency | Use a ruler or lightly mark equal distances before drawing |
| Wobbly lines | Tension in wrist or improper grip | Loosen your grip; draw from the shoulder for longer strokes |
| Incorrect proportions | Not using guidelines | Always sketch reference lines first |
| Heavy start points | Pressing too hard at stroke beginnings | Practice ghosting—hover and rehearse motion before committing |
Progressing Beyond the Basics: Creative Applications
Once you’ve mastered the standard \"y\", challenge yourself with variations that expand your skillset. These exercises bridge foundational practice with real-world artistry.
- Stylized Typography: Experiment with serif, sans-serif, or graffiti-inspired versions of \"y\". Notice how weight distribution affects balance.
- 3D Lettering: Add shadows and depth using one-point perspective. Extend edges backward and connect them to create volume.
- Animated Motion Studies: If interested in animation, draw \"y\" transforming into another letter—like morphing into \"g\" or \"j\"—to train smooth transitions.
- Integration with Design: Incorporate the letter into logos or wordmarks, considering spacing, kerning, and visual hierarchy.
Mini Case Study: From Struggles to Confidence
Maya, a 24-year-old aspiring illustrator, initially struggled with inconsistent letterforms in her sketchbook. She found herself redrawing \"y\" repeatedly due to crooked stems and mismatched angles. After adopting a daily 10-minute drill focused solely on lowercase letters—including timed repetitions of \"y\"—she noticed dramatic improvement within three weeks. Her line confidence increased, and she began applying the same disciplined approach to facial features and figure drawing. “I didn’t think practicing a single letter would help so much,” she said. “But now I see structure everywhere.”
Essential Tips for Continuous Improvement
Improvement doesn't come from occasional effort—it’s built through routine and mindful repetition. Here are key strategies to keep advancing:
- Use tracing paper over well-drawn examples to internalize shape flow.
- Flip your drawing upside down to spot asymmetries more easily.
- Record yourself drawing to analyze hand movement and posture.
- Compare your work weekly to track subtle improvements.
Checklist: Daily Practice Routine for Drawing 'Y'
- Warm up with loose wrist circles and scribbles (2 min)
- Sketch guidelines on paper (horizontal baselines)
- Draw 10 block-style \"y\" letters with focus on symmetry
- Draw 10 cursive \"y\" letters emphasizing smooth flow
- Select one best example and circle areas for refinement
- Erase cleanly and reflect briefly on progress
Frequently Asked Questions
Can learning to draw letters really improve my overall art skills?
Absolutely. Letters combine controlled lines, curves, spacing, and proportion—all essential in figure drawing, architecture, and design. Practicing them strengthens precision and patience, which transfer across mediums.
I keep making one side of the 'y' longer than the other. How do I fix this?
This is common. Try measuring with your pencil: hold it up to your sketch, align the tip with one arm’s end, and compare visually with the other. You can also use a mirror or turn your page upside down to see imbalances more clearly.
Should I use a mechanical pencil or regular graphite?
Either works, but a standard HB or 2B wooden pencil offers better tactile feedback and shading versatility. Mechanical pencils provide uniform thickness, which helps consistency but may limit expressive variation.
Conclusion: Turn Practice into Progress
Drawing \"y\" is more than an exercise in handwriting—it's a microcosm of artistic discipline. Every stroke teaches alignment, pressure control, and attention to detail. What starts as a simple letter becomes a tool for building confidence, sharpening observation, and preparing for greater creative challenges. The path from beginner to skilled artist isn’t marked by grand leaps, but by consistent, thoughtful repetition.


 浙公网安备
33010002000092号
浙公网安备
33010002000092号 浙B2-20120091-4
Comments
No comments yet. Why don't you start the discussion?