
Green screening—once reserved for Hollywood studios—is now accessible to anyone with a camera and editing software. Whether you're creating social media content, designing product images, or producing digital art, removing and replacing backgrounds can elevate your visuals dramatically. The key lies not just in the tools, but in understanding lighting, color contrast, and post-processing techniques that ensure clean, natural-looking results. This guide walks through every phase of mastering photo green screening, from setup to final export, so your compositions look professional and seamless.
Why Green Screening Works: The Science Behind It
Green screening, or chroma keying, relies on isolating a specific color—usually bright green—from an image and making it transparent. This works because green is far from human skin tones and most clothing, reducing the risk of accidental erasure. Digital editors use algorithms to detect pixels within a defined color range and remove them, allowing new backgrounds to be inserted behind the subject.
The success of this process depends on three factors: consistent lighting, minimal color spill, and high contrast between the subject and backdrop. Poor execution leads to jagged edges, halos, or unnatural blending—issues that frustrate beginners. But with proper technique, even smartphone photographers can achieve studio-quality results.
“Chroma keying isn’t about the software—it’s about preparation. A well-lit green screen beats any AI tool.” — Jordan Lee, Digital Imaging Specialist at StudioFrame Labs
Step-by-Step Guide to Perfect Green Screen Photos
Follow this timeline to capture and edit a photo with flawless background removal. Each stage builds on the previous one, ensuring optimal quality throughout the workflow.
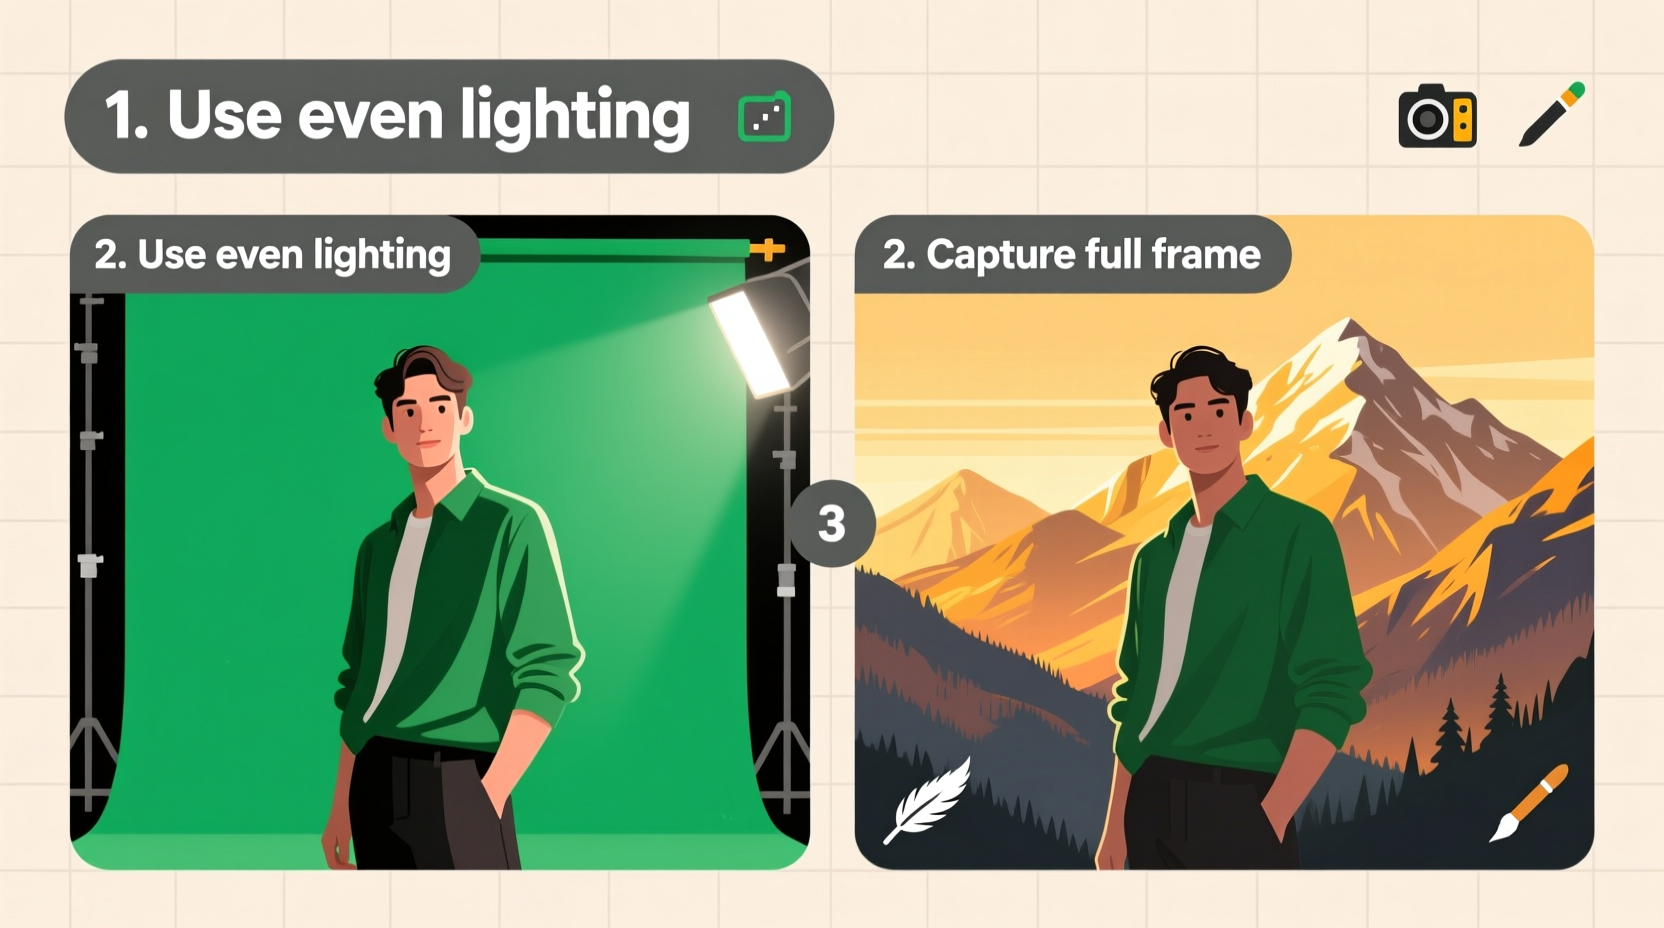
- Set up your green screen: Use a smooth, wrinkle-free backdrop made of fabric, paper, or collapsible vinyl. Ensure it covers floor to ceiling if full-body shots are needed.
- Light the screen evenly: Position two soft lights at 45-degree angles to eliminate shadows. Use a light meter or histogram to confirm uniform brightness across the surface.
- Separate subject from background: Keep at least 6 feet between the person and the screen to prevent green light reflection (spill) onto hair or clothing.
- Light your subject independently: Use three-point lighting (key, fill, backlight) to create depth without casting shadows on the green screen.
- Capture the image: Shoot in RAW format if possible, using manual white balance to avoid color shifts. Avoid green-tinted clothing or accessories.
- Import into editing software: Choose tools like Adobe Photoshop, GIMP, or online platforms such as Remove.bg or Photopea.
- Apply chroma key effect: Use the magic wand, quick selection tool, or dedicated chroma key filter to select and delete the green background.
- Refine edges: Adjust tolerance, edge feathering, and noise reduction to smooth out hair strands or fine details. <9> Insert new background: Place a high-resolution image behind your subject, aligning perspective and lighting direction. <10> Final color grading: Match exposure, temperature, and shadows between subject and new scene for realism.
Essential Tools and Software Comparison
Different projects demand different tools. Here's a comparison of popular options based on accessibility, precision, and learning curve.
| Tool | Type | Best For | Pros | Cons |
|---|---|---|---|---|
| Adobe Photoshop | Professional desktop | Precision editing, complex composites | Advanced masking, non-destructive layers | Expensive, steep learning curve |
| GIMP | Free open-source | Budget creators, learners | Powerful features, customizable | Clunky interface, limited tutorials |
| Remove.bg | Online AI tool | Quick edits, social media | No installation, instant results | Limited control, subscription cost |
| Photopea | Browser-based editor | PSD editing without download | Supports PSD files, free to use | Ads, slower performance |
| Canva Pro | Design platform | Non-designers, marketers | User-friendly, built-in templates | Less precise, watermark on free tier |
Avoid These Common Green Screen Mistakes
Even experienced creators make errors that degrade output quality. Recognizing these pitfalls early saves time and improves consistency.
- Wrinkled or uneven backdrops: Creates shadows and inconsistent color, confusing selection tools.
- Insufficient distance between subject and screen: Causes green spill, especially visible in lighter hair or translucent fabrics.
- Over-reliance on automatic tools: AI may cut off fingers or leave green fringes; always manually refine.
- Mismatched lighting angles: If the new background shows sunlight from the left but your subject is lit from the right, the illusion breaks.
- Using low-resolution replacement backgrounds: Pixelation makes compositing obvious and unprofessional.
Real-World Example: E-Commerce Product Photography
Sophia runs a small jewelry brand selling handmade necklaces online. To maintain visual consistency across her site, she wanted all products photographed against varied scenic backgrounds—beaches, cityscapes, forest trails—without traveling.
She set up a portable green screen in her home studio, used LED panels for even lighting, and photographed each necklace on a mannequin bust. In Photoshop, she removed the green background, refined the delicate chain edges using the refine edge brush, then placed each piece into lifestyle scenes matching her brand aesthetic. By adjusting the highlights to mimic golden-hour lighting, the final images looked authentic and engaging.
The result? A 40% increase in conversion rates on product pages, with customers commenting on the “real-life” feel of the photos—despite never leaving her apartment.
Checklist for Flawless Green Screen Execution
Before every shoot and edit, run through this checklist to ensure maximum quality:
- ✅ Backdrop is smooth, fully stretched, and free of stains
- ✅ Lighting on green screen is even (no hotspots or shadows)
- ✅ Subject stands at least 5–6 feet away from the backdrop
- ✅ No clothing or props match the green screen color
- ✅ Camera settings are manual (focus, white balance, exposure)
- ✅ Image saved in high resolution (preferably RAW)
- ✅ Editing software has chroma key or background removal capability
- ✅ Edges refined and spill suppressed before final export
- ✅ New background matches perspective, scale, and lighting direction
- ✅ Final composite reviewed at 100% zoom for imperfections
Frequently Asked Questions
Can I use a green bed sheet as a backdrop?
Yes, but only if it’s tightly stretched and wrinkle-free. Wrinkles cause shading variations that interfere with clean keying. Matte-finish photography backdrops are ideal because they don’t reflect light.
Why does my subject have a green halo after removal?
This is called \"color spill,\" where green light reflects off the backdrop and onto the subject. Use spill suppression tools in your editor or adjust the hue/saturation of affected areas. Increasing subject-to-screen distance also helps prevent it.
Do I need expensive software to get good results?
Not necessarily. While Photoshop offers the most control, free tools like GIMP or Remove.bg produce excellent results for simpler tasks. Success depends more on shooting conditions than software price.
Conclusion: Elevate Your Visual Storytelling
Mastering green screen techniques opens doors to limitless creative possibilities. From crafting compelling marketing visuals to building immersive digital experiences, the ability to seamlessly replace backgrounds is a powerful skill in today’s image-driven world. The difference between amateur and professional results often comes down to attention to detail—lighting, spacing, edge refinement, and realistic integration. With practice and the right approach, anyone can produce polished, convincing composites that captivate audiences.


 浙公网安备
33010002000092号
浙公网安备
33010002000092号 浙B2-20120091-4
Comments
No comments yet. Why don't you start the discussion?