
The pear-shaped puff pastry, often seen in French patisseries and artisanal bakeries, is an elegant fusion of form and flavor. Unlike standard rectangular or round pastries, the pear shape offers a tapered elegance that makes it ideal for both sweet and savory applications—think almond cream fillings, spiced fruit compotes, or even herbed goat cheese centers. Achieving the perfect pear-shaped puff requires precision in shaping, understanding dough behavior, and careful attention to baking dynamics. This guide breaks down the entire process into manageable steps, equipping you with the knowledge to produce consistently beautiful, flaky puffs at home.
Understanding the Pear-Shaped Puff: Why Shape Matters
Puff pastry relies on hundreds of thin layers of butter and dough that expand when heated, creating a light, airy structure. The pear shape—a rounded base tapering to a narrow tip—is not just aesthetic; it influences how heat distributes during baking. The wider end bakes slightly slower than the pointed tip, which can dry out if not monitored. A well-executed pear shape ensures balanced rise and even browning.
This shape is commonly used in chouquettes, frangipane tarts, and decorative appetizers. It’s also a favorite in competitive baking due to its technical challenge. The key lies in gentle handling and maintaining structural integrity from roll-out to bake.
Essential Tools and Ingredients
Before shaping, gather the right tools and ingredients. Precision starts before the first cut.
| Item | Purpose |
|---|---|
| High-fat puff pastry (homemade or store-bought) | Minimum 70% fat content ensures proper lamination |
| Sharp pastry wheel or knife | Clean cuts prevent dough sealing and layer loss |
| Ruler and pencil (food-safe) | For marking symmetrical shapes |
| Bench scraper | Helps lift and transfer delicate dough without tearing |
| Baking sheet with parchment paper | Prevents sticking and ensures even heat distribution |
| Egg wash (1 egg + 1 tbsp water) | Creates shine and promotes browning |
Use only cold butter-based puff pastry. Avoid margarine-based versions—they lack the moisture content needed for steam-driven lift. If making your own, allow at least 2 hours for resting between folds.
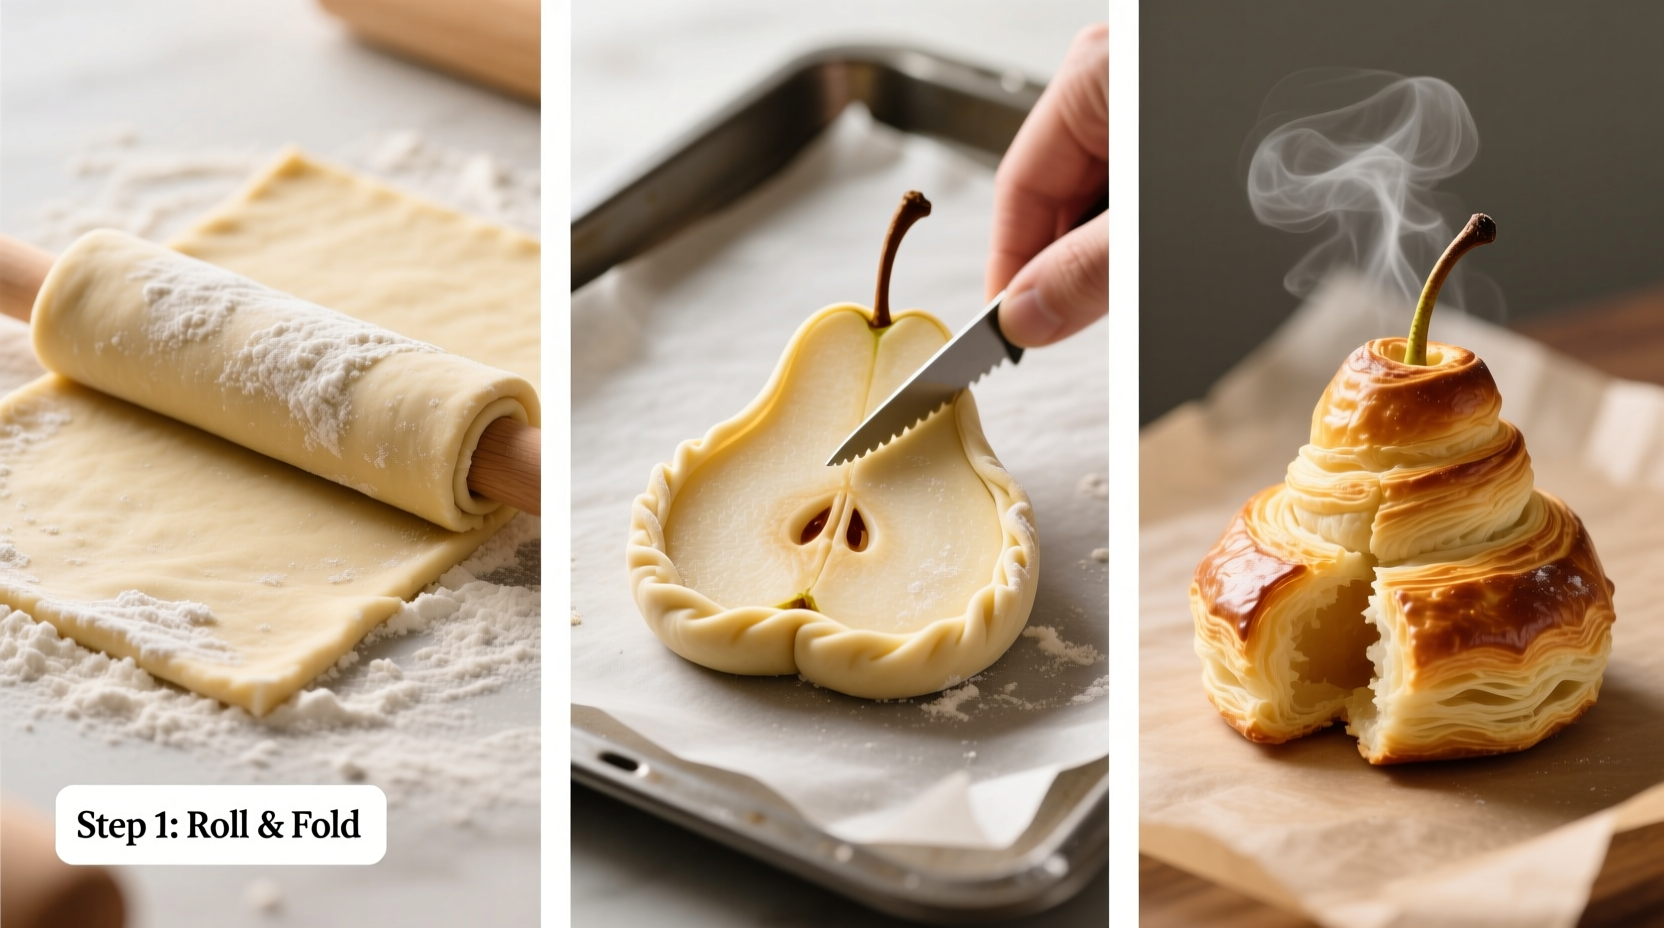
Step-by-Step Guide to Shaping the Perfect Pear
- Chill the dough: Place the puff pastry sheet in the refrigerator for 30 minutes before handling. Cold dough holds its shape better during cutting and shaping.
- Cut rectangles: Roll the pastry to a uniform ¼-inch thickness. Cut into rectangles approximately 4 inches by 6 inches.
- Mark the center line: Using a food-safe marker or lightly scored line, draw a vertical centerline down each rectangle. This guides the folding process.
- Create the base: At one end of the rectangle (the future base), gently press your thumb into the center to create a slight indentation. This will become the rounded bottom of the pear.
- Fold diagonally: Bring one corner over the centerline toward the opposite side, forming a diagonal fold. Repeat with the other side so both corners meet at the centerline, creating a triangular top. The untouched end remains flat—the base.
- Shape the curve: Gently roll the folded portion forward while applying light pressure to the base, coaxing the dough into a smooth, curved pear silhouette. Use your fingertips to refine the taper.
- Seal the edge: Dampen the seam lightly with water and press gently to secure. Do not overwork—this can compress the layers.
- Transfer carefully: Use a bench scraper to lift the shaped puff onto a parchment-lined baking sheet. Keep space between pieces for expansion.
- Chill again: Refrigerate for 15 minutes before baking. This resets the gluten and re-solidifies the butter.
- Apply egg wash: Brush the surface evenly with egg wash, avoiding the edges to prevent sealing shut.
“Shaping is where technique meets artistry. The pear puff rewards patience—rushing leads to collapsed forms and uneven layers.” — Chef Léa Moreau, Pastry Instructor at Le Cordon Bleu Paris
Common Pitfalls and How to Avoid Them
Even experienced bakers encounter issues when crafting pear-shaped puffs. Here are frequent mistakes and their solutions:
| Issue | Causes | Solutions |
|---|---|---|
| Flat, dense texture | Butter melted before baking, over-handling | Keep dough cold; minimize touch |
| Uneven rise (lopsided puff) | Asymmetrical folding, inconsistent thickness | Use ruler; fold precisely |
| Tearing during shaping | Dough too cold or rolled too thin | Let sit 2 minutes at room temp; maintain ¼-inch thickness |
| Base spreads too wide | Not chilled before baking | Always double-chill: pre- and post-shaping |
| Dull color after baking | Insufficient egg wash or oven too cool | Brush generously; preheat to correct temp |
Real Example: Baking Competition Success Story
In the 2022 Regional Artisan Bake-Off, contestant Diego Mendez placed second with his lavender-honey pear puffs. His secret? A two-stage chilling method and a custom mold made from bent metal wire to maintain shape during proofing. “I noticed my puffs would slump sideways,” he explained. “So I created a U-shaped support that cradled the base and guided the rise upward.” He also brushed the interior layers with honey glaze before folding, enhancing caramelization without compromising lift. Judges praised the balance of visual appeal and textural complexity—crisp exterior, tender interior, and a defined pear silhouette.
Baking for Optimal Results
Once shaped and chilled, baking must be precise. Preheat your oven to 400°F (200°C) at least 20 minutes in advance. Convection ovens work best, but if using conventional, place the baking sheet in the center rack for even airflow.
Bake for 18–22 minutes, rotating the tray halfway through. The puffs are done when deeply golden, fully puffed, and hollow-sounding when tapped. Avoid opening the oven during the first 15 minutes—temperature drops can cause collapse.
For filled puffs: Remove from oven, pierce the base with a skewer to release steam, then cool completely. Fill using a piping bag with a narrow tip. Popular options include:
- Almond frangipane
- Lemon curd
- Spinach and feta cream
- Mushroom duxelles
FAQ
Can I freeze uncooked pear-shaped puffs?
Yes. Freeze them on a tray until solid (about 2 hours), then transfer to an airtight container. Bake from frozen, adding 3–5 minutes to the cooking time. Do not thaw beforehand.
Why did my puff pastry shrink after shaping?
Shrinkage usually indicates the dough was stretched during rolling or not rested enough. Always let laminated dough rest for at least 30 minutes after rolling and before cutting.
Can I use phyllo dough instead?
No. Phyllo lacks the layered butter structure needed for self-rising. It browns quickly but won’t achieve the same voluminous puff. Stick to true puff pastry for authentic results.
Final Checklist Before Baking
- ✅ Dough is cold and firm
- ✅ Work surface is lightly floured
- ✅ All tools are ready (pastry wheel, scraper, brush)
- ✅ Oven is fully preheated
- ✅ Baking sheets are lined with parchment
- ✅ Each puff is evenly spaced (at least 2 inches apart)
- ✅ Egg wash is applied uniformly
Conclusion
Mastering the pear-shaped puff is more than a technical skill—it's a demonstration of control, timing, and respect for the science of baking. From the initial chill to the final golden gleam, every step contributes to a result that’s as impressive visually as it is satisfying to eat. Whether you're preparing for a dinner party, refining your pastry repertoire, or simply indulging in the joy of homemade elegance, this technique opens doors to creative expression in the kitchen.


 浙公网安备
33010002000092号
浙公网安备
33010002000092号 浙B2-20120091-4
Comments
No comments yet. Why don't you start the discussion?