
Accurate timekeeping is essential for productivity, communication, and app functionality on your Android device. Whether you're traveling across time zones, troubleshooting calendar sync issues, or simply want to ensure your phone displays the correct time, knowing how to manage time settings gives you control over one of the most fundamental features of your smartphone. While Android typically handles time automatically, there are situations where manual intervention is necessary or preferred. This comprehensive guide walks you through everything you need to know about setting and managing time on your Android phone—accurately and efficiently.
Why Accurate Time Settings Matter
The clock on your Android phone does more than tell time—it synchronizes alarms, calendar events, messaging timestamps, and even security certificates used in banking and email apps. An incorrect time can lead to missed appointments, failed logins, or inaccurate location tracking. For example, if your phone’s clock is off by even 10 minutes, scheduled meetings may appear out of sequence, and two-factor authentication systems might reject your login attempts due to time-based token mismatches.
Android devices use Network Time Protocol (NTP) servers to maintain precision, often syncing within milliseconds of global atomic clocks. However, network errors, airplane mode, or disabled auto-settings can cause discrepancies. Understanding how to manually verify and adjust the time ensures reliability regardless of connectivity.
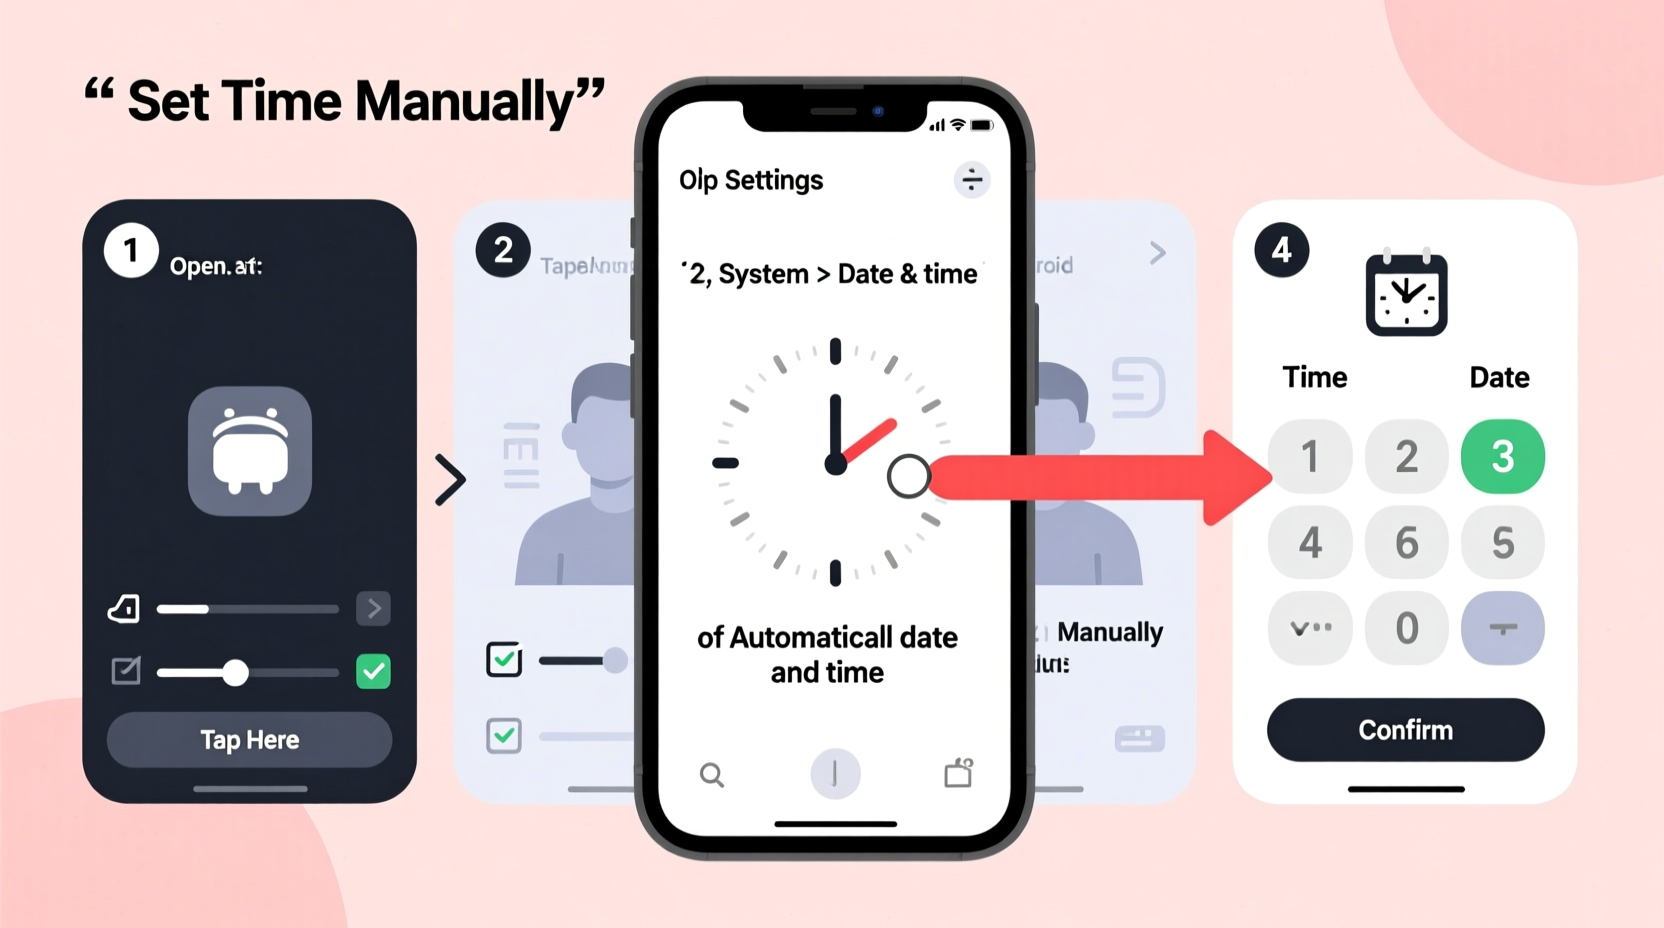
Step-by-Step Guide to Setting the Time on Your Android Phone
Modern Android phones running Android 6.0 (Marshmallow) and later follow a consistent settings structure. The process may vary slightly depending on your manufacturer (Samsung, Google Pixel, OnePlus, etc.), but the core steps remain the same.
- Open the Settings App – Tap the gear icon from your home screen or app drawer.
- Navigate to “System” or “Date & Time” – On most devices, this is under “System.” Some brands like Samsung place it directly in the main menu as “General Management” > “Date and Time.”
- Disable Automatic Date & Time (if setting manually) – Toggle off “Set time automatically” to gain manual control.
- Tap “Set Time” – Use the dial or digital input to adjust hours, minutes, and AM/PM if applicable.
- Adjust the Date (if needed) – Similarly, tap “Set date” and choose the correct day, month, and year.
- Select Time Zone (optional) – If not using automatic detection, tap “Select time zone” and pick your current region.
- Confirm Changes – Once set, exit the menu. The system will save your preferences immediately.
After completing these steps, verify that all apps reflect the updated time. Alarms, calendar entries, and lock screen clocks should display correctly within seconds.
Re-enabling Automatic Time Sync
Once you’ve verified the correct time zone and connectivity, consider re-enabling automatic time updates. This ensures long-term accuracy without requiring future adjustments. Simply return to the same menu and toggle “Set time automatically” back on. Your phone will then sync with NTP servers every few days or whenever network conditions allow.
Common Issues and How to Fix Them
Even with proper setup, users sometimes encounter persistent time inaccuracies. These are often due to overlooked settings or environmental factors.
- Time resets after reboot: Likely caused by a failing battery or software glitch. Try restarting and reapplying settings. If the issue persists, check for system updates.
- Incorrect time zone while traveling: Ensure “Use location to set time zone” is enabled. This allows GPS and network data to detect your current region and update accordingly.
- Apps showing wrong timestamps: Clear cache for affected apps (e.g., Gmail, WhatsApp) via Settings > Apps > [App Name] > Storage > Clear Cache.
- Phone stuck in 24-hour format: Return to Date & Time settings and toggle “Use 24-hour format” off for standard 12-hour display.
“Time synchronization isn’t just convenience—it’s critical for digital trust. Secure communications rely on precise clocks.” — Dr. Lena Patel, Cybersecurity Analyst at MobileTrust Labs
Do’s and Don’ts When Managing Android Time Settings
| Do’s | Don’ts |
|---|---|
| Enable automatic time sync when possible | Manually set time and forget to double-check |
| Verify time zone during international travel | Ignore recurring time drift—it may indicate deeper issues |
| Use airplane mode + manual time for flight logs or testing | Disable automatic settings indefinitely without reason |
| Regularly update your OS for improved time management | Assume cellular networks always provide accurate time |
Real-World Example: Traveler’s Time Adjustment
Sophie, a digital marketer based in Chicago, flew to Berlin for a week-long conference. Upon landing, she noticed her calendar alerts were triggering five hours early. Her phone hadn’t updated the time zone automatically because she had disabled location services to conserve battery. After connecting to Wi-Fi, she went to Settings > System > Date & Time, confirmed “Set time automatically” was on, and toggled “Use location for time zone.” Within 30 seconds, her phone adjusted to Central European Time, and her meeting reminders realigned perfectly. This small fix prevented scheduling chaos throughout her trip.
Expert Tips for Optimal Time Management
Beyond basic configuration, advanced users can fine-tune their experience for greater efficiency and consistency.
- Leverage dual time zones: Some Samsung and LG models allow displaying a second time zone in the clock widget—ideal for coordinating with remote teams.
- Sync with smartwatches: Wear OS devices pull time directly from your phone. Ensuring phone accuracy guarantees wearable precision.
- Test alarm reliability: After changing time settings, schedule a test alarm two minutes ahead to confirm functionality.
- Avoid rooted device complications: Custom ROMs or root modifications may interfere with NTP syncing. Use trusted sources and monitor behavior post-installation.
Checklist: Mastering Android Time Settings
- ✅ Verify that “Set time automatically” is enabled unless manual control is needed
- ✅ Confirm your time zone matches your physical location
- ✅ Check whether 12-hour or 24-hour format suits your preference
- ✅ Test alarms and calendar notifications after any change
- ✅ Re-enable automatic sync after temporary manual adjustments
- ✅ Update your operating system regularly for optimal timekeeping performance
Frequently Asked Questions
Can I set a different time zone without changing my actual clock?
No—Android ties the displayed time directly to the selected time zone. However, you can add secondary clocks via widgets or third-party apps to view other regions simultaneously.
Why does my phone show the wrong time even with auto-set enabled?
This usually occurs due to poor network connectivity, disabled location services, or outdated system software. Restart your device, ensure internet access, and check for OS updates.
Does setting the time manually affect battery life?
No—time setting has no direct impact on battery consumption. However, frequent manual changes suggest underlying issues (like signal loss) that could indirectly affect power usage.
Final Thoughts: Take Control of Your Digital Clock
Setting the time on your Android phone is a quick task, but its implications ripple across nearly every function of your device. From timely notifications to secure online transactions, accurate timekeeping forms the invisible backbone of modern mobile life. By mastering both automatic and manual methods, you empower yourself to stay punctual, organized, and connected—no matter where you are or what time it is.


 浙公网安备
33010002000092号
浙公网安备
33010002000092号 浙B2-20120091-4
Comments
No comments yet. Why don't you start the discussion?