
Accurate measurement is foundational in countless everyday tasks—whether you're crafting, sewing, building, or completing school assignments. The metric system, widely used across the globe, relies heavily on centimeters as a standard unit of length. Yet, many people misread rulers or make avoidable errors that compromise precision. Understanding how to read and use a ruler in centimeters properly ensures consistency, improves project outcomes, and builds confidence in practical skills. This guide breaks down every aspect of using a centimeter ruler with clarity and real-world relevance.
Understanding the Centimeter Ruler Layout
A standard metric ruler is typically 30 centimeters long, marked from 0 to 30. Each large number represents one centimeter (cm), and between each centimeter are ten smaller divisions—each representing one millimeter (mm). This means 1 cm equals 10 mm, allowing for precise sub-centimeter measurements.
The markings vary slightly in length to help distinguish units:
- Longest lines: Represent full centimeters (e.g., 1 cm, 2 cm).
- Medium lines: Often mark the halfway point at 5 mm within each centimeter.
- Shortest lines: Represent single millimeters.
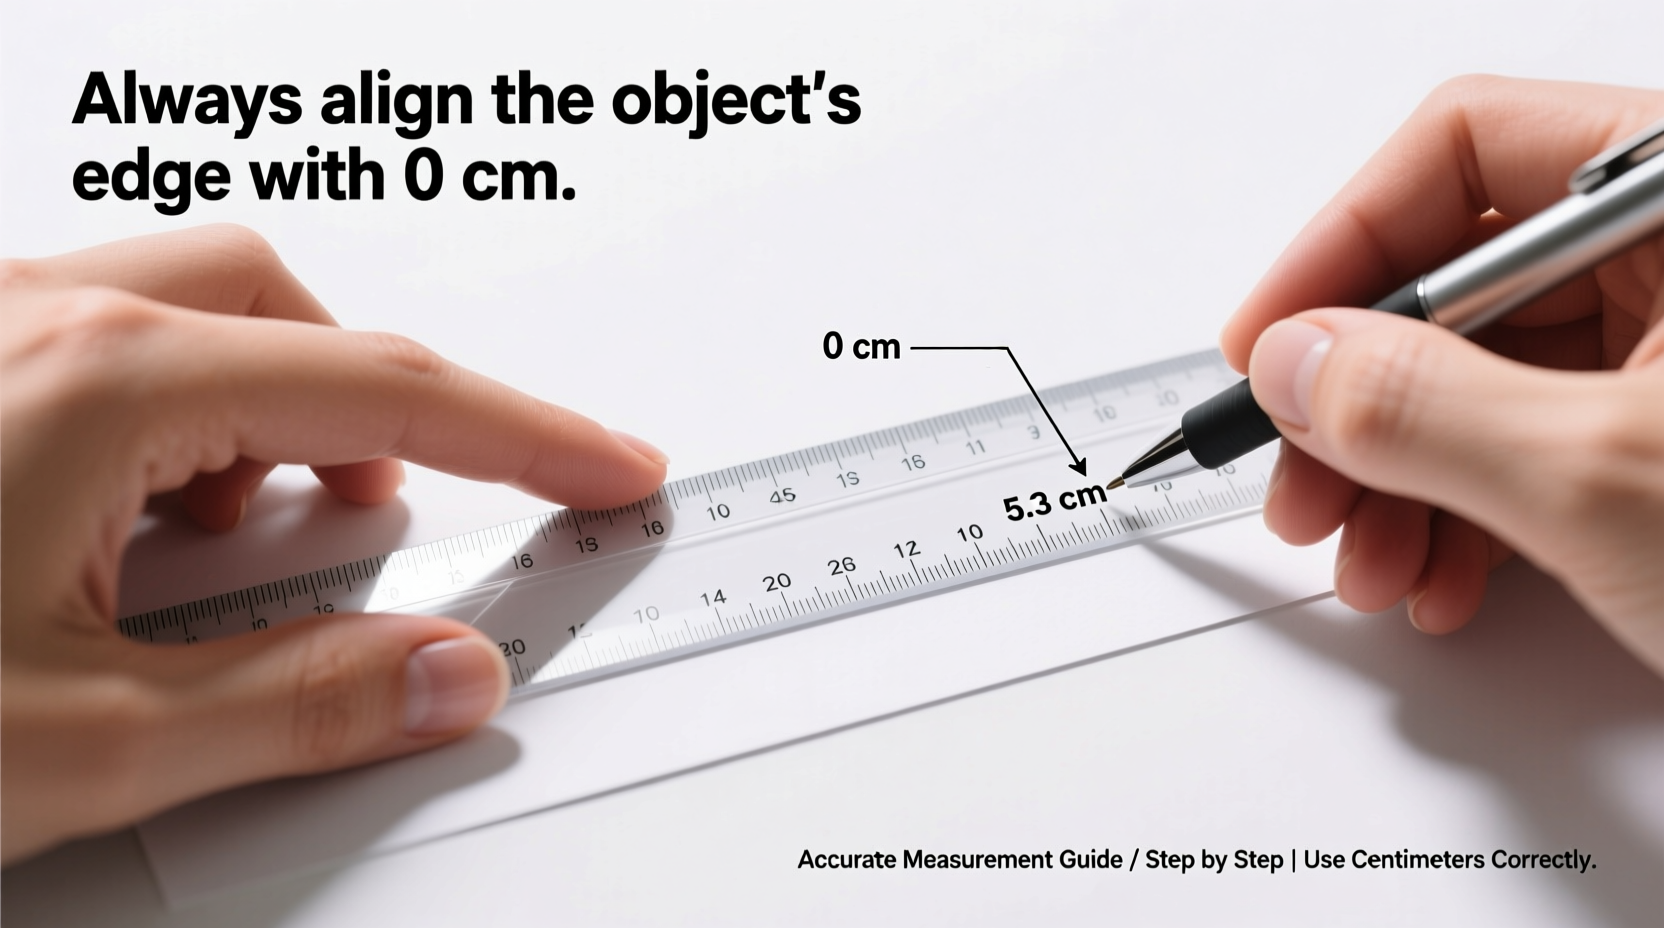
Unlike imperial rulers that use fractions, the metric system uses decimals, making calculations simpler. For example, a measurement falling at the third small line after the 7 cm mark is 7.3 cm—or 73 mm.
Step-by-Step Guide to Measuring Accurately in Centimeters
To ensure consistent accuracy, follow this logical sequence when using a centimeter ruler:
- Choose the right ruler: Use a clear, rigid ruler with sharp, legible markings. Flexible rulers may bend and distort readings.
- Position the object correctly: Place the item you’re measuring along the edge of the ruler, ensuring it lies flat and straight.
- Align with zero: Match one end of the object exactly with the “0” mark. If your ruler lacks a true zero edge, begin at 1 cm and subtract 1 from your final reading.
- Read the largest whole number: Identify how many full centimeters the object spans.
- Count the millimeters: Look at the smallest lines past the last full centimeter. Count how many millimeters beyond that point the object ends.
- Combine the values: Express the total as centimeters with one decimal place (e.g., 8.6 cm).
- Double-check alignment: Reconfirm that nothing has shifted and that your eye is directly above the mark to avoid parallax error.
This method works whether you're measuring paper, fabric, wood, or any linear distance. Consistency in technique leads to reliability over time.
Common Mistakes and How to Avoid Them
Even experienced users occasionally make errors due to haste or poor habits. Recognizing these pitfalls enhances accuracy:
| Mistake | Why It’s Problematic | Solution |
|---|---|---|
| Starting from the ruler's edge instead of 0 | Some rulers have space before the first mark, leading to under-measurement | Verify where “0” starts; align carefully or use an internal mark |
| Viewing the ruler at an angle | Causes parallax error, distorting perception of alignment | Look straight down at the measurement point |
| Using a worn or bent ruler | Distorted markings lead to incorrect readings | Replace damaged tools; store rulers flat and protected |
| Ignoring millimeter precision | Limits accuracy, especially in technical projects | Always note both cm and mm for exact results |
Real-World Example: Measuring Fabric for a DIY Pillow Cover
Sophie was creating a cushion cover for her living room and needed to cut a piece of cotton fabric measuring exactly 45 cm by 45 cm. She placed her fabric on a table, aligned the left edge with the 0 mark on her ruler, and began measuring along the bottom edge. However, she noticed her initial cut came out slightly short—only 44.5 cm.
Upon review, she realized she had started measuring from the physical edge of the ruler, not the engraved \"0\" line, which was set back by 2 mm. After correcting her alignment and re-cutting with proper technique, her second piece fit perfectly. This small adjustment made all the difference in achieving symmetrical seams and a professional finish.
This scenario illustrates how minor misalignments can compound into noticeable flaws—especially in repeat measurements or paired components.
“Precision begins with awareness. A ruler is only as accurate as the person using it.” — Dr. Lena Peters, Industrial Design Instructor, Berlin Technical Academy
Pro Tips for Enhanced Measurement Accuracy
Beyond basic usage, refining your approach elevates results. Consider these expert-backed strategies:
- Use a magnifying glass for fine work involving millimeters.
- Write down measurements immediately to prevent memory errors.
- When working with children or beginners, color-code the centimeter marks with highlighters to reinforce learning.
- Store rulers away from heat sources to prevent warping, especially plastic ones.
Quick Checklist: Mastering Your Metric Ruler
Follow this checklist every time you measure to maintain high standards:
- ✅ Confirm the ruler starts at zero and identify its starting point
- ✅ Align the object flush with the zero mark
- ✅ Keep the ruler and object flat and stable
- ✅ Read the centimeter value first, then add millimeters
- ✅ View the scale perpendicularly to avoid parallax
- ✅ Record the measurement in decimal form (e.g., 12.7 cm)
- ✅ Double-check critical measurements before cutting or assembling
Frequently Asked Questions
What do the small lines between centimeters mean?
Each small line represents one millimeter. There are 10 millimeters in a centimeter, so these allow for precise readings down to the nearest tenth of a centimeter.
Can I use a centimeter ruler to measure round objects?
Directly, no—rulers measure straight lines. To measure circumference, wrap a string around the object, mark it, then lay the string flat against the ruler. For diameter, place the object between two blocks and measure the gap with the ruler.
Is there a difference between a student ruler and a technical ruler?
Yes. Student rulers are often softer, less durable, and may lack fine gradations. Technical rulers (engineer’s rules) are made of metal or rigid plastic, feature etched markings, and offer greater longevity and precision for detailed work.
Conclusion: Precision Is Within Reach
Mastering the use of a centimeter ruler isn’t about innate talent—it’s about applying consistent, informed techniques. From understanding the layout to avoiding common visual errors, every detail contributes to more reliable results. Whether you're a student, crafter, DIY enthusiast, or educator, accurate measurement builds trust in your work and improves outcomes across projects.


 浙公网安备
33010002000092号
浙公网安备
33010002000092号 浙B2-20120091-4
Comments
No comments yet. Why don't you start the discussion?