
Switching to a metal strap can elevate the look of your Apple Watch from casual to sophisticated in seconds. Sleek, durable, and available in finishes like silver, gold, and space black, metal bands offer both style and longevity. However, installing one incorrectly can lead to scratches, loose fittings, or even accidental detachment. Unlike silicone or nylon bands, metal straps often require precise alignment and careful handling. This guide walks you through every stage—from choosing the right band to final adjustments—ensuring a secure, polished fit that lasts.
Selecting the Right Metal Strap
Before installation, confirm compatibility. Apple Watch sizes have evolved over generations, and not all metal bands fit every model. Check your watch’s case size—typically 38mm, 40mm, 41mm, 42mm, 44mm, 45mm, or 49mm (Ultra). Most quality manufacturers list compatible models clearly. Also, consider the type of metal band:
- Milanese Loop: Magnetic mesh design, fully adjustable, ideal for smaller wrists.
- Link Bracelet: Solid metal links with micro-adjustments; requires sizing.
- Oyster or Jubilee: Classic Rolex-style links; often come pre-sized but may need pin adjustments.
Choose stainless steel for durability or aluminum alloys for lightweight comfort. Avoid third-party bands without proper certification—they may lack secure latching mechanisms.
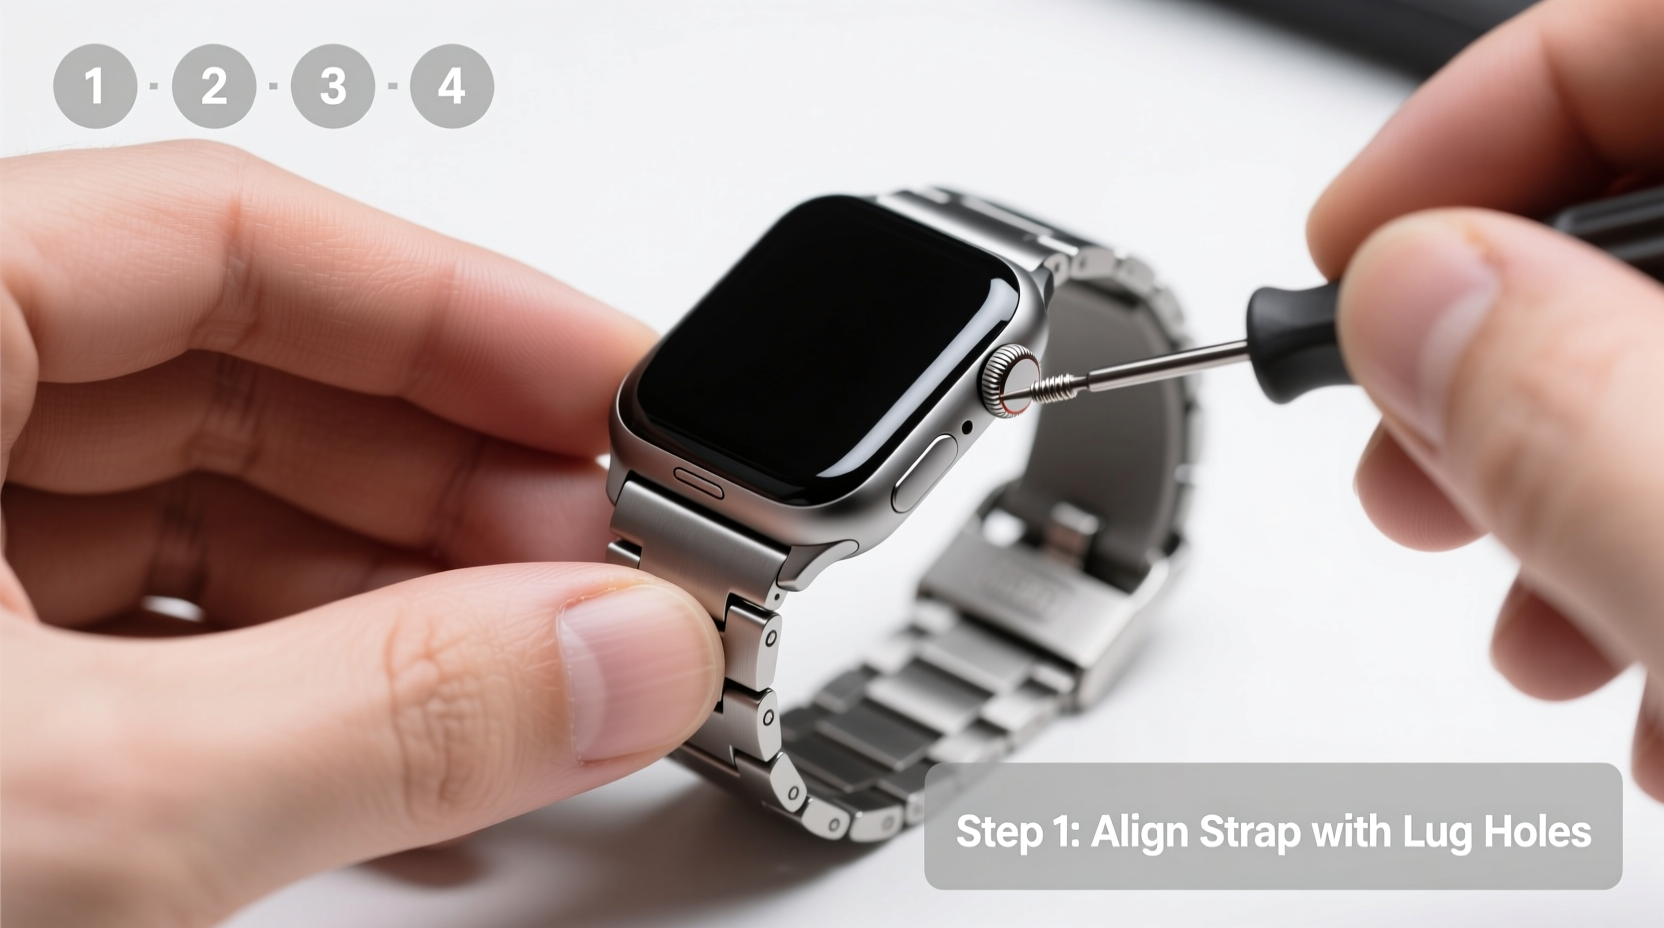
Step-by-Step Installation Process
Installing a metal strap correctly prevents damage to your Apple Watch and ensures long-term reliability. Follow these steps carefully:
- Power down your watch (optional but recommended): While not required, turning off the device reduces risk of accidental input during handling.
- Position the watch face-down: Use a soft microfiber cloth on a flat surface to avoid scratches.
- Locate the release button on the current band: Press it inward while gently sliding the band out from the housing. Repeat on the other side.
- Align the new metal band’s connector: Ensure the arrow on the band’s attachment mechanism points toward the watch body.
- Insert one side firmly: Slide one end of the metal strap into the slot until it clicks. Do not force it.
- Attach the second side: Hold the first side steady and insert the opposite connector. You should hear a distinct snap.
- Test the connection: Gently tug on the band to ensure it’s secure. There should be no wobbling or lateral movement.
The entire process should take less than three minutes once you’re familiar with the mechanism. Take your time—rushing increases the chance of misalignment.
Adjusting Your Metal Band for Comfort
A well-installed band still needs proper sizing. A loose fit risks slippage; too tight restricts circulation. Adjustment methods vary by style:
| Band Type | Adjustment Method | Tools Required |
|---|---|---|
| Milanese Loop | Slide magnetic closure along mesh | None |
| Link Bracelet | Add/remove links using pin removal tool | Precision screwdriver or pushpin |
| Oyster/Jubilee | Micro-adjust clasp or link resizing | Pin tool, rubber mallet (for stubborn pins) |
For link-based bracelets, start by removing links from the outer sides to preserve symmetry. Loosen the pin using a fine-tipped tool, then tap it out gently. Reinsert pins during reassembly with the dimpled end facing outward—this aligns with Apple’s internal spring mechanism.
“Proper band tension affects both comfort and sensor accuracy. A band that shifts during activity can interfere with heart rate readings.” — Dr. Lena Torres, Wearable Technology Specialist
Common Mistakes and How to Avoid Them
Even experienced users make errors when switching bands. Here are frequent pitfalls and their solutions:
- Forcing the connector: Never use excessive pressure. Misaligned connectors can damage the internal latch.
- Ignoring directional arrows: The attachment mechanism must face the correct direction. Reversing it prevents locking.
- Leaving sharp pin ends exposed: After resizing, ensure pins are fully seated. Protruding ends can scratch skin or surfaces.
- Over-tightening the clasp: Some metal bands have folding clasps with multiple notches. Choose the middle setting initially, then fine-tune.
Real-World Example: Sarah’s Upgrade Experience
Sarah, a graphic designer in Portland, upgraded her Apple Watch Series 7 to a brushed titanium link bracelet for client meetings. She bought the band online but didn’t verify compatibility with her 45mm model. Upon installation, one side wouldn’t click. Frustrated, she nearly returned it—until she noticed the connector arrow was pointing outward. Flipping the band corrected the orientation instantly. Next, she resized the bracelet using a pushpin and pliers, removing two links. The final fit stayed secure during yoga sessions and felt professional at presentations. “It took 20 minutes total,” she said, “but now it looks like it came with the watch.”
Essential Checklist for Safe Installation
Use this checklist before, during, and after installation:
- ✅ Confirm watch size matches band specifications
- ✅ Power off the device (recommended)
- ✅ Work on a soft, clean surface
- ✅ Align connector arrows toward the watch body
- ✅ Insert one side fully before attaching the second
- ✅ Test stability with a gentle pull
- ✅ Adjust fit using appropriate tools
- ✅ Inspect pins and clasps for smooth operation
Frequently Asked Questions
Can I install a metal strap on any Apple Watch model?
Yes, as long as the band is designed for your specific case size. All modern Apple Watches use the same quick-release system, so physical compatibility exists across Series 1 through Ultra models—but always verify sizing.
Why does my metal band feel loose after installation?
This usually means improper insertion or incorrect band sizing. Double-check that both connectors are fully seated. If they are, the band may need resizing via link removal or micro-adjustment on the clasp.
Is it safe to resize a metal band at home?
Yes, if you use the right tools and follow instructions. Many users successfully resize bands with a pushpin and small hammer. However, if you're uncomfortable, visit an authorized Apple Store or jeweler for professional help.
Final Thoughts and Action Steps
Mastering metal strap installation transforms how you experience your Apple Watch. It’s not just about aesthetics—it’s about precision, safety, and daily comfort. A properly fitted metal band stays secure during workouts, enhances sleep tracking accuracy, and complements formal attire effortlessly. Now that you understand the mechanics, compatibility, and adjustment techniques, you’re equipped to switch bands confidently whenever needed.


 浙公网安备
33010002000092号
浙公网安备
33010002000092号 浙B2-20120091-4
Comments
No comments yet. Why don't you start the discussion?