
Setting your makeup can make or break your look—especially when you need it to last through humidity, long workdays, or evening events. The Morphe Baking and Setting Powder has gained cult status for its ultra-fine texture, translucent finish, and ability to lock foundation in place without cakiness. But using it effectively requires more than just dusting it on. When applied correctly, this technique—known as \"baking\"—can deliver a matte, airbrushed complexion that stays fresh for hours. This guide walks you through the science, strategy, and subtle nuances of mastering Morphe’s setting powder for a truly flawless, enduring result.
The Science Behind Baking: Why It Works
Baking involves applying a generous amount of loose setting powder to specific areas of the face—typically under the eyes, along the forehead, and on the chin—then letting it sit for several minutes before brushing away the excess. The heat from your skin helps the powder meld with your foundation and concealer, creating a semi-permanent barrier against oil, sweat, and movement.
Morphe’s powder is finely milled and translucent, making it suitable for most skin tones without leaving a white cast. Its silica-rich formula absorbs excess sebum while blurring fine lines and pores. Unlike heavier powders that can settle into creases, Morphe’s version maintains a soft-focus effect, enhancing radiance rather than dulling it.
“Baking isn’t about piling on powder—it’s about precision and timing. The right technique transforms your base from good to camera-ready.” — Lena Torres, Celebrity Makeup Artist
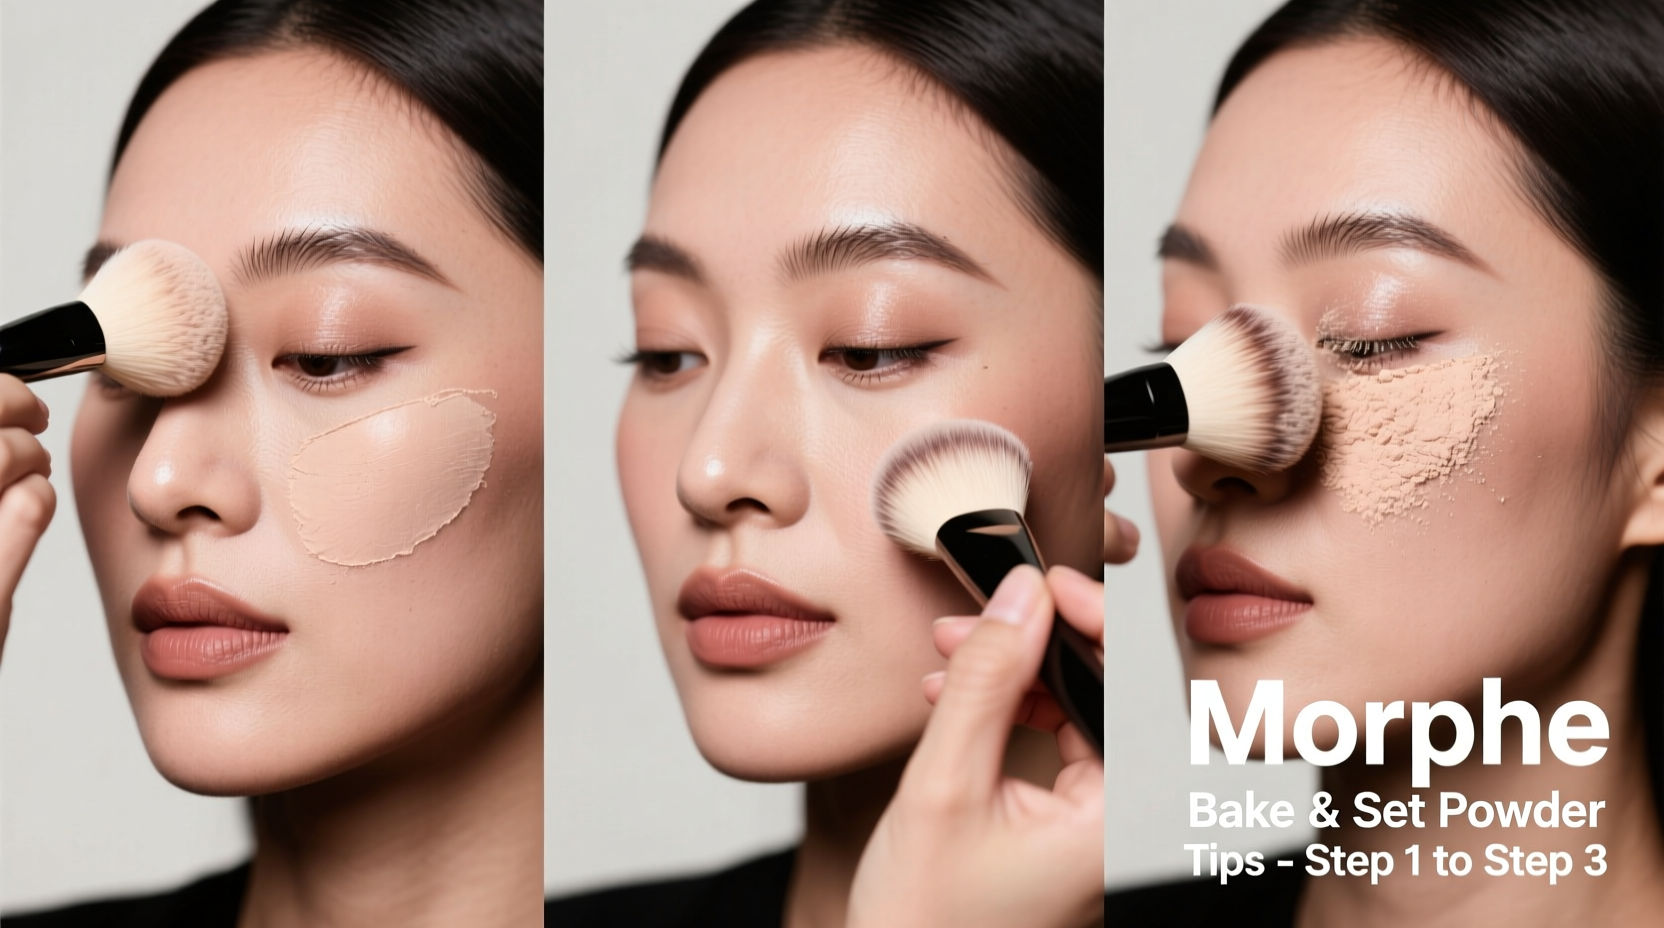
Step-by-Step Guide to Flawless Baking with Morphe Powder
Follow this detailed timeline to achieve a smooth, long-wearing finish without over-powdering or creasing.
- Prep Your Skin: Start with clean, moisturized skin. Use a hydrating primer suited to your skin type—matte for oily skin, illuminating for dry skin. Allow at least two minutes for absorption.
- Apply Foundation: Use a liquid or cream foundation and blend evenly with a damp sponge or brush. Avoid heavy layers; build coverage only where needed.
- Conceal Strategically: Apply concealer under the eyes, on redness, and around the nose. Do not blend fully yet—keep it slightly thicker in baking zones.
- Choose the Right Brush: Use a tapered concealer brush or small fluffy brush to apply Morphe powder precisely. A velour puff can also be used for pressing (more on that below).
- Apply the Powder Liberally (But Only Where Needed): Focus on high-movement and oil-prone areas:
- Under-eye triangles
- Down the bridge of the nose
- Forehead center
- Chin
- Let It Bake: Wait 5–7 minutes. This allows your body heat to set the makeup beneath. Avoid touching or fanning the area during this time.
- Dust Off Gently: Use a large, fluffy powder brush to sweep away excess. Circular motions work best to avoid disturbing the base.
- Final Press (Optional): For extra longevity, lightly press the areas again with a damp beauty sponge to fuse the layers.
Do’s and Don’ts When Using Morphe Bake and Set Powder
| Do’s | Don’ts |
|---|---|
| Use a light hand when reapplying during the day | Apply powder before concealer (this prevents proper blending) |
| Tap off excess powder from your brush before application | Bake for longer than 10 minutes (can cause dryness and cracking) |
| Store the powder in a cool, dry place away from sunlight | Use a dense brush that packs too much product at once |
| Blend edges seamlessly to avoid harsh lines | Forget to set the rest of your face lightly after baking |
| Carry a travel-sized version for touch-ups | Apply baking powder on dry, flaky skin without prepping first |
Real-World Example: All-Day Wear Tested
Sophia, a nurse working 12-hour shifts in a warm hospital environment, struggled with her concealer slipping by mid-morning. She used full-coverage foundation and waterproof concealer but still experienced under-eye creasing. After switching to the Morphe Baking and Set Powder and following the 7-minute bake method only under her eyes and T-zone, she noticed a dramatic improvement. Her makeup stayed intact throughout her shift, even after wearing a mask and frequent handwashing. By focusing on targeted baking and finishing with a setting spray, she achieved a fresh look from 7 AM to 7 PM—with only a quick blot, no reapplication.
This case illustrates how strategic baking—not full-face powdering—delivers endurance without compromising comfort.
Pro Tips for Different Skin Types
The key to successful baking lies in adapting the technique to your skin’s needs. One size does not fit all.
- Oily Skin: Embrace the full bake. Let the powder sit for the full 7 minutes and consider double-setting: once after concealer, once after blush/bronzer.
- Dry Skin: Limit baking to under the eyes only. Moisturize thoroughly beforehand and use a hydrating setting spray afterward to revive luminosity.
- Combination Skin: Target only the T-zone and under-eyes. Avoid baking on cheeks to prevent emphasizing dry patches.
- Mature Skin: Use a lighter hand. Excess powder can settle into fine lines. Opt for a pressing technique with a damp sponge instead of heavy layering.
Essential Checklist for Perfect Baking Results
Keep this checklist handy for consistent results every time:
- ✅ Skin is cleansed and moisturized
- ✅ Primer applied and given time to set
- ✅ Foundation blended smoothly
- ✅ Concealer applied to target zones
- ✅ Morphe powder applied only to areas needing extra hold
- ✅ Powder allowed to “bake” for 5–7 minutes
- ✅ Excess gently brushed away
- ✅ Entire face misted with setting spray for seamless finish
Frequently Asked Questions
Can I use Morphe Bake and Set Powder if I have dark skin?
Yes. The powder is translucent and designed to work across a wide range of skin tones without leaving a gray or white cast. However, always test in natural light to ensure compatibility with your undertones.
Is baking bad for your skin?
When done occasionally and correctly, baking is safe. However, daily excessive baking can disrupt your skin’s moisture barrier, especially if you have dry or sensitive skin. Limit baking to days when long wear is essential, and always follow with a gentle cleanser at night.
Should I bake before or after contouring and blush?
Bake after foundation and concealer, but before applying cream blush or contour. If using powder products, apply them after baking and then lightly set the entire face with a dusting of the same Morphe powder for uniformity.
Final Thoughts: Elevate Your Makeup Game
Mastering the Morphe Bake and Set Powder isn’t just about copying a trend—it’s about understanding how to enhance your makeup’s performance with intelligent technique. Whether you're preparing for a wedding, a long workday, or simply want your everyday look to stay sharp, baking done right offers unmatched staying power. The secret lies in restraint, precision, and knowing your skin’s needs.
With the right tools, timing, and approach, you can achieve a finish that looks professionally retouched—without looking overdone. Now that you’ve learned the ins and outs of flawless baking, it’s time to put it into practice.


 浙公网安备
33010002000092号
浙公网安备
33010002000092号 浙B2-20120091-4
Comments
No comments yet. Why don't you start the discussion?