
Folding a paper plane may seem like child’s play, but achieving consistent, graceful flight requires more than random creases. With the right design, precise folds, and an understanding of aerodynamics, even a standard sheet of paper can soar over 50 feet in stable, controlled flight. The key isn’t luck—it’s mastery. This guide breaks down the science and craft behind high-performance paper planes, offering clear, repeatable steps to help you achieve flawless flights every time.
The Science Behind Flight: Why Some Planes Fly Better
Paper planes follow the same fundamental principles of flight as commercial aircraft: lift, drag, thrust, and weight. When you throw a paper plane, your arm provides thrust. As it moves forward, air flows over the wings, creating lift. Drag works against forward motion, while weight pulls the plane downward. A well-balanced plane minimizes drag and optimizes lift-to-weight ratio.
The center of gravity (CG) is critical. If the nose is too heavy, the plane dives. Too light, and it stalls. For most designs, the CG should be about one-third of the way back from the nose. Symmetry also matters—uneven wings cause yaw or roll mid-flight.
“Precision in folding directly correlates with flight consistency. Even a 2mm misalignment can turn a smooth glide into a spiral crash.” — Dr. Alan Liu, Aerodynamics Researcher, MIT
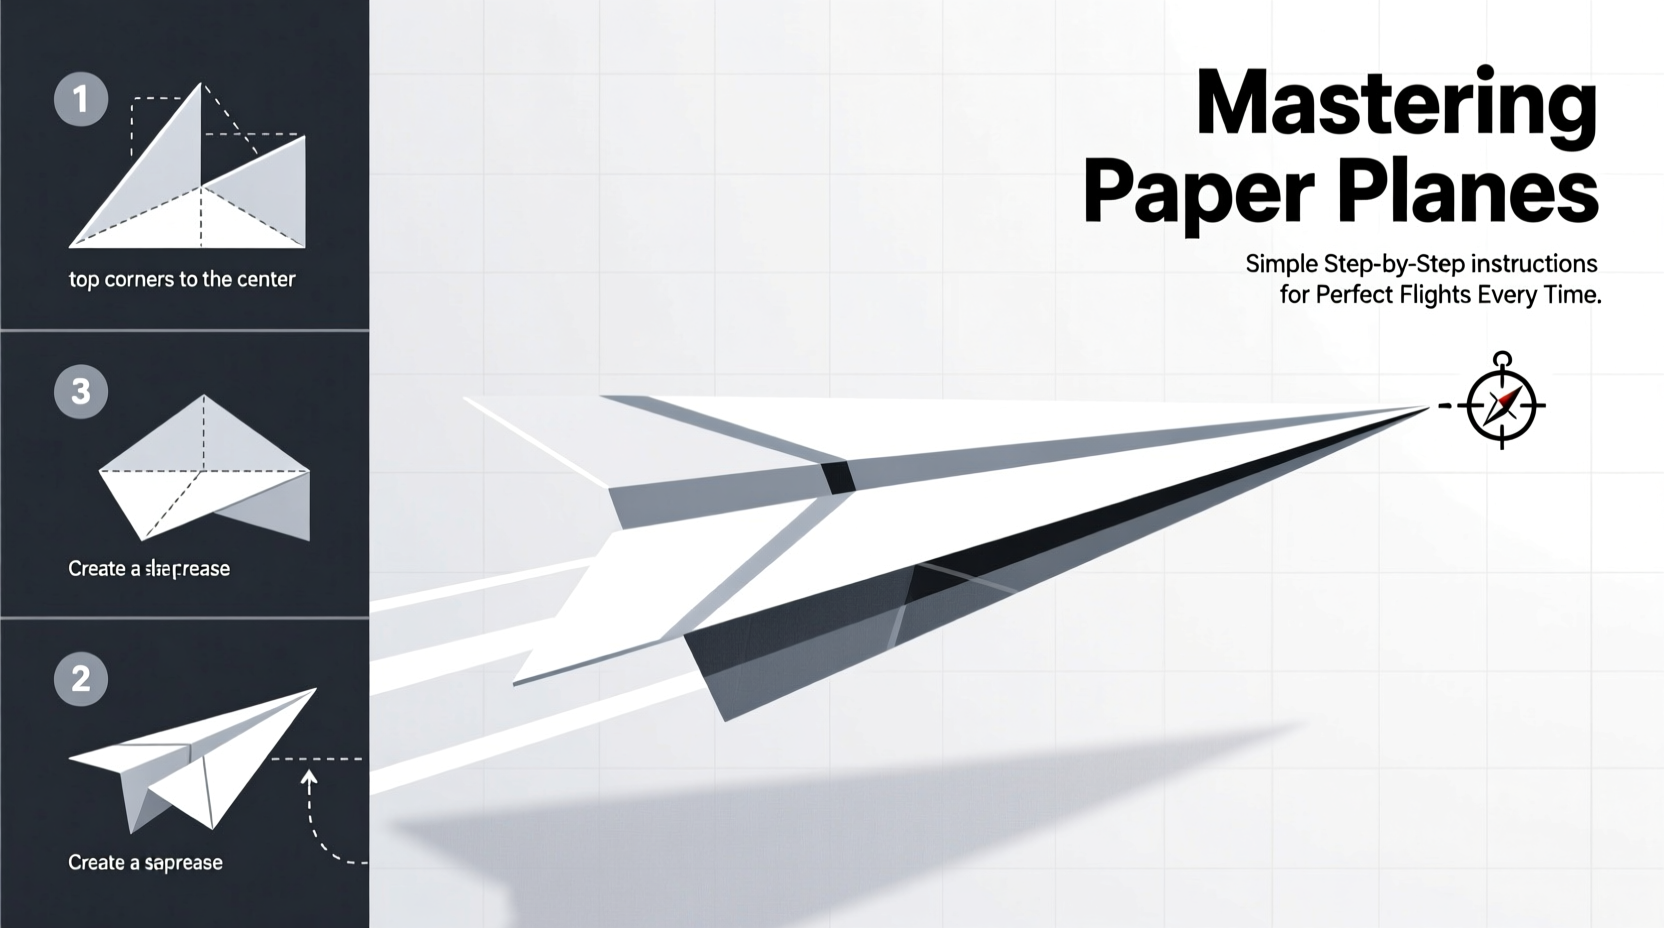
Step-by-Step Guide: Folding the Dart – A Proven Design for Distance
The classic dart remains one of the most reliable designs for straight, fast, long-distance flight. Follow these exact steps for optimal results:
- Start with a standard 8.5” x 11” sheet of paper. Use printer paper—cardstock is too heavy; tissue paper lacks rigidity.
- Fold the paper in half lengthwise. Crease sharply, then unfold. This creates a center guideline.
- Fold the top two corners toward the center crease. Align the edges precisely to form a pointed nose. Press firmly along the fold.
- Fold the new top corners to the center again. You’ll now have a narrower triangle at the top with a small rectangle at the bottom.
- Fold the plane in half along the original center crease. The folded edges should now face outward.
- Create the wings by folding each side down. Align the top edge of the wing with the bottom edge of the plane’s body. Repeat on the other side.
- Add slight wing elevators (optional). Bend the trailing edge of each wing up by 2–3mm to increase lift and prevent nosedives.
Design Variations for Different Flight Goals
Not all flights are about distance. Depending on your goal—glide time, stability, or acrobatics—different designs excel. Below is a comparison of three top-performing models:
| Design | Best For | Fold Difficulty | Flight Time (Avg) | Key Feature |
|---|---|---|---|---|
| Dart | Distance | Easy | 3–5 seconds | Speed and straight-line accuracy |
| Glacier | Loft & Duration | Medium | 8–12 seconds | Broad wings for slow descent |
| Suzanne | Records & Efficiency | Hard | 15+ seconds | World-record holding design |
The Suzanne, named after its designer John Collins’ wife, holds the Guinness World Record for longest indoor flight (27.9 seconds). While complex, its success lies in balanced dihedral wings and a carefully weighted nose. For beginners, mastering the Dart first builds essential folding discipline before progressing to advanced models.
Common Mistakes and How to Fix Them
Even experienced folders make errors that sabotage flight. Here are frequent issues and their solutions:
- Nose dives immediately: Add small upward bends to the back edges of the wings (elevators).
- Planes veer left or right: Check wing symmetry. One side may be slightly lower or longer.
- Stalls and drops straight down: Nose is too light. Reinforce with a tiny paper clip or refold to add mass.
- Spins out of control: Wings may be warped. Flatten them gently and ensure equal dihedral angles.
- Short flight despite strong throw: Excessive drag. Avoid bulky folds and keep the profile sleek.
Mini Case Study: From Classroom Fails to State Champion
Jamal Rivera, a 7th grader from Portland, struggled with erratic paper plane flights during his school’s STEM fair. His early attempts looped or nosedived within seconds. After studying folding precision and adjusting wing angles based on trial logs, he refined a modified Dart with 5-degree upturned wingtips. At the regional competition, his plane flew 68 feet in a straight line—winning first place. “I learned that small changes make big differences,” Jamal said. “Once I started measuring my folds, everything improved.”
Checklist for Perfect Paper Plane Performance
Before every launch, run through this checklist to maximize success:
- ✅ Use clean, flat, 8.5” x 11” copy paper (no wrinkles or tears)
- ✅ Fold with sharp, deliberate creases using a flat surface
- ✅ Ensure both wings are symmetrical and level
- ✅ Adjust elevators slightly upward if diving occurs
- ✅ Balance the center of gravity—nose should feel slightly heavier
- ✅ Throw smoothly at a slight upward angle (10–15 degrees), not overhead
- ✅ Launch in a wide, open space free of obstacles and drafts
Frequently Asked Questions
Can I use tape or staples?
Minimal reinforcement is acceptable. A small piece of tape at the nose can stabilize weak folds, and a staple near the tip adds weight for better balance. However, overuse increases drag and disrupts airflow. Use only when necessary and keep additions symmetrical.
Why does my plane fly well once but not again?
Inconsistency usually stems from minor folding variations. Even slight asymmetries in wing angle or crease depth affect flight. Refold from scratch rather than adjusting a flawed model. Consistency comes from repetition and attention to detail.
What’s the best way to throw a paper plane?
Use a smooth, level throw at a slight upward angle. Avoid jerky motions or excessive force. Think of releasing the plane like placing it on an invisible track—steady and aligned. Wrist flicks often induce spin. Practice gentle, straight-arm releases for maximum control.
Final Tips for Mastery
Like any skill, paper plane excellence comes from deliberate practice. Keep a notebook to record fold adjustments and flight outcomes. Try one variable at a time—wing angle, nose weight, or throw speed—and observe the effect. Over time, you’ll develop an intuitive sense of what works.
Environmental factors matter too. Humidity softens paper, making it harder to hold creases. Cold, dry air improves stiffness. Indoors, avoid ceiling fans or HVAC vents that create turbulence.
“The beauty of paper aviation is accessibility. Anyone can start with one sheet and, through observation and refinement, achieve something extraordinary.” — Takuo Toda, Origami Flight Artist & Record Holder
Conclusion: Launch Your Skills Today
Mastering paper planes isn’t about complexity—it’s about precision, patience, and understanding the subtle interplay of design and physics. Whether you’re launching for fun, teaching kids about aerodynamics, or aiming for personal records, the principles remain the same. With the right technique and consistent practice, perfect flights aren’t rare events—they become the norm.


 浙公网安备
33010002000092号
浙公网安备
33010002000092号 浙B2-20120091-4
Comments
No comments yet. Why don't you start the discussion?