
Puff pastry is one of the most elegant and versatile elements in baking. Its delicate layers rise dramatically in the oven, creating a crisp, buttery shell ideal for tarts, turnovers, vol-au-vents, or even savory appetizers. While store-bought options exist, nothing compares to homemade puff pastry—crafted with care, precision, and patience. Achieving that perfect lift and texture isn’t magic; it’s technique. This guide walks you through every stage, from mixing to baking, so you can master puff pastry at home with confidence.
The Science Behind the Layers
Puff pastry works on a simple principle: water evaporates from dough during baking, creating steam that lifts thin layers of dough apart. The key lies in how those layers are built. Each fold traps a sheet of cold butter between two layers of flour-and-water dough. When heat hits the oven, the butter melts and releases steam, pushing the layers upward—sometimes doubling or tripling in height.
This process requires discipline. The butter must remain solid yet pliable throughout rolling and folding. If it softens too much, it absorbs into the dough and ruins the layering. Too cold, and it cracks. Temperature control is everything.
“Puff pastry teaches bakers respect for time, temperature, and touch.” — Jacques Bernier, Pastry Chef & Instructor, Le Cordon Bleu Paris
Essential Ingredients and Tools
Homemade puff pastry uses only a few ingredients, but their quality and handling make all the difference.
Ingredients
- All-purpose flour: Provides structure. Bread flour can be used for more gluten strength, but AP flour offers better tenderness.
- Salted butter: Preferably European-style (82–84% fat), which has less water and higher melting point—ideal for clean layering.
- Ice-cold water: Keeps the dough cool and limits gluten development.
- Pinch of salt: Enhances flavor without affecting texture.
Equipment Checklist
- Large cutting board or marble slab (non-porous, stays cool)
- Rolling pin (preferably French-style tapered)
- Plastic wrap
- Ruler and pastry brush
- Bench scraper
- Digital scale (for accuracy)
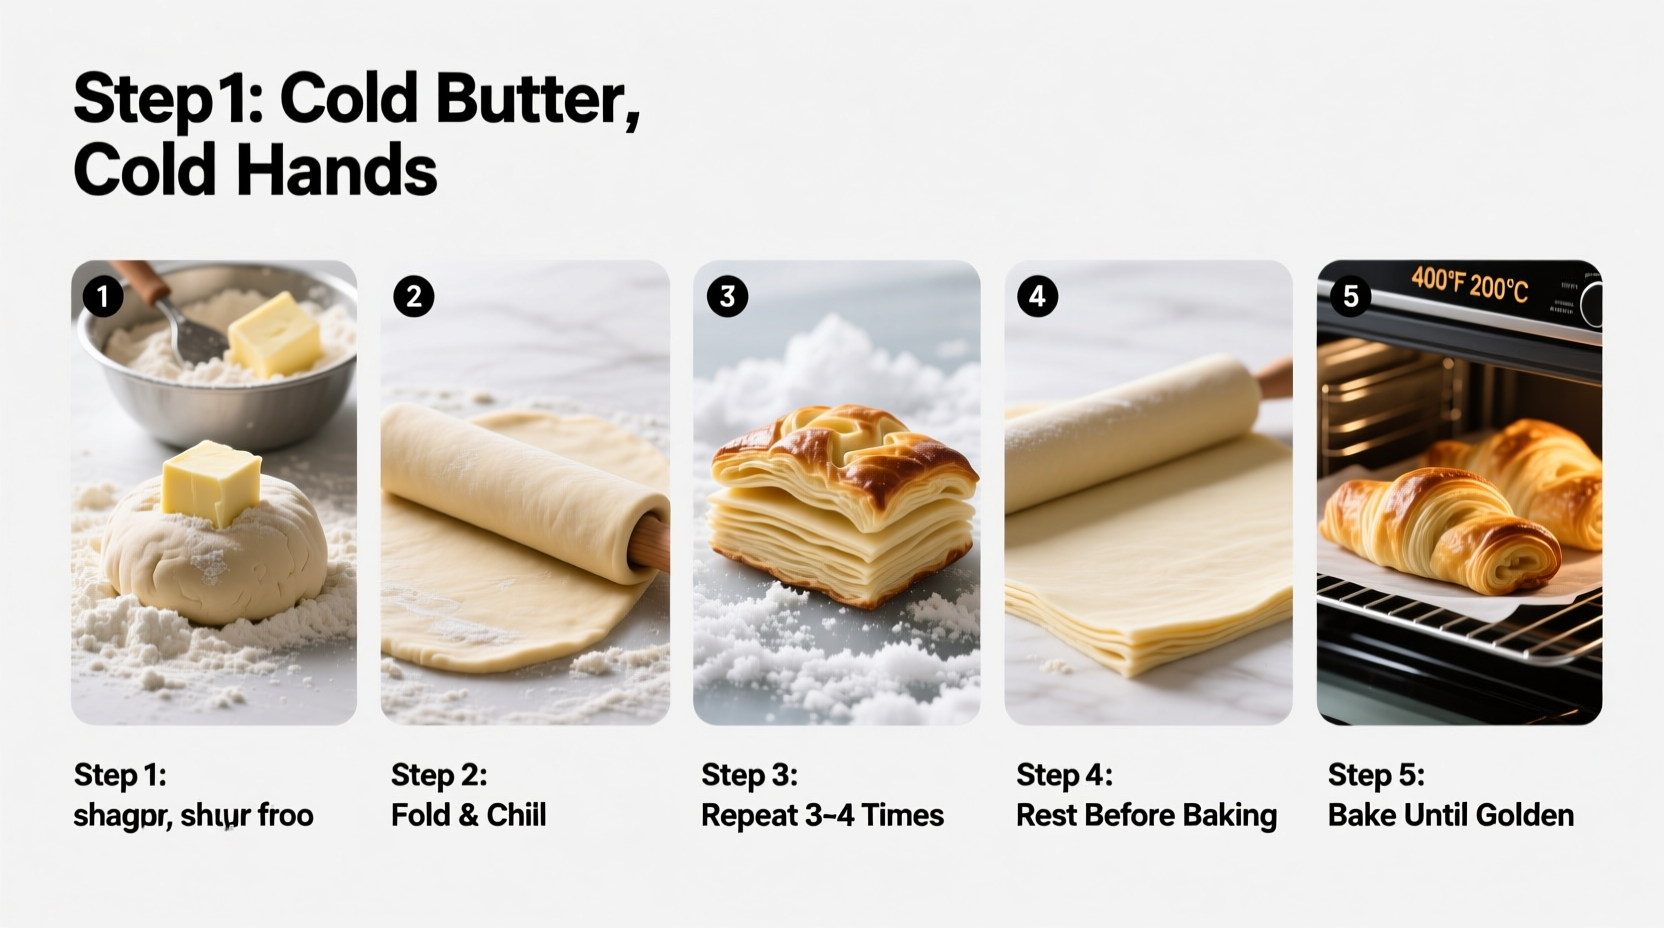
Step-by-Step Guide to Making Puff Pastry
Making puff pastry takes time—about 3–4 hours including chilling—but active effort is minimal. Most of the work happens in short bursts, separated by rest periods. Follow this timeline carefully.
- Day 1 – Make the détrempe (dough base): Mix 250g flour, 1/4 tsp salt, and 125ml ice water until a shaggy ball forms. Flatten into a rectangle, wrap, and chill for 1 hour.
- Prepare the butter block: Pound 185g cold butter into a 7x7 inch square using a rolling pin. Dust lightly with flour to prevent sticking. Chill again.
- Encase the butter: Roll the dough into a 10x10 inch square. Place the butter block diagonally in the center. Fold the corners over like an envelope and seal edges gently.
- First turn (single fold): Roll the dough into a long rectangle (about 20x8 inches). Fold into thirds like a letter. This is a “single” or “book” fold. Wrap and chill 30 minutes.
- Repeat turns: Perform three more single folds, chilling 30 minutes between each. After four total turns, the dough rests overnight in the fridge.
- Day 2 – Shape and bake: Roll out chilled dough to desired thickness (usually 1/8 inch). Use immediately or freeze for later.
Common Mistakes and How to Avoid Them
Even experienced bakers face setbacks with puff pastry. Understanding these pitfalls improves success rate dramatically.
| Mistake | Why It Happens | How to Fix |
|---|---|---|
| Butter leaks out during baking | Butter was too soft during lamination or oven too cold at start | Keep butter firm; preheat oven fully (at least 400°F / 200°C) |
| Dough doesn’t rise | Over-handling, warm kitchen, or insufficient turns | Work quickly, chill thoroughly, complete all 4 turns |
| Uneven layers | Inconsistent rolling pressure or skipping rotation | Apply even pressure; rotate dough 90° before each roll session |
| Tough texture | Too much gluten development from overworking | Handle minimally; let dough rest between folds |
Real Example: From Kitchen Failure to Golden Success
When amateur baker Maria attempted puff pastry for the first time, her dough collapsed in the oven, spreading sideways instead of rising. She realized too late that she’d skipped chilling between turns and rolled in a warm kitchen. On her second try, she lowered the thermostat, iced her counter, and followed precise timing. The result? A golden, airy batch of palmiers that rose nearly two inches. Her secret? “I treated each chill like a mandatory pause—not a suggestion.”
Her experience underscores a universal truth: puff pastry rewards patience, not speed.
Storing and Using Your Homemade Puff Pastry
Once made, puff pastry can be stored and used flexibly.
- Fridge: Keep wrapped tightly for up to 3 days.
- Freezer: Freeze shaped or unrolled sheets for up to 3 months. Thaw overnight in the refrigerator before use.
- Pre-baking tip: Dock (prick) areas meant to stay flat (like tart shells) with a fork to prevent unwanted puffing.
Before baking, always brush with egg wash (1 egg + 1 tbsp water) for shine and color. Cut cleanly with a sharp knife or pizza wheel—never press down.
Frequently Asked Questions
Can I reduce the number of folds?
Technically yes, but fewer than four turns yield less defined layers and reduced rise. Some recipes use six folds for ultra-fineness, but four is standard for balance between effort and result.
Why does my pastry brown too fast on the outside but stay raw inside?
This indicates uneven heat distribution. Use a convection oven if possible, or place the tray in the middle rack with no obstructions. An oven thermometer helps verify accurate temperature.
Can I use margarine or oil instead of butter?
No. Margarine contains more water and breaks down too early. Oil lacks the structure needed for lamination. True puff pastry relies on high-fat, real butter.
Final Tips for Consistent Results
- Work in a cool environment (ideally under 68°F / 20°C).
- Never skip chilling steps—even 10 minutes matters.
- If butter breaks through the surface, dust lightly with flour and continue rolling.
- Trim edges before baking for perfectly straight sides.
Conclusion: Elevate Your Baking One Layer at a Time
Mastering puff pastry is a rite of passage for serious home bakers. It demands attention to detail, but the payoff—a crisp, golden, sky-high pastry—is unmatched. With this guide, you now have the knowledge, techniques, and troubleshooting tools to succeed. Don’t expect perfection on the first try; even professionals refine their method over years. What matters is persistence, precision, and pride in the process.


 浙公网安备
33010002000092号
浙公网安备
33010002000092号 浙B2-20120091-4
Comments
No comments yet. Why don't you start the discussion?