
Puff puffs are a beloved African snack—crispy on the outside, soft and airy within, and satisfyingly golden. But achieving that perfect balance of fluffiness, shape retention, and consistent texture can be elusive. Too often, home cooks end up with flat, dense, or misshapen puff puffs. The secret lies not in luck but in understanding the science behind the dough, frying temperature, and handling techniques. With the right approach, you can produce puff puffs that stay soft for hours, hold their round shape beautifully, and deliver that melt-in-the-mouth experience everyone craves.
The Science Behind Puff Puff Texture
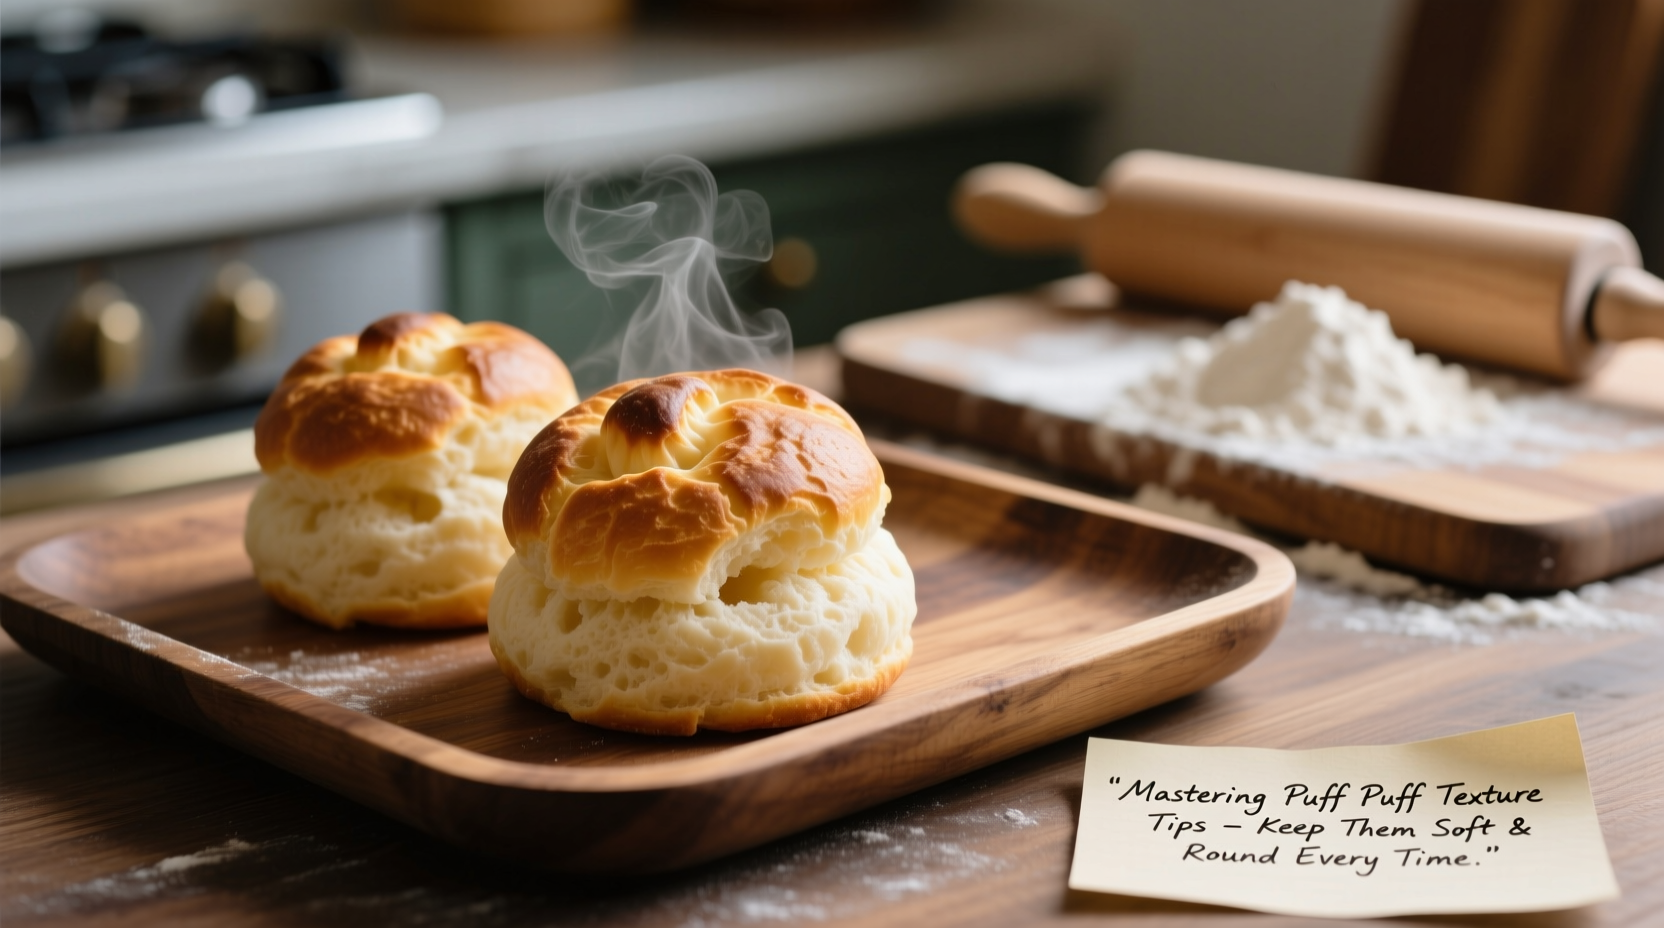
The magic of puff puff comes from fermentation and steam expansion. When yeast activates in warm liquid, it consumes sugar and releases carbon dioxide, creating tiny air pockets in the dough. During frying, these bubbles expand rapidly due to heat, causing the dough to rise and become light. The outer layer sets quickly under high heat, forming a crisp shell while the inside remains tender.
However, several factors can disrupt this process:
- Overmixing develops gluten too much, leading to chewy, tough puff puffs.
- Inconsistent oil temperature causes uneven cooking—too low, and they absorb oil; too high, and they brown too fast while staying raw inside.
- Improper resting time means insufficient fermentation, resulting in dense centers.
Mastering texture starts long before the pot hits the stove—it begins with ingredient selection and dough preparation.
Essential Ingredients for Soft, Round Puff Puffs
While recipes vary across regions, the foundation remains consistent. Here’s what truly impacts texture:
| Ingredient | Role in Texture | Best Choice |
|---|---|---|
| All-purpose flour | Provides structure without excessive gluten | Avoid bread flour—it makes puff puffs too chewy |
| Active dry yeast | Creates lift through fermentation | Fresh or instant yeast works too, but adjust quantities |
| Sugar | Feeds yeast and enhances browning | Granulated white sugar is ideal; honey adds moisture |
| Eggs (optional) | Adds richness and tenderness | One egg per cup of flour improves softness |
| Milk or water | Hydrates flour and supports yeast activity | Milk yields softer results than water |
For puff puffs that stay soft longer, consider adding a teaspoon of vegetable oil or melted butter to the batter. Fat coats the gluten strands, reducing toughness and improving shelf life.
Step-by-Step Guide to Perfect Puff Puff Texture
- Mix wet ingredients first: Combine warm milk or water, sugar, and yeast. Let sit for 5–10 minutes until foamy—a sign the yeast is active.
- Sift dry ingredients: Whisk flour, a pinch of salt, and any optional spices (like nutmeg) into a separate bowl.
- Combine gently: Pour the wet mixture into the dry ingredients. Stir just until no dry flour remains. Do not overmix—lumps are acceptable.
- Add fat: Mix in a tablespoon of oil or melted butter to enrich the dough and improve softness.
- Rise properly: Cover the bowl with a damp cloth and let ferment in a warm place for 1–2 hours, or until doubled in size.
- Heat oil correctly: Use a deep, heavy pot and heat neutral oil (like canola or vegetable) to 350°F (175°C). A thermometer ensures accuracy.
- Shape with care: Use two spoons or a small ice cream scoop to drop evenly sized balls into the oil. Avoid flattening them.
- Fry in batches: Cook 3–4 at a time, turning occasionally, until golden brown all over (about 3–4 minutes total).
- Drain well: Place on a wire rack over paper towels to prevent sogginess from trapped steam.
Common Mistakes That Ruin Puff Puff Shape and Softness
Even experienced cooks make errors that compromise texture. Watch out for these pitfalls:
- Skipping the proofing step: Rushing leads to dense, flat puff puffs. Fermentation cannot be rushed without sacrificing quality.
- Using cold batter: If refrigerated, bring dough back to room temperature before frying to ensure even rising.
- Crowding the pot: Overloading lowers oil temperature and causes sticking or uneven browning.
- Pressing down with a spoon: Some stir puff puffs to keep them submerged, but this breaks the crust and flattens them.
- Not salting the oil: A small pinch of salt added to the oil enhances flavor and stabilizes frying temperature.
“Texture in fried dough isn’t just about ingredients—it’s about thermal control. Consistent oil heat is the invisible hand shaping perfection.” — Chef Tunde Afolabi, West African Culinary Instructor
How to Keep Puff Puffs Soft After Frying
Many assume puff puffs must be eaten immediately, but with proper handling, they can stay soft for up to 48 hours.
The key is managing moisture loss and avoiding condensation. Immediately after frying, do not cover puff puffs tightly. Trapped steam softens the crust and creates sogginess. Instead, cool them completely on a wire rack, then store in an airtight container with a slice of bread or a damp (not wet) paper towel. The bread absorbs excess moisture while releasing humidity, helping maintain softness.
For longer storage, freeze cooled puff puffs in a single layer, then transfer to a sealed bag. Reheat in a 325°F (160°C) oven for 5–7 minutes to restore warmth and texture—microwaving makes them rubbery.
Storage Comparison Table
| Method | Softness Duration | Notes |
|---|---|---|
| Room temp, open air | 2–4 hours | Crisp exterior fades quickly |
| Airtight container + bread slice | Up to 48 hours | Best for soft interior retention |
| Refrigerator | 3 days | Reheat before serving; may dry slightly |
| Freezer | 1 month | Thaw and re-crisp in oven |
Real Example: From Flat to Fluffy
Adesuwa, a home cook in Lagos, struggled for years with puff puffs that spread into irregular shapes and hardened within an hour. She followed traditional recipes but never measured oil temperature or allowed proper rise time. After switching to a digital thermometer and extending her fermentation to 90 minutes, her results transformed. She also began using whole milk instead of water and added one egg per batch. Her puff puffs now rise evenly, stay rounded, and remain soft through family gatherings—even when served two hours after frying.
“I used to think it was just about the recipe,” she said. “But it’s really about patience and precision. Now my kids ask for them every weekend.”
Frequently Asked Questions
Why do my puff puffs come out flat?
Flat puff puffs usually result from under-proofed dough, oil that’s too hot (causing rapid surface hardening), or overmixing. Ensure your yeast is active, let the dough rise fully, and maintain oil at 350°F. Also, avoid pressing the dough balls down during frying.
Can I make puff puffs without yeast?
You can use baking powder as a leavening agent for a quicker version, but the texture will be more like a doughnut ball than a fermented puff puff. Yeast gives the signature airy, slightly tangy softness that defines authentic puff puffs.
How do I keep puff puffs round and prevent spreading?
Use a consistent portion size (about 1½ tablespoons per puff puff) and drop them gently into the oil without flattening. A well-rested, slightly thick batter holds its shape better. If the batter is too runny, add a bit more flour—¼ tablespoon at a time.
Final Checklist for Perfect Puff Puffs
- ✅ Use fresh, active yeast and proof it properly
- ✅ Sift dry ingredients to avoid clumping
- ✅ Mix batter gently—do not overwork
- ✅ Allow full fermentation (1–2 hours)
- ✅ Heat oil to 350°F (175°C) and monitor consistently
- ✅ Fry in small batches to maintain temperature
- ✅ Cool on a wire rack before storing
- ✅ Store with a moisture regulator (e.g., bread slice)
Conclusion: Elevate Your Puff Puff Game
Perfect puff puffs aren’t reserved for street vendors or special occasions. With attention to detail—from yeast activation to oil control—you can achieve soft, round, and consistently delicious results at home. Texture is not accidental; it’s the product of understanding how ingredients interact and respecting each step of the process. Whether you’re making them for breakfast, snacks, or celebrations, mastering puff puff texture means sharing joy in every bite.


 浙公网安备
33010002000092号
浙公网安备
33010002000092号 浙B2-20120091-4
Comments
No comments yet. Why don't you start the discussion?