
Drawing the human figure is one of the most rewarding yet challenging skills in visual art. Unlike still life or landscapes, the human form combines complexity with emotion—every line can convey tension, grace, or personality. Whether you're just starting out or refining your technique, mastering realistic human drawing requires a structured approach grounded in observation, anatomy, and consistent practice. This guide breaks down essential methods, tools, and mindset shifts that lead to tangible improvement.
Understanding Human Proportions: The Foundation
Before capturing expression or movement, artists must understand standard human proportions. These serve as a baseline before introducing stylistic variations. Most adults are drawn using an 7.5 to 8-head tall proportion system, where the height of the head is used as a measuring unit.
The body divides logically:
- Top of head to chin: 1 head unit
- Chin to collarbone: 1/3 head
- Collarbone to navel: 2 heads
- Navel to knee: 2 heads
- Knee to sole: 2 heads
Limbs follow similar logic. Arms extend from shoulder to fingertip at about 3.5 head lengths, with elbows aligning with the waistline when relaxed. Hands reach mid-thigh, and fingers should not cross the kneecap when standing straight.
Anatomy Basics Every Artist Should Know
While proportions give structure, anatomy brings believability. Knowing major muscle groups and bony landmarks prevents flat, mannequin-like figures. Focus on key areas first: the skull, ribcage, pelvis, and limb joints.
The skull governs facial features and tilt. Its oval shape determines eye alignment (horizontal center), nose base (lower third), and mouth position (just above bottom quarter). The jawline follows an inverted U-shape connecting ear to chin.
The ribcage acts as a central anchor. It’s wider than the pelvis in males and narrower in females, influencing posture and gesture. Shoulder blades move along its back, while clavicles act like handles connecting arms to the torso.
“Drawing anatomy isn’t about memorizing every muscle—it’s about understanding how forms interact under skin.” — Daniel Park, Figure Drawing Instructor at NMA
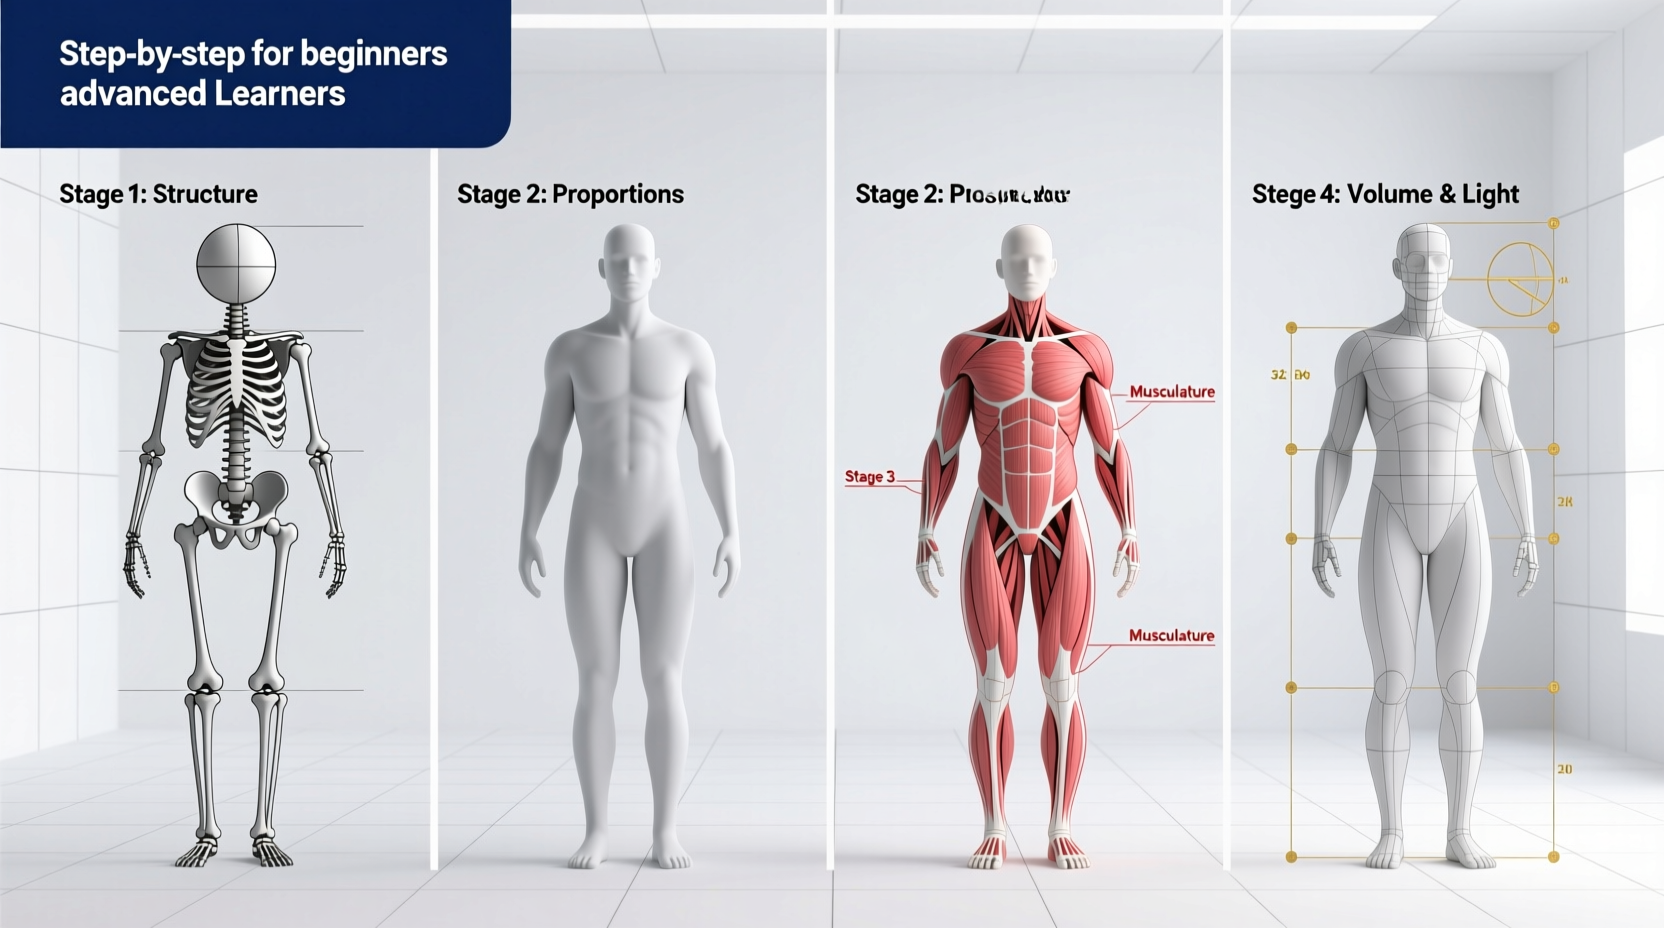
Step-by-Step Guide to Constructing a Realistic Figure
Follow this sequence to build confidence and accuracy in your drawings:
- Gesture Sketch (2–5 minutes): Capture motion and weight distribution with loose, flowing lines. Focus on the spine curve and limb direction.
- Build Basic Shapes: Replace limbs with cylinders, hands with cubes, head with spheres. Position them according to gesture.
- Refine Proportions: Check vertical alignment using head units. Adjust shoulders, hips, and joint placements.
- Add Anatomical Landmarks: Mark elbow pits, kneecaps, sternum, and spine. These guide muscle placement.
- Define Contours and Details: Refine outer edges, add hands and facial features, then finalize clothing folds if present.
- Shading and Volume: Apply tonal values based on a single light source. Emphasize core shadows and reflected light.
Mastering Facial Features and Expression
The face communicates more than any other part of the body. To draw it realistically, use the Loomis method: begin with a sphere, slice it vertically and horizontally, then add a jaw block beneath.
Eyes sit halfway down the head, ears span from brow to nose base, and the mouth rests one-third from nose to chin. When drawing expressions, remember that emotions shift multiple features simultaneously. A smile raises cheeks, squints eyes, and may create nasolabial folds.
| Expression | Key Changes | Common Mistake |
|---|---|---|
| Happiness | Crow’s feet, raised cheeks, curved lower eyelids | Overextending mouth corners beyond cheekbones |
| Sadness | Downward brows, drooping eyelids, downturned lips | Making eyes too large or watery without cause |
| Anger | Furrowed brows, flared nostrils, tense jaw | Exaggerating veins or teeth unnecessarily |
Light, Shadow, and Depth: Creating Realism
A well-drawn outline becomes lifelike only when volume is introduced through shading. Identify your light source first. Then map out three primary zones: highlight (no shadow), midtone (ambient exposure), and core shadow (least light).
Use gradual transitions between tones. Hard edges suggest sharp planes (like the bridge of the nose), while soft edges indicate curves (such as the cheek). Avoid uniform hatching—vary pressure and direction to mimic skin texture.
Cast shadows fall on surfaces behind the figure. They’re darkest near the object and fade outward. Reflected light subtly illuminates shadowed areas, preventing them from appearing flat or unnaturally black.
Checklist: Essentials for Realistic Shading
- Establish a consistent light direction
- Identify highlight, midtone, and shadow zones
- Use blending tools sparingly—over-blending kills texture
- Preserve at least one small highlight for liveliness
- Darken cast shadows slightly more than form shadows
Case Study: From Stick Figures to Lifelike Portraits
Jessica, a self-taught artist from Portland, spent years frustrated with her inability to draw convincing people. Her early sketches lacked depth, and faces looked cartoonish despite effort. She began following a daily routine focused on fundamentals: 15 minutes of gesture drawing, 20 minutes of anatomical studies, and one detailed portrait per week.
Within six months, her work transformed. By studying skeletal references and practicing value scales, she learned how light wraps around the zygomatic bone or dips into the supraorbital ridge. Her portraits gained dimension, and peers noted improved realism in hand poses and posture. Jessica credits progress not to talent, but to targeted practice and patience.
Avoiding Common Pitfalls
Many beginners unknowingly sabotage their progress. Recognizing these habits accelerates improvement:
- Tracing without analysis: Copying images helps less than drawing from observation unless you study why lines behave a certain way.
- Ignoring negative space: The shapes between limbs or around the head are powerful alignment tools.
- Overworking early stages: Spending 30 minutes on a head while neglecting body balance leads to disproportionate results.
- Using reference photos only from social media: Many online images are poorly lit or distorted. Use high-resolution, well-lit anatomical resources or live models when possible.
FAQ
How long does it take to draw realistically?
With consistent practice (3–5 sessions weekly), most beginners achieve recognizable realism in 6–12 months. Mastery takes years, but visible progress comes quickly with focused drills.
Do I need expensive materials to start?
No. A sketchbook and HB or 2B pencil are sufficient. Charcoal and ink become useful later for contrast and speed studies.
Is it okay to use digital tools as a beginner?
Yes, especially with layering and undo functions. However, mastering traditional media builds stronger observational discipline. Try both and compare results.
Conclusion: Your Journey Starts Now
Realistic human drawing isn’t reserved for prodigies or art school graduates. It’s built through deliberate practice, keen observation, and resilience in the face of imperfect sketches. Each line teaches something—about structure, movement, or light. The goal isn’t perfection but progress. Pick up your pencil today, set a timer for ten minutes, and draw a simple gesture. Repeat tomorrow. In weeks, you’ll see growth. In months, you’ll create figures that breathe, stand, and feel alive.


 浙公网安备
33010002000092号
浙公网安备
33010002000092号 浙B2-20120091-4
Comments
No comments yet. Why don't you start the discussion?