
Installing drywall is a foundational skill in home construction and renovation. While it may seem straightforward, the quality of the final wall surface depends heavily on one critical detail: proper sheetrock screw installation. A poorly secured panel can lead to sagging, nail pops, uneven seams, and costly repairs down the line. Mastering the technique ensures durability, smooth finishes, and structural integrity. This guide walks through every phase—from tool selection to final inspection—with actionable insights for both DIYers and professionals.
Selecting the Right Tools and Materials
The foundation of successful sheetrock screw installation begins before the first screw is driven. Using inappropriate tools or substandard fasteners compromises the entire project. Drywall screws are specifically engineered for attaching gypsum board to wood or metal studs, differing significantly from nails or general-purpose screws.
- Drywall screws: Use coarse-thread screws for wood studs and fine-thread for metal studs.
- Power drill or screw gun: A dedicated drywall screw gun offers depth control, preventing over-driving.
- Measuring tape and stud finder: Accurate stud location prevents weak anchoring.
- Utility knife and T-square: For precise cutting and trimming of panels.
- Safety gear: Gloves and eye protection are essential during installation.
Understanding Screw Spacing and Placement
Proper spacing ensures even support across the drywall sheet and minimizes stress points that could lead to cracking. Industry standards, as outlined by the Gypsum Association, provide clear guidelines based on application and framing type.
| Application | Stud Type | Edge Spacing | Field Spacing |
|---|---|---|---|
| Walls (vertical hanging) | Wood | 7–8 inches | 12 inches |
| Walls (horizontal hanging) | Metal | 8 inches | 12 inches |
| Ceilings | Wood or Metal | 6–7 inches | 8–12 inches |
Edges require tighter spacing because they’re more prone to damage and deflection. Field screws maintain flatness between supports. Never rely solely on adhesive; screws remain the primary load-bearing fastener.
“Consistent screw placement isn’t just about holding the board—it’s about controlling movement. Thermal expansion, humidity shifts, and vibration all affect drywall over time.” — James Holloway, Commercial Framing Contractor with 28 years of experience
Step-by-Step Installation Process
Follow this sequence to ensure secure, professional results every time:
- Measure and locate studs: Use a stud finder and verify spacing (typically 16 or 24 inches on center). Mark each stud edge clearly.
- Prepare the drywall panel: Cut to size using a utility knife and straightedge. Deburr edges slightly to reduce chipping.
- Lift and align: Position the panel vertically on walls (recommended) or horizontally for ceilings. Ensure edges land directly over studs.
- Start at the top: Drive the first screw near the upper corner, leaving a slight dimple but not breaking the paper face.
- Secure edges first: Fasten along all vertical and horizontal edges every 7–8 inches.
- Move to the field: Install screws in a staggered pattern across the center area, maintaining even spacing.
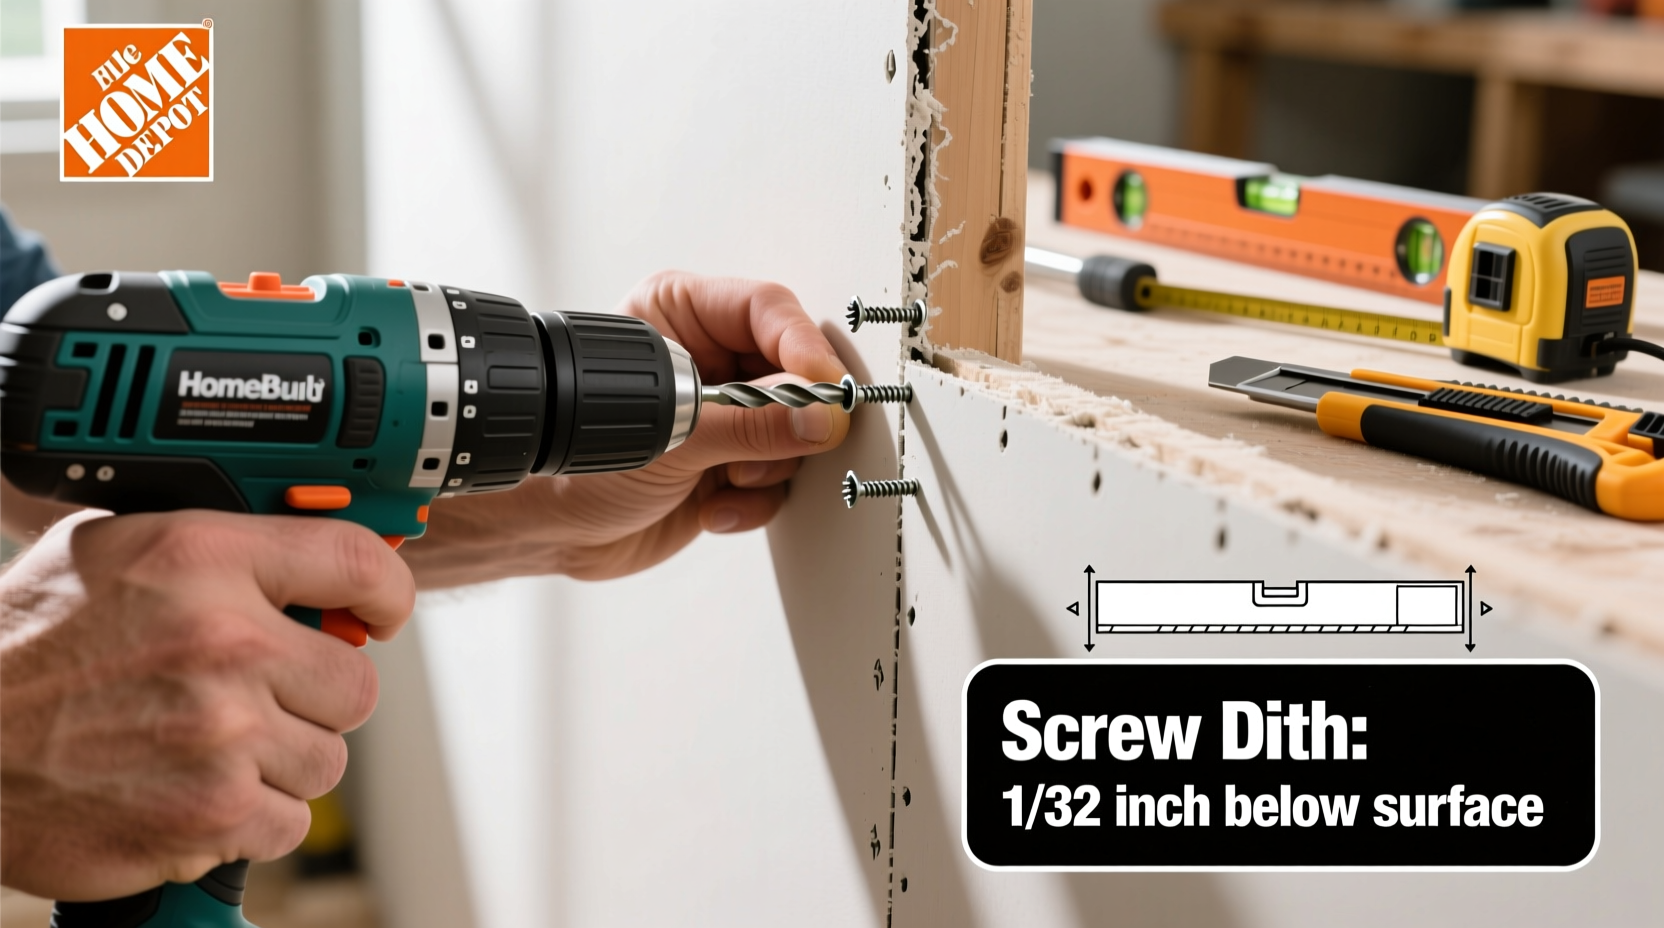
- Check depth: Screws should be just below the surface without tearing the paper. Over-driven screws reduce holding strength.
- Repeat for adjacent panels: Maintain a 1/8-inch gap between sheets to allow for expansion.
Avoiding Common Installation Mistakes
Even experienced installers occasionally make errors that compromise performance. Awareness helps prevent these issues:
- Over-driving screws: Creates weak spots and increases risk of joint cracks.
- Under-driving screws: Leaves them proud, interfering with taping and finishing.
- Skipping stud alignment: Screwing into empty space leads to sagging and popping.
- Ignoring gaps between sheets: No expansion room causes bulging or buckling in humid conditions.
- Using nails instead of screws on ceilings: Nails are more likely to pop due to vibration and wood shrinkage.
Real-World Example: Fixing a Sagging Ceiling Repair
A homeowner in Cincinnati attempted a bathroom ceiling repair using drywall nails spaced 16 inches apart. Within six months, visible bumps appeared along the seams. Upon inspection, a contractor found that several nails had pulled partially out due to joist shrinkage and inadequate holding power. The fix required removing the old fasteners, installing new 1¼-inch coarse-thread drywall screws every 7 inches along joists, and re-taping the joints. The corrected ceiling remained stable for over five years. This case underscores why proper fastener choice and spacing matter—not just for initial installation, but long-term performance.
Final Inspection and Readiness for Finishing
Before proceeding to taping and mudding, conduct a thorough check:
📋 Drywall Screw Installation Checklist- ✅ All screws are evenly spaced per code requirements
- ✅ Every edge is fastened to a stud—no floating sections
- ✅ Screw dimples are consistent and not torn
- ✅ Gaps between sheets are approximately 1/8 inch
- ✅ No squeaks or movement when lightly pressed
- ✅ Ceiling screws form a tight grid pattern with no missed joists
If any screws are loose or improperly seated, remove and reinstall them immediately. It’s far easier to correct now than after the joint compound has been applied.
Frequently Asked Questions
Can I use drywall screws on both wood and metal studs?
Yes, but use the correct type: coarse-thread screws for wood studs provide better grip, while fine-thread screws are designed to bite into metal without stripping. Using the wrong type reduces holding strength and may damage the stud.
How deep should drywall screws go?
Screws should be driven just below the surface of the paper facing, creating a small dimple. The paper should remain intact—if it tears, the screw is too deep and must be replaced.
Is adhesive enough without screws?
No. While drywall adhesive can supplement screw fastening and reduce stud noise, it should never replace screws. Structural codes require mechanical fasteners for safety and stability.
Conclusion: Build Confidence Through Precision
Mastering sheetrock screw installation is not about speed—it’s about consistency, accuracy, and adherence to best practices. Whether you're refinishing a basement or framing new interior walls, taking the time to install screws correctly pays off in smoother finishes, fewer callbacks, and longer-lasting results. With the right tools, spacing, and attention to detail, anyone can achieve professional-quality drywall installation.


 浙公网安备
33010002000092号
浙公网安备
33010002000092号 浙B2-20120091-4
Comments
No comments yet. Why don't you start the discussion?