
Sourdough baking is as much about rhythm and routine as it is about flour and water. At the heart of every great loaf lies a living culture—the sourdough starter. This fermented mixture of flour and water hosts wild yeast and lactic acid bacteria that leaven bread naturally and impart its signature tang. Unlike commercial yeast, a sourdough starter requires daily attention, especially in its early stages. But with patience and consistency, anyone can cultivate and maintain a robust starter capable of producing bakery-quality loaves at home.
The process may seem mysterious at first—bubbles, smells, and inconsistent rise—but understanding the biology behind fermentation demystifies it. A healthy starter isn’t just alive; it’s balanced, predictable, and resilient. Whether you're beginning your first attempt or troubleshooting an underperforming culture, this guide walks through each phase of starter development, maintenance, and revival with practical insights drawn from bakers and fermentation scientists alike.
Understanding the Sourdough Ecosystem
A sourdough starter is not simply flour and water—it’s a dynamic microbial community. When mixed, these ingredients attract wild yeasts and bacteria from the air and grain itself. Over time, specific strains dominate: primarily Lactobacillus bacteria and Saccharomyces exiguus, a wild yeast species well-suited to acidic environments.
These microbes feed on the starches and sugars in flour, producing carbon dioxide (which causes dough to rise) and organic acids (responsible for sour flavor). The balance between them determines how active, reliable, and tasty your starter will be. Temperature, hydration, flour type, and feeding frequency all influence this ecosystem.
“Think of your starter not as an ingredient but as a pet. It thrives on routine, proper nutrition, and a stable environment.” — Dr. Karl DeSautel, Fermentation Microbiologist, University of Oregon
Unlike commercial yeast, which acts quickly and uniformly, wild cultures require time to establish dominance. Early bubbles often come from undesirable bacteria like Enterobacter, which produce off-smells and weak gas retention. Only after several days of regular feeding do beneficial microbes take over, resulting in a stable, predictable culture.
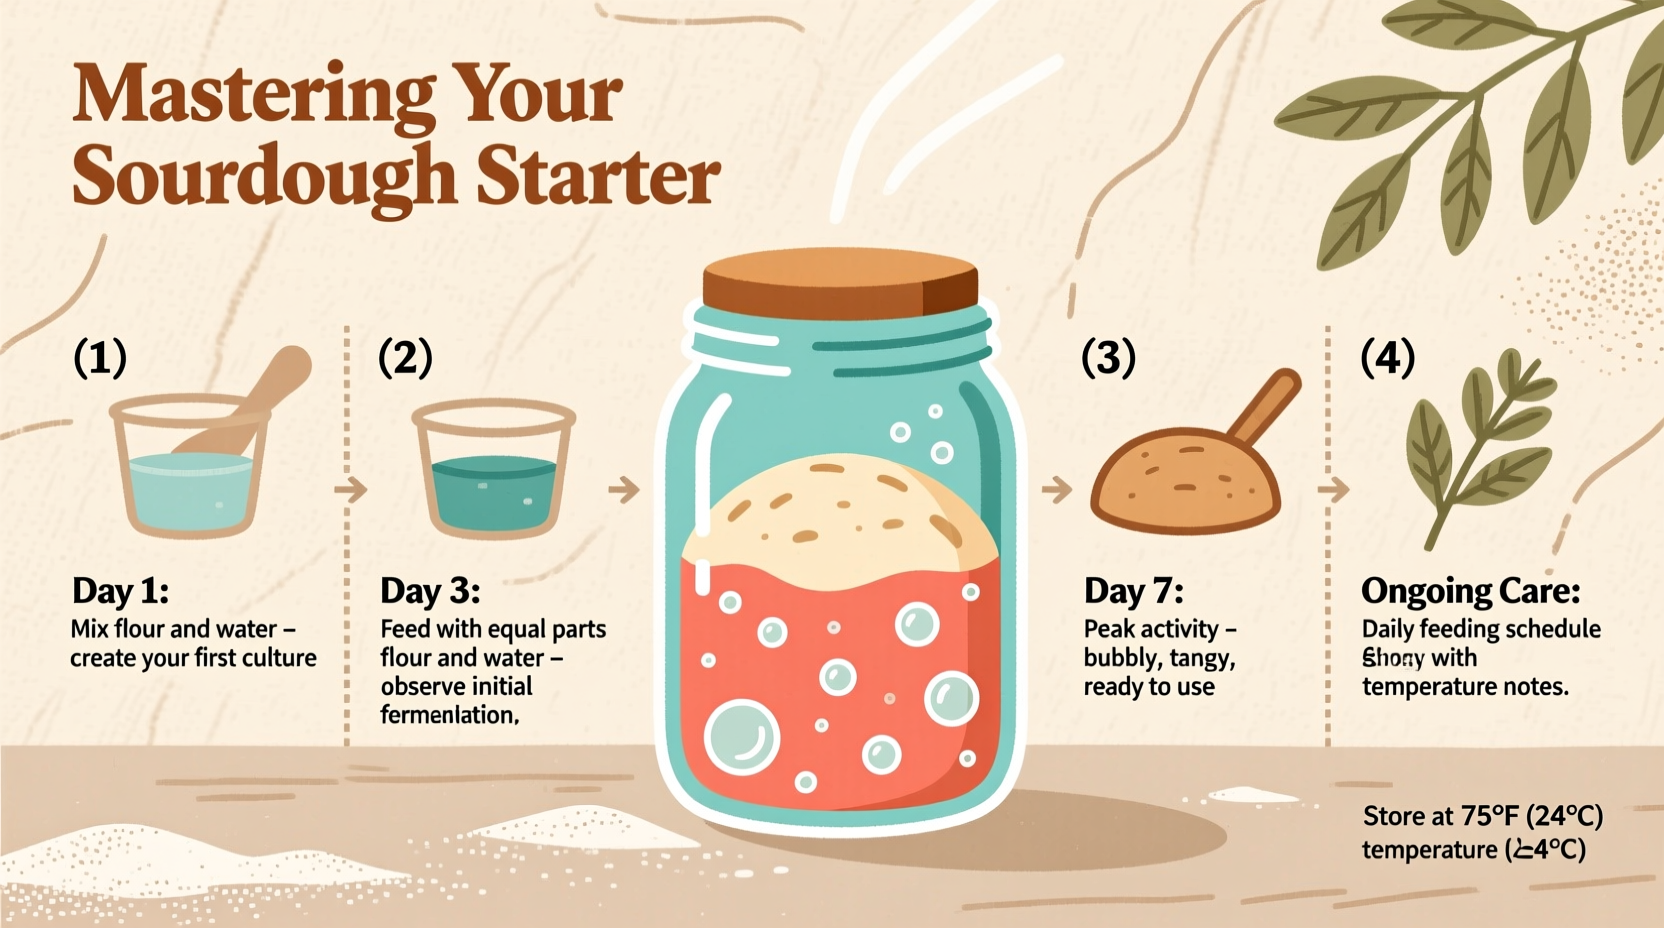
Creating Your Starter from Scratch: A 7-Day Timeline
Starting a sourdough culture takes about one week under ideal conditions (70–75°F / 21–24°C). Cooler temperatures slow fermentation; warmer ones accelerate it but risk imbalance. Use filtered or non-chlorinated water, as chlorine can inhibit microbial growth.
- Day 1: Mix 60g whole grain rye or whole wheat flour with 60g lukewarm water in a clean jar. Stir until smooth. Cover loosely with a lid or cloth. Let sit at room temperature.
- Day 2: Little activity expected. May smell slightly sweet or musty. Discard half the mixture (about 60g), then feed with 60g flour and 60g water. Stir well.
- Day 3: Bubbles may appear. Smell could turn vinegary, cheesy, or unpleasant. This is normal. Discard half, then feed again with equal parts flour and water.
- Day 4: Activity increases. Bubbles multiply. Starter may expand and fall. Continue discarding and feeding twice daily (every 12 hours).
- Day 5: Rise becomes more consistent. Smell shifts toward yogurt or ripe fruit. Begin testing float test: place ½ tsp starter in a glass of water. If it floats, it’s producing enough gas to leaven bread.
- Day 6: Strong fermentation evident. Starter doubles within 4–6 hours after feeding. Sour aroma develops. Continue twice-daily feedings.
- Day 7: Starter consistently rises and falls, passes float test, and has a pleasant tang. It is now mature and ready to bake with.
Feeding and Maintaining a Healthy Starter
Once established, your starter needs regular nourishment. How often depends on storage method and baking frequency.
Room Temperature Maintenance (Daily Baking):
If kept on the counter, feed your starter once or twice daily. Each feeding should double its volume. For example: 50g starter + 50g flour + 50g water. After feeding, it should peak (rise fully) within 4–8 hours before deflating.
Refrigerated Storage (Occasional Baking):
For less frequent use, store the starter in the fridge. Feed it weekly: remove, bring to room temperature, discard most, feed, let rise 4–6 hours, then return to refrigerator. Cold slows microbial activity, reducing feeding needs.
| Maintenance Method | Feeding Frequency | Best For | Notes |
|---|---|---|---|
| Room Temperature | Every 12–24 hours | Daily bakers | More active; ready to use immediately |
| Refrigerated | Once per week | Weekly or biweekly bakers | Requires revival before baking |
| Dried & Stored | As needed | Long-term backup | Can last years; rehydrate with water and flour |
Troubleshooting Common Starter Problems
Even experienced bakers encounter issues. Most problems stem from environmental fluctuations or inconsistent care. Here are common scenarios and solutions:
- Hooch formation (dark liquid on top): This alcohol layer indicates hunger. Pour off or stir in, then feed promptly.
- No bubbles after Day 5: Ensure warmth (use oven with light on), switch to whole grain flour, or extend feeding window.
- Foul odor (rotten eggs, acetone): Usually due to infrequent feeding. Resume twice-daily feedings; odor should resolve in 2–3 days.
- Mold appearance: Pink, orange, or fuzzy spots mean contamination. Discard entirely and restart.
- Starter won’t rise: Test freshness of flour. Chlorine in tap water may also inhibit growth. Try bottled water.
“My starter failed three times before I realized my kitchen was too cold. Moving it beside the radiator made all the difference.” — Lena Tran, Home Baker, Portland, OR
In Lena’s case, her initial attempts stalled at Day 4 due to temperatures below 65°F (18°C). After placing the jar on a heating mat set to 72°F (22°C), her fourth batch developed strong activity by Day 6 and produced her first successful boule.
Reviving a Dormant or Neglected Starter
Life happens. Starters get forgotten in the back of the fridge for weeks—or months. Fortunately, many can be revived.
If your refrigerated starter has hooch and a sunken texture but no mold, begin revival:
- Remove from fridge and discard all but 20g of starter.
- Feed with 40g flour and 40g water. Use whole grain flour if possible.
- Let sit at room temperature for 12 hours.
- Repeat feeding every 12 hours, doubling the starter each time.
- After 2–4 days, signs of life—bubbles, rise, sour smell—should return.
- Once doubling within 6 hours and passing the float test, it’s ready to bake with.
Complete dehydration (dried flakes in a jar) can also be rehydrated. Place 10g dried starter in a bowl, add 50g lukewarm water, stir, wait 30 minutes, then mix in 50g flour. Proceed with daily feedings as above.
Optimizing Flour and Hydration for Peak Performance
Not all flours support microbial life equally. Whole grain flours—especially rye and whole wheat—are rich in nutrients and minerals that boost early starter development. Once mature, many bakers transition to all-purpose or bread flour for milder flavor and better predictability.
Hydration level (ratio of water to flour by weight) affects texture and behavior:
- 100% hydration: Equal parts water and flour (e.g., 50g each). Most common; pourable but thick.
- Lower hydration (60–75%): Stiffer starter. More tolerant of temperature swings; preferred in humid climates.
- Higher hydration (125–150%): Very fluid. Faster fermentation but harder to manage.
Consistency matters more than perfection. Choose a hydration and flour blend that suits your climate and schedule, then stick with it to build stability.
Essential Sourdough Starter Checklist
To ensure long-term success, follow this maintenance checklist:
- ✅ Use non-chlorinated water
- ✅ Feed at consistent intervals
- ✅ Store in a clean, breathable container (glass jar with loose lid)
- ✅ Keep at stable room temperature (70–75°F / 21–24°C)
- ✅ Discard and refresh regularly to prevent acidity buildup
- ✅ Label jars with dates and feeding times
- ✅ Maintain a backup (dried or frozen portion)
- ✅ Observe rise, smell, and texture daily
Frequently Asked Questions
Can I use tap water for my starter?
Chlorinated tap water can inhibit microbial growth. If your water is heavily treated, use filtered or bottled water. Alternatively, leave tap water uncovered for 12–24 hours to allow chlorine to evaporate.
Why does my starter smell like vinegar or nail polish remover?
This is usually acetic acid or ethanol buildup from underfeeding. Resume regular feedings—twice daily for a few days—and the smell should normalize. Persistent acetone odor may indicate prolonged neglect.
How do I know when my starter is ready to bake with?
A mature starter should double in size within 4–6 hours of feeding, have a bubbly, frothy texture, and pass the float test. It should smell pleasantly sour, not rotten or overly alcoholic.
Cultivating Consistency and Confidence
Mastering a sourdough starter is less about precision and more about observation and rhythm. Every kitchen, flour batch, and season introduces variation. The goal isn’t perfection but resilience—a culture that reliably responds to care and produces satisfying results.
Beyond baking, maintaining a starter connects us to centuries of tradition and the quiet science of fermentation. It teaches patience, attentiveness, and respect for living systems. With each feeding, you’re not just nurturing microbes—you’re building intuition, skill, and a deeper relationship with food.


 浙公网安备
33010002000092号
浙公网安备
33010002000092号 浙B2-20120091-4
Comments
No comments yet. Why don't you start the discussion?