
Stone carving is one of humanity’s oldest artistic traditions, bridging function and expression across civilizations. From ancient temples to modern sculptures, the craft demands patience, precision, and a deep understanding of material behavior. While the process may seem intimidating at first, mastering stone carving is accessible to anyone willing to learn foundational techniques, respect the medium, and practice consistently. Whether you're shaping limestone for a garden feature or refining marble into an expressive figure, success lies in technique, tool control, and thoughtful design planning.
Selecting the Right Stone for Your Project
Not all stones are created equal when it comes to carving. The hardness, grain structure, and brittleness of a material dictate how it responds to chisels and rasps. Beginners often benefit from softer stones that allow for forgiving corrections, while advanced carvers may seek out dense marbles or granites for their durability and polishability.
| Stone Type | Hardness (Mohs) | Workability | Best For |
|---|---|---|---|
| Limestone | 3–4 | Easy | Beginners, relief carvings |
| Sandstone | 6–7 | Moderate | Architectural details, outdoor pieces |
| Marble | 3–5 | Moderate to Difficult | Fine sculpture, indoor art |
| Soapstone | 1–2 | Very Easy | Prototypes, small figurines |
| Granite | 6–7 | Difficult | Monuments, long-lasting installations |
Soapstone is ideal for learning basic forms due to its softness and smooth texture. Limestone offers a balance between ease of use and structural integrity, making it a favorite among apprentices. Marble, though more challenging, rewards skilled hands with luminous finishes and fine detail retention.
Essential Tools and Their Functions
Effective stone carving relies on using the right tool for each phase of work. Unlike wood or clay, stone cannot be “added back” once removed. Each strike must be deliberate. A well-equipped toolkit evolves with experience but starts with a few core instruments.
- Point Chisel: Used for roughing out shapes and removing large amounts of material quickly.
- Claw Chisel: Features multiple teeth; ideal for refining surfaces and creating textured patterns.
- Flat Chisel: Delivers clean, straight cuts and defines edges and planes.
- Round Burin: Carves concave forms and intricate curves, especially in detailed areas like eyes or folds.
- Rasps and Files: Smooth surfaces and refine contours after chiseling.
- Mallet: Typically made of wood or rawhide; delivers controlled force without damaging chisel handles.
High-carbon steel tools maintain sharpness longer and resist deformation under impact. Keep them regularly sharpened—a dull chisel slips unpredictably and damages both stone and carver.
Step-by-Step Guide to Carving Your First Relief Sculpture
A relief sculpture—carved into a flat slab—is an excellent starting project. It teaches depth control, proportion, and tool handling without the complexity of full-round carving.
- Design Transfer: Sketch your image on paper, then trace it onto the stone surface using carbon paper or a soft pencil.
- Outline the Form: Use a small point chisel to lightly score along the main lines, establishing boundaries.
- Rough Out Background: With a larger point or flat chisel, begin removing stone around the raised design area. Work outward from the center to avoid undercutting too early.
- Define Depth Layers: Identify foreground, midground, and background elements. Use progressively smaller chisels to carve varying depths—deeper for shadows, shallower for highlights.
- Refine with Claw Chisel: Texture the surface uniformly to eliminate hammer marks and prepare for finishing.
- Smooth with Rasps: Gradually progress from coarse to fine rasps, rounding edges and softening transitions.
- Final Polish (Optional): For marble or soapstone, use sandpaper (up to 1200 grit) or polishing compounds for a luminous finish.
This methodical approach builds confidence and reinforces the principle that stone carving is subtractive—every removal is permanent, so planning is paramount.
Safety Practices Every Carver Must Follow
Stone carving involves flying chips, repetitive motion, and heavy tools. Protecting yourself isn’t optional—it’s part of professional discipline.
- Always wear ANSI-approved safety goggles to shield eyes from debris.
- Use a dust mask or respirator, especially when working indoors or with silica-rich stones like sandstone or granite.
- Secure your stone on a non-slip surface or bench vise to prevent shifting during strikes.
- Keep hands behind the cutting edge at all times—never hold near the impact zone.
- Work in a well-lit, ventilated space with clear floor space to avoid tripping hazards.
“Respect the stone, and it will reveal its beauty. Rush it, and it will break—not just the piece, but possibly your hand.” — Rafael Torres, Master Stone Carver, Vermont School of Traditional Arts
Tips for Achieving Precision and Creative Expression
Technical skill alone doesn’t make great carvings. The best works blend accuracy with imagination. These strategies help bridge craftsmanship and creativity.
- Work from General to Specific: Block in broad shapes before detailing features like fingers or facial expressions.
- Rotate the Stone Frequently: View your work from multiple angles to catch distortions early.
- Use Calipers and Templates: Measure proportions accurately, especially when replicating natural forms.
- Embrace the Stone’s Nature: Let natural fissures or color variations inspire design choices rather than fighting them.
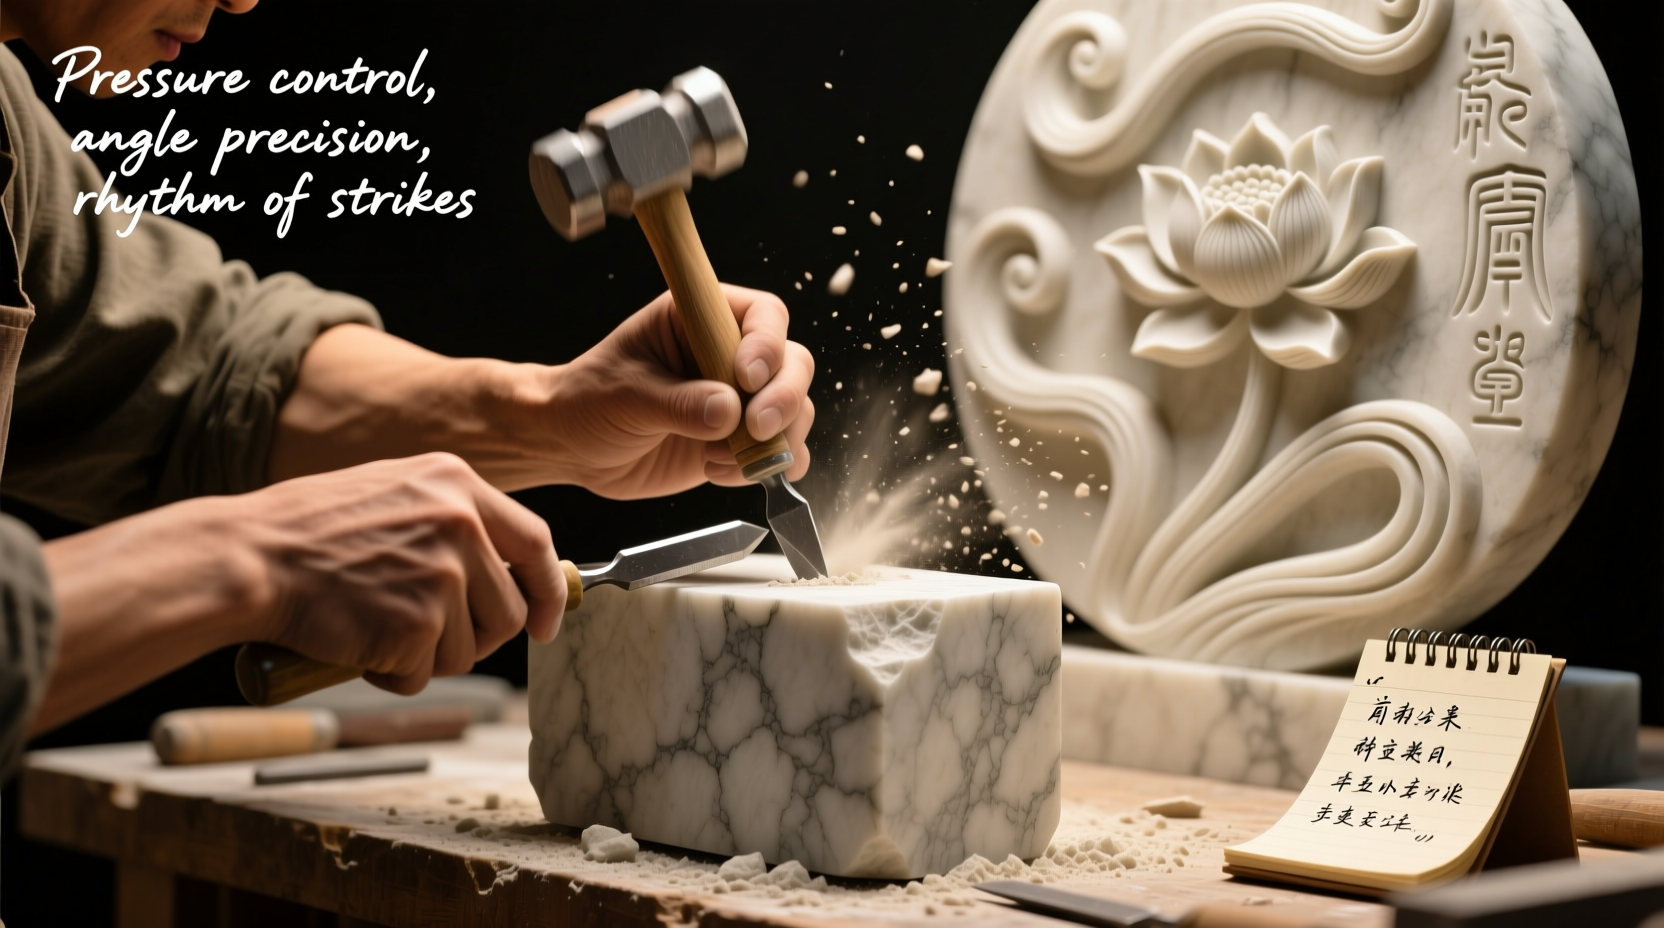
- Carve with Intention, Not Force: Controlled, rhythmic taps produce better results than aggressive pounding.
Real Example: From Concept to Completed Bust
Maya Chen, a sculptor based in Portland, began her first marble bust with a 12-inch block of Carrara marble. She started by modeling the face in clay to understand volume, then transferred key landmarks using grid measurements. Over six weeks, she used progressively finer chisels to shape the nose, eyes, and hairline. When a small flake broke near the jawline, she incorporated it into the design as a shadowed contour, enhancing realism. The final piece was sanded through five grit levels and lightly polished on the forehead and cheeks to simulate skin sheen. Her disciplined layering and adaptability turned a potential flaw into a defining feature.
Checklist: Preparing for a Carving Session
- ✔️ Secure the stone firmly on a stable surface
- ✔️ Put on safety goggles and dust mask
- ✔️ Select appropriate chisels for the current stage
- ✔️ Sharpen tools if edges feel dull
- ✔️ Have design references visible (sketches, photos)
- ✔️ Clear workspace of clutter and tripping hazards
- ✔️ Set up ventilation or dust extraction system
Frequently Asked Questions
Can I carve stone with basic hand tools?
Yes. While pneumatic hammers speed up the process, traditional hand tools—chisels, mallets, rasps—are entirely sufficient for detailed work. Many masterpieces were created without power tools.
How do I prevent my chisels from slipping?
Ensure the chisel edge is sharp and seated firmly on the stone before striking. A dull or improperly angled chisel is more likely to skid. Also, maintain a firm grip and consistent striking motion.
What’s the best way to fix a mistake in stone carving?
Minor errors can often be incorporated into the design—shadows, texture, or flowing lines can hide small flaws. Major breaks may require repositioning the focus of the piece or starting anew, which is why practicing on softer stone first is wise.
Conclusion: Begin with Stone, End with Art
Mastering stone carving is not about perfection on the first try. It’s about developing a dialogue with the material—listening to how it resists, yields, and ultimately reveals form. With the right tools, safety habits, and progressive techniques, even beginners can create meaningful, lasting work. Each chip removed is a step toward refinement, each session building muscle memory and artistic intuition. The stone does not forgive haste, but it rewards patience with timeless beauty.


 浙公网安备
33010002000092号
浙公网安备
33010002000092号 浙B2-20120091-4
Comments
No comments yet. Why don't you start the discussion?