
A well-packed tactical backpack is only as effective as its fit. No matter how high-quality the materials or advanced the design, poor adjustment leads to discomfort, fatigue, and even long-term strain. Whether you're trekking through rugged terrain, commuting in urban environments, or preparing for emergency scenarios, proper backpack ergonomics are non-negotiable. This guide walks you through the science and practical steps of fine-tuning your tactical pack for optimal weight distribution, stability, and all-day comfort.
Understanding Tactical Backpack Anatomy
Tactical backpacks differ from standard daypacks in their durability, modularity, and load-carrying capacity. Most feature multiple adjustment points designed to distribute weight efficiently across the body. Key components include:
- Shoulder straps: Contoured padding and load-lifter adjustments that transfer weight from shoulders to the hips.
- Hip belt: The primary weight-bearing component—should sit securely on the iliac crest (top of the hip bones).
- Sternum strap: Stabilizes shoulder straps and reduces shoulder fatigue.
- Load-lifter straps: Connect the top of the pack to the shoulder straps, pulling the load closer to your back.
- Frame sheet or internal stays: Maintains an upright posture by keeping the pack aligned with your spine.
- Compression straps: Secure the load and prevent shifting during movement.
Each element plays a role in biomechanical efficiency. Misalignment in one area can cascade into discomfort elsewhere—especially over extended wear.
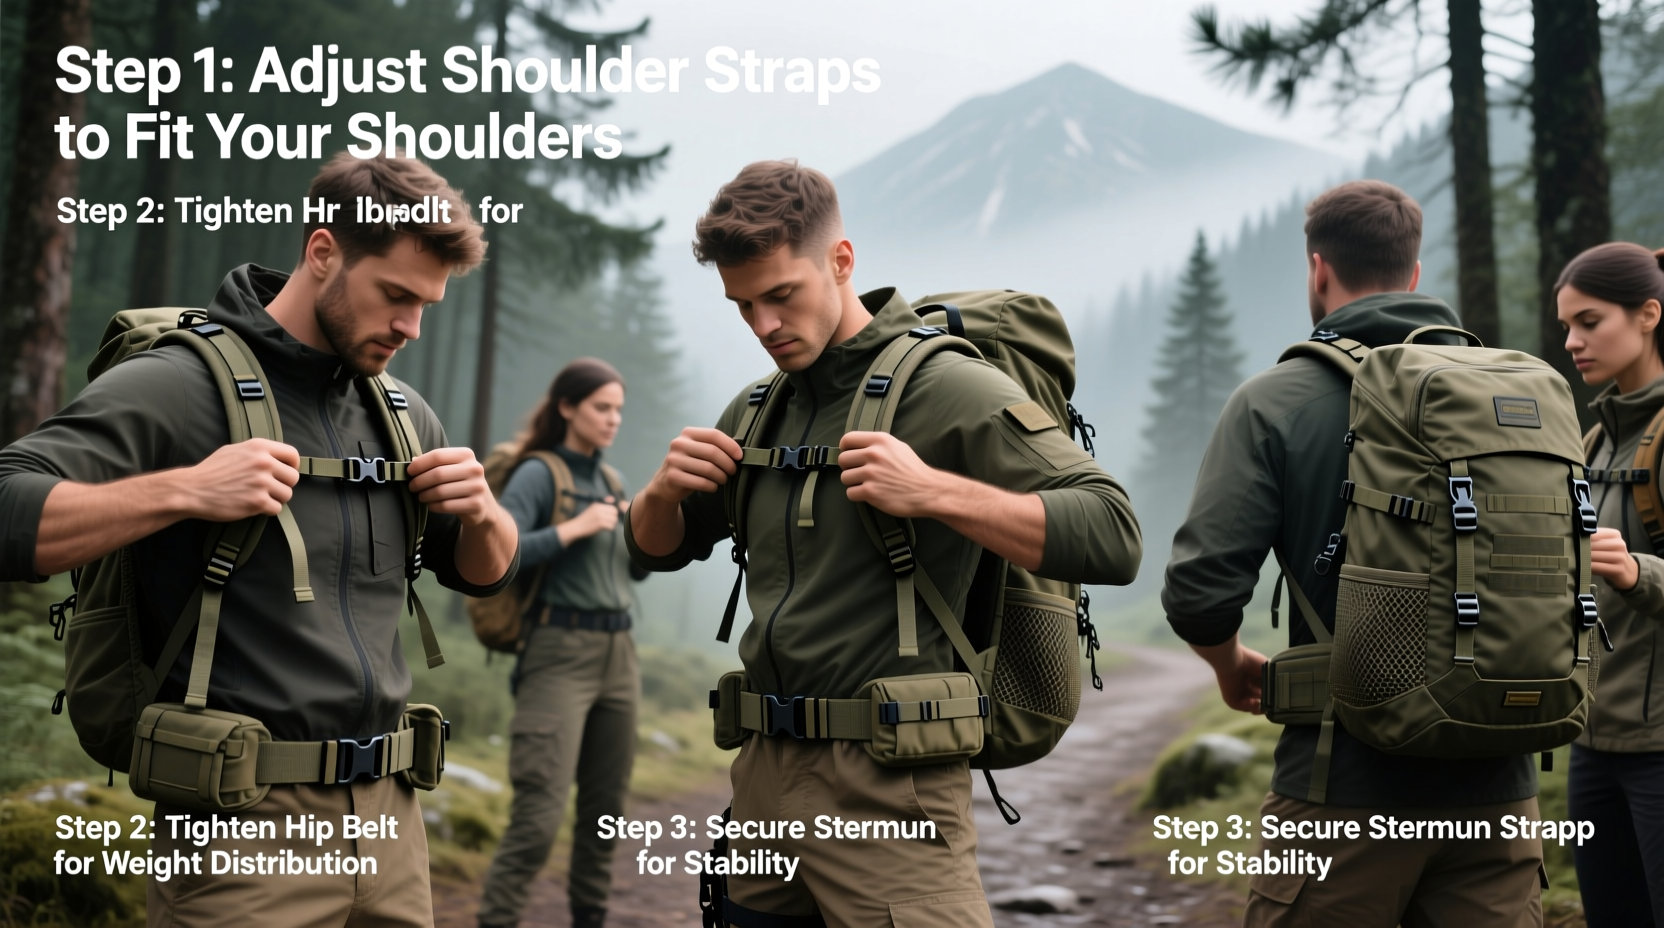
Step-by-Step Guide to Perfect Fit Adjustment
Follow this sequence to achieve balanced support. Perform these steps wearing the same clothing you’ll use during activity, as layer thickness affects fit.
- Set torso length. Measure your torso from the C7 vertebra (base of neck) to the top of your hip bones. Adjust the shoulder harness up or down so the top anchor point aligns with your shoulders. Many packs offer interchangeable harnesses for precise sizing.
- Position the hip belt. Fasten the hip belt so it sits directly on your iliac crest—not above the waist or below the hips. Over 80% of the pack’s weight should rest here. If the belt rides up when walking, tighten the shoulder straps slightly.
- Secure shoulder straps. Adjust length so they follow your shoulder contour without digging in. There should be no gap between the strap and your shoulder, but also no pinching. Padding should cover the full width of the shoulder.
- Engage load-lifter straps. These form a 45–60 degree angle from the top of the pack to your shoulders. Pull them tight enough to bring the upper pack close to your upper back—this prevents backward pull and improves balance.
- Fasten the sternum strap. Position it at mid-chest level. It should pull the shoulder straps inward slightly, reducing lateral movement. Avoid riding too high, which restricts breathing.
- Activate compression straps. Tighten side and front compression straps to eliminate internal load sway. The pack should feel like an extension of your body, not a loose burden.
This process takes under five minutes once mastered, yet dramatically improves endurance and reduces joint stress.
Weight Distribution Best Practices
Even a perfectly adjusted pack fails if packed incorrectly. Weight placement affects center of gravity and spinal alignment.
| Item Type | Recommended Placement | Rationale |
|---|---|---|
| Heavy gear (e.g., water, stove, batteries) | Centered against the back, midway up | Keeps mass close to spine and avoids lower back strain |
| Medium-weight items (clothing, tools) | Bottom and outer compartments | Balances vertical load; keeps heavy items stable |
| Light/frequently used items | Top lid or front pockets | Easy access without unpacking; minimal impact on balance |
| Bulkier items (sleeping bag, jacket) | Bottom third of main compartment | Prevents top-heaviness and maintains upright posture |
Overloading the top or sides forces your body to compensate forward, leading to hunched posture and accelerated fatigue. Keep total weight under 20% of your body weight for day hikes, and 30% max for trained users on multi-day missions.
“Proper load management begins with fit, but depends equally on how you organize what’s inside. A 50-pound pack worn correctly feels lighter than a poorly adjusted 35-pound one.” — Captain Marcus Tran, U.S. Army Ranger (Ret.), Outdoor Training Instructor
Common Adjustment Mistakes and How to Fix Them
Even experienced users fall into fitting traps. Recognizing these errors early prevents chronic discomfort.
- Hip belt too low or loose: Causes shoulder strain. Re-center on hip bones and ensure snug (but not restrictive) tension.
- Load-lifter straps too slack: Pack pulls away from back, destabilizing gait. Tighten until the top of the pack hugs your upper trapezius.
- Sternum strap obstructing breathing: Move it down to natural chest crease. It should aid stability, not restrict expansion.
- Ignoring frame tension: Some packs have adjustable back panels or tension cords. Use them to match curvature to your spine.
- Uneven compression: One side tighter than the other causes lateral lean. Check both sides symmetrically after loading.
Real-World Scenario: Urban Commute vs. Mountain Hike
Consider two users with the same 35-liter tactical backpack:
Alex, a city commuter, carries a laptop, lunch, and jacket. He wears the pack loosely over a coat, hip belt unfastened. After three hours, he experiences shoulder numbness and neck pain.
Jamila, a weekend hiker, uses the same model for a trail excursion. She adjusts the torso length, fastens the hip belt over her hips, and tightens load lifters. Despite carrying 30 lbs, she completes a 10-mile hike with minimal fatigue.
The difference? Fit discipline. Alex assumed urban use didn’t require tuning. Jamila treated every carry as mission-critical. The result: identical gear, vastly different outcomes.
Frequently Asked Questions
How often should I readjust my backpack during use?
Check fit at the start of each journey and after removing layers (e.g., shedding a jacket). Re-tighten hip and load-lifter straps as needed. During long treks, pause every few hours to reassess tension and comfort.
Can I adjust a tactical backpack for someone else?
Yes, but only within reasonable limits. Torso length differences over 2 inches usually require a different harness. Sharing packs among team members works best when models support modular harness systems.
Why does my lower back ache even with a good fit?
Pain may stem from overloading the bottom compartment or weak core muscles. Reposition heavy items higher and closer to the back. Also, strengthen abdominal and gluteal muscles to better support carried loads.
Final Checklist: Achieving Optimal Backpack Setup
- ✅ Measure your torso length
- Ensure compatibility with your pack model.
- ✅ Position hip belt on iliac crest
- Transfers majority of weight to skeletal structure.
- ✅ Align shoulder straps without gaps
- Prevents friction and pressure points.
- ✅ Set load-lifter straps at 45–60° angle
- Brings load into your center of gravity.
- ✅ Secure sternum strap at mid-chest
- Stabilizes upper load without restricting breath.
- ✅ Engage compression straps evenly
- Eliminates internal movement and swaying.
- ✅ Pack smart: heavy near back, light on top
- Maintains balance and reduces fatigue.
Conclusion: Comfort Is a Skill, Not Luck
Mastering tactical backpack adjustments isn’t about following trends—it’s about respecting biomechanics. A properly fitted pack enhances mobility, reduces injury risk, and extends operational endurance. Whether you’re navigating city streets or remote trails, the principles remain the same: align, stabilize, balance.
Don’t accept discomfort as inevitable. Take ten minutes today to recalibrate your pack using this guide. Your shoulders, spine, and stamina will thank you tomorrow.


 浙公网安备
33010002000092号
浙公网安备
33010002000092号 浙B2-20120091-4
Comments
No comments yet. Why don't you start the discussion?